


Working with Planner Data Through the Graph
PowerShell has its Limitations
I like using PowerShell to work with Office 365 data, but sometimes PowerShell isn’t the right tool. It might be too slow, or a PowerShell cmdlet isn’t available to work with some data.
Planner is a good example. People have asked about reporting the plans available to a user or the plans used across the tenant. When investigating, I discovered that there’s no PowerShell module for Planner and the coverage of Planner in the preview PowerShell module for the Graph is not good. In these situations, the solution is often to revert to native Graph API calls. I’ve used this approach many times to do things like reporting storage for SharePoint Online sites or creating a list of Teams to process with PowerShell.
These examples all use an app registered with Azure AD that’s granted some Graph application permissions to access data. Application permission is one of the two types of Graph permissions, the other being delegated permissions. Application permissions are a natural fit for many kinds of PowerShell scripts as they allow apps to run without a signed-in user. Authentication is gained by using an app secret to authenticate with the Graph.
Planner Graph Permissions
The Planner Graph endpoint only supports delegated permissions. As the name implies, apps using these permissions are delegated access by a user or administrator. Planner uses delegated permissions because the basis for access to Planner data is the set of plans someone has access to.
I don’t do enough work with the Graph to have run into the need to use delegated permissions before. There’s plenty of advice available on the web, such as Lee Ford’s article about getting started using the Graph with PowerShell (pay attention to how to create a registered app), this article explaining how to do many different operations through the Graph, and Alexander Holmset’s explanation about how to move Planner data from one tenant to another.
Plans and Groups
One immediate problem is that access to a plan is needed to be able to report its content. Every plan is owned by a Microsoft 365 group (aka Office 365 group). Only members of the group can access the plans owned by the group. Administrators cannot access the plans in a tenant unless they are members of the groups owning the plans. It’s possible to write PowerShell code to:
- Find all Microsoft 365 groups.
- Loop through each group to add an administrator account to the membership
- Run the report
- Remove the administrator account from the membership.
This works for small tenants but might run into horrible scaling issues in large tenants.
Getting a Device Code Access Token
Alexander’s Planner migration script depends on access to every group in both the source and target tenants. It also uses an approach called a device code for authentication. To do this, the app issues a POST command to Azure AD to request a device code to be issued. Azure AD responds to ask whoever’s running the app to open the https://microsoft.com/devicelogin page in a browser and enter the supplied code.
Make sure that the authentication settings for the app you register in Azure AD to access the Graph mark the app as a public client. If the app isn’t marked, the example code described here won’t work. In my case, I used this code:
$CodeBody = @{
    resource  = $resource
    client_id = $clientId
    scope     = $scope }

# Get OAuth Code
$CodeRequest = Invoke-RestMethod -Method POST -Uri "https://login.microsoftonline.com/$tenantId/oauth2/devicecode" -Body $CodeBody

# Print Code to console
Write-Host "`n$($codeRequest.message)"
If the user’s credentials aren’t available, Azure AD prompts for credentials before it proceeds. Eventually, the authentication sequence completes (Figure 1), and an access token is available for the app to fetch and use.
Here’s how we proceed to use the response returned by the device code to get an access token:
$Body = @{
    grant_type = "urn:ietf:params:oauth:grant-type:device_code"
    code       = $CodeRequest.device_code
    client_id  = $clientId
}
# Get OAuth Token
$Token = $Null; $TokenRequest = $Null
while ([string]::IsNullOrEmpty($tokenRequest.access_token)) {
    $tokenRequest = try {
        Invoke-RestMethod -Method POST -Uri "https://login.microsoftonline.com/$tenantId/oauth2/token" -Body $Body }
    catch {
        $errorMessage = $_.ErrorDetails.Message | ConvertFrom-Json
        # If not waiting for auth, throw error
        if ($errorMessage.error -ne "authorization_pending") {
            throw
        }
}}
$Token = $tokenRequest.access_token
$Headers = @{Authorization = "Bearer $Token"}
Another Way to Get an Access Token
Device codes work and they have the benefit that you can decide which account to sign-in as. Another way of getting an access token is to use calls to the Microsoft Identity Model namespace. I’m indebted for this example to MVP Vasil Michev, which returns an access token for the currently signed in account that can be used for delegated permissions. If multiple accounts are signed in, you’ll see a screen to pick one to use.
$AuthContext = New-Object "Microsoft.IdentityModel.Clients.ActiveDirectory.AuthenticationContext" -ArgumentList "https://login.windows.net/redmondassociates.onmicrosoft.com"
$Platform =  New-Object Microsoft.IdentityModel.Clients.ActiveDirectory.PlatformParameters -ArgumentList "Auto"
$AuthenticationResult = $authContext.AcquireTokenAsync("https://graph.microsoft.com", "ded88173-911c-42a5-892b-26d7bea4c788", "https://login.microsoftonline.com/common/oauth2/nativeclient", $Platform)
$Headers = @{'Authorization'=$AuthenticationResult.Result.CreateAuthorizationHeader()}

# Extract user details from the authentication result
$User = $AuthenticationResult.Result.UserInfo.DisplayableId
This code is very different to our other example. The point is that an app needs an access token to authenticate before you can work with the Graph and there are several ways to accomplish the goal.
Getting All Groups
Whatever method you choose, with an access token safely stored in the $Headers variable, we can fetch Graph data. For example, this code finds the set of groups the account identified in the $user variable belongs to:
$Uri = "https://graph.microsoft.com/beta/users/$user/transitiveMemberOf"
$MemberOf = Invoke-WebRequest -Headers $Headers -Uri $Uri | ConvertFrom-Json
Remember that the Graph often restricts the number of results returned. This is true for objects like users and groups, so the code needs to check if more results are available to be fetched (pagination). This is done by checking the odata.Nextlink property in the returned results. If the NextLink is not empty, it contains a link to the next set (page) of results. You can use the link to fetch the next page of data and continue doing so until you have all results.
Office 365 supports different types of groups, so we need to filter the returned set to find Microsoft 365 Groups because these are the only type that have plans. This is easily done by checking the GroupTypes property for each group for “unified,” the value assigned to Microsoft 365 Groups.
Looking for Plans
Not every Microsoft 365 group has a plan and there’s no group property to query to find if it has a plan. Therefore, we must check each group to see if the Graph returns any plan data. For each group, we run a command like this:
$PlanURI = 'https://graph.microsoft.com/V1.0/groups/' + $Group.GroupId + '/planner/plans'
$Plans = Invoke-WebRequest -Method GET -Uri $PlanURI -ContentType "application/json" -Headers $Headers
If the $Plans variable contains anything after the call, we know that some plan data is available for processing. In this case, the $Plans variable will hold a set of plan identifiers, each pointing to a separate plan. Groups used to be limited to a single plan, but this constraint was lifted to allow Teams to create plans in channel tabs.
Fetching Plan Information
With the plan identifier, we can fetch information like the plan properties (its title, date created, and so on) and data like the tasks, buckets, and categories (labels). The Planner Graph API explains details of what information is available. For my report, I need some basic information about each plan and numbers of tasks and buckets to give an idea about the level of activity. I also check the date of the latest task added to a plan to figure out how long it’s been since a plan was used. A series of different Planner API calls does the trick:
ForEach ($Plan in $Plans.Value) {
        $PlanId = $Plan.Id
        $PlanNumber++
        $PlanCreated = Get-Date($Plan.CreatedDateTime) -format g
        $PlanOwner = $Plan.Owner # Microsoft 365 Group
        $PlanTitle = $Plan.Title
        $BucketURI = 'https://graph.microsoft.com/v1.0/planner/plans/' + $PlanId + '/buckets/'
        $Buckets = Invoke-RestMethod -Method GET -Uri $BucketURI -ContentType "application/json" -Headers $Headers
        $NumberBuckets = $Buckets.Value.Count
        $TasksURI = 'https://graph.microsoft.com/v1.0/planner/plans/' + $PlanId + '/tasks/'
        $Tasks = Invoke-RestMethod -Method GET -Uri $TasksURI -ContentType "application/json" -Headers $Headers
        $NumberTasks = $Tasks.'@odata.count'
        [DateTime]$LastTask = "1-Jan-1999"
        ForEach ($Task in $Tasks.Value) {
         If (-not [string]::IsNullOrEmpty($Task.CreatedDateTime)) {
            [DateTime]$TaskCreated = Get-Date($Task.CreatedDateTime) -format g }
        If ($TaskCreated -gt $LastTask) {
            $LastTask = $TaskCreated; $LastTaskTitle = $Task.Title}
        }  # End For
        If ($LastTask -eq "1-Jan-1999") { # Check how long it's been since a task was created in the plan
            $LastTaskDate = "No tasks"; $DaysSinceTask = "N/A"}
        Else {
           $LastTaskDate = Get-Date($LastTask) -format g
Obviously. you can go deeper to uncover more information about tasks. For example, if you want to retrieve who’s been assigned tasks, you can look at the Assignments property of a task.
$Assignees = ($Task.Value.Assignments | Get-Member -MemberType 'NoteProperty').Name
Plans store task assignments using the object identifier for accounts, so you’ll find one or more identifiers that need to be resolved against Azure Active Directory if you want to return the display name or other information about the account.
Reporting and Analyzing
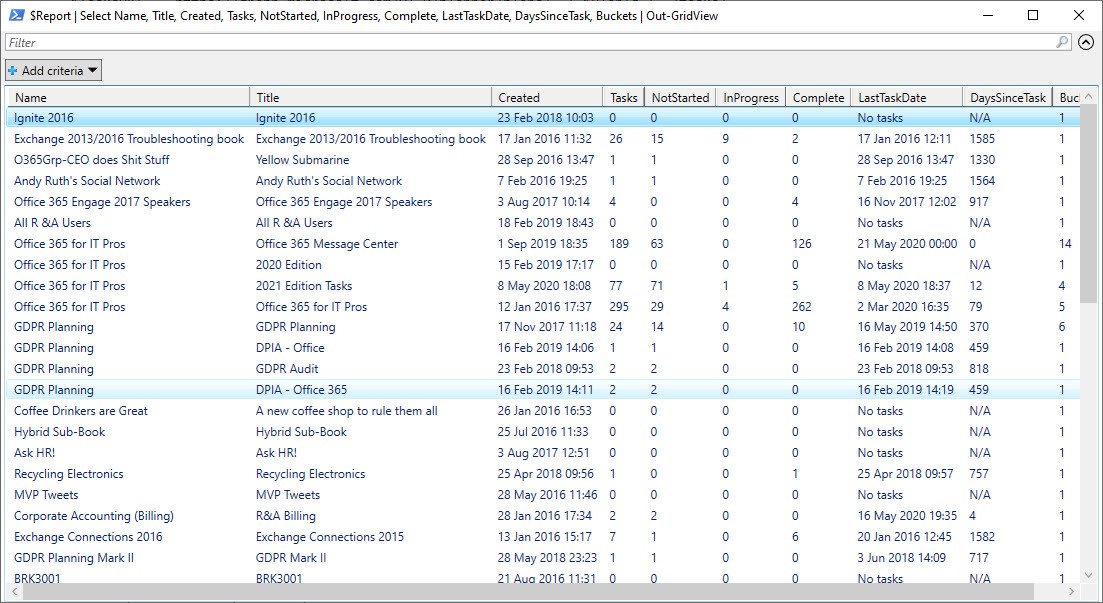
With all the data fetched and processed, it’s now a matter of creating some output. As I normally do, I store processed information in a PowerShell list object and operate from that. The existence of the list makes it easy to do some initial analysis, output to a CSV file, or browse the data by piping it to Out-GridView (Figure 2).
These examples satisfied my desire to know how to fetch Planner data from PowerShell. The code isn’t the prettiest, needs some error handling, and can probably be done better. But it proves the point, and that’s the joy of PowerShell. Hack away until you get there…
You can pick up the complete sample scripts from GitHub using these links to the Device code version and the Microsoft Identity Model version.
Related articles