VMware has enabled workload virtualization and virtual machine hosting on their VMware vSphere hypervisor platform. Traditionally, VMware vSphere is managed by the VMware vCenter environment to provide added functionality such as High Availability (HA), Distributed Resource Scheduler (DRS), vSphere host based clusters and much more. One often overlooked feature of VMware vSphere is vApp.
A vApp is a grouping of virtual machines and is managed very similarly as a virtual machine. It can contain resource pools and can be powered on, off, and cloned. In this first article in a two-part series, I’ll provide an introduction to VMware vApp, describe some use cases, and help you create your first vApps. In the second part of this article series, I’ll focus on vApp management, including exporting and importing of vApps into your VMware environment.
Requirements for using VMware vApps
In this post I’m going to walk you through how to create a vApp in VMware ESXi. In order to use vApps in this scenario, there are a some requirements. You’ll need:
- VMware vCenter
- DRS enabled
Typically, it’s recommended to have a VMware vCenter environment to fully leverage all of the management, availability, and performance features that come with the full platform. In this article, we will be using a simple VMware vCenter implementation.
vApps can be deployed on ESXi in VMware vCenter or deployed other VMware platforms, such as VMware Workstation and VMware Fusion. vApps are delivered as a single file in the Open Virtualization Format (OVF).
Use Cases for vApps
There are many different use cases that we can apply to a vApp implementation. vApps have the flexibility of being able to be deployed inside a folder, resource pool, cluster, or another vApp. Using a vApp is also possible on a standalone host managed by vCenter, although it is less typical to see that type of deployment in a production environment. Using the full features of DRS and clustering is part of the draw to using VMware vSphere and vCenter for redundancy, performance, and availability.
vApps may contain one virtual machine, multiple virtual machines, as well as one or more other vApps. A common use case for a vApp is when there is a multi-tiered application, which is comprised of multiple virtual machines. This could include a database server and a web server for example. The application itself requires both components and it also requires that they are brought up and down in a specific order.
vApps can be useful in order to deliver pre-configured environments to users. They can be used to provide a developer with a consistent, repeatable test environment, or to provide a steady training environment.
Creating a vApp
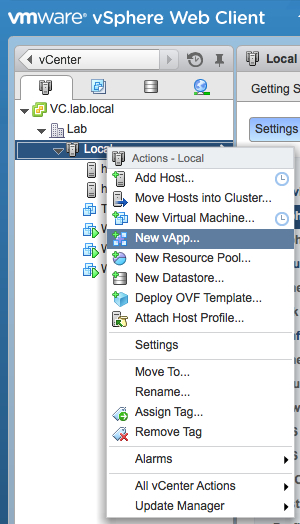
1. Using our sample lab, we will connect to our vCenter through the web client to create a brand new vApp, which we will call vApp1. This is done by right clicking on our cluster in the Hosts & Clusters inventory view:
The ‘New vApp…’ option in the Hosts & Clusters inventory view. (Image: Melissa Palmer)
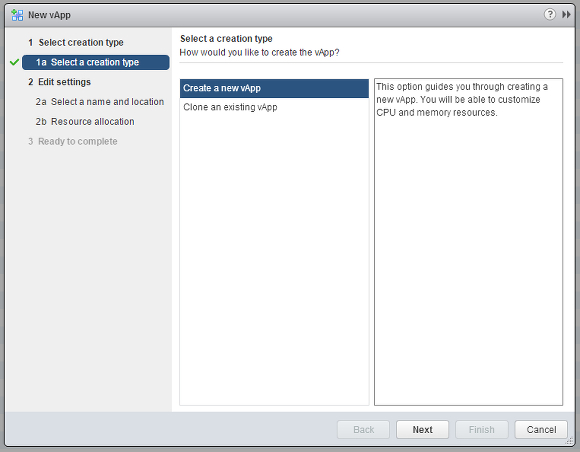
2. Next, we are going to select Create a new vApp. If we selected Clone an existing vApp, we would be creating a copy of a pre-existing vApp, and have the ability to customize the settings
Creating a new VMware vApp. (Image: Melissa Palmer)
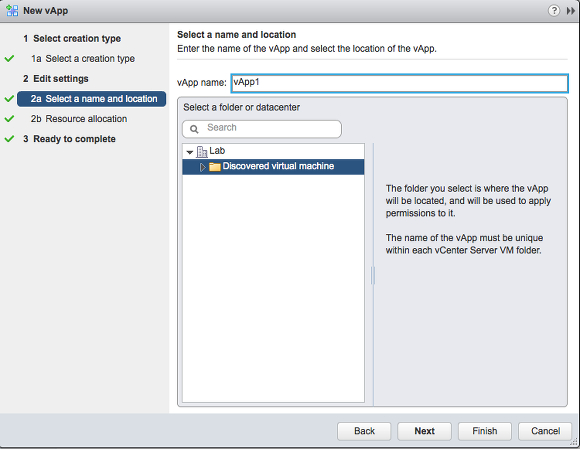
3. Now, it is time to name the vApp, and select what folder it should be placed in inside the vSphere inventory.
Selecting VMware vApp name and location options. (Image: Melissa Palmer)
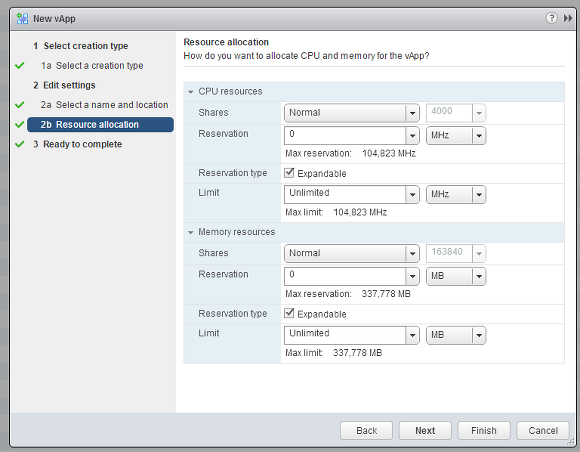
Note: In this screen, we can set shares, reservations, or limits for our vApp. In the use case of a development environment, we may want to limit the amount of CPU and Memory can utilize most of the time, to ensure it will not impact production workloads. On the other hand, there may come a time where the vApp needs to be giving specific reservations to simulate the production environment. In either case, this can easily be changed by selecting Clone from the new vApp screen, and modifying these settings as needed.
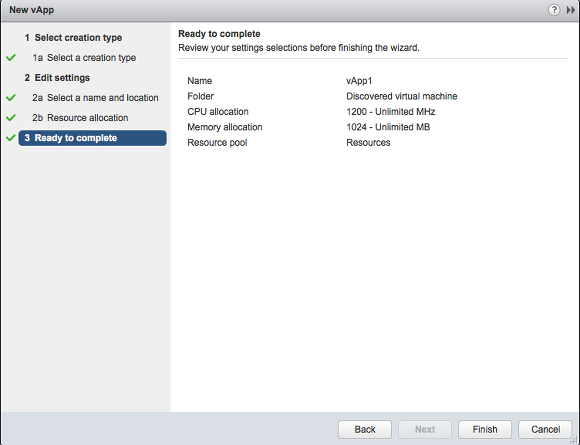
4. The settings in the vApp can also be modified at any time by right clicking on the vApp and selecting Edit Settings. For configuration Shares, we can select from Low, Normal, High, or Custom, as in Virtual Machine settings in vSphere. Limits can also be selected based on the resources available in the vSphere environment. We’ve reserved 1200 MHz of CPU and 1024 MB of RAM.
Editing resource allocation settings for VMware vApp. (Image: Melissa Palmer)
5. Now, we are ready to finish creating our vApp.
Completing creation of a VMware vApp. (Image: Melissa Palmer)
As we can see from this, the vApp wizard provides some customization on performance parameters and is a very simple set of steps to get our vApp configured.
Adding Virtual Machines to the vApp
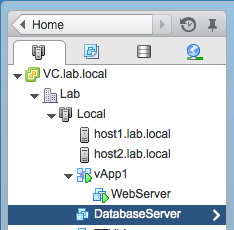
Now that we have our vApp, it is time to add virtual machines. Adding a virtual machine to a vApp is as simple as dragging it and dropping it onto the vApp. First, the WebServer dragged into the vApp, and then the DatabaseServer will be dragged in as well.
Adding virtual machines to the vApp. (Image: Melissa Palmer)
Now that we have our new vApp created with virtual resources placed inside of it, we can now view the additional features and options available.
Managing vApp Boot and Shutdown Order
Because vApps can have multiple objects inside of them as part of the application design, we have extended properties that aren’t available to traditional virtual machine guests. In our sample vApp, we have a web server and a database server. Let’s assume that we have a dependency order for these servers that requires that the database server should always be powered on first, and must be shut down last to ensure data integrity.
This is easily done by choosing the Edit Settings option for our new vApp and expanding the Start Order section in our web client.
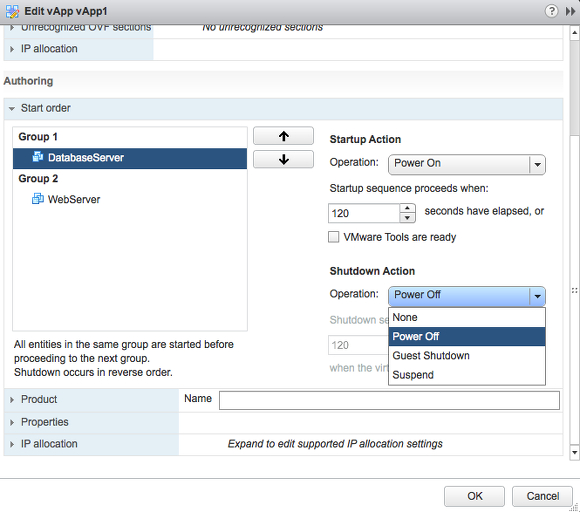
By placing the database server in Group 1 and the web server in Group 2, the boot order is set. By default, the Startup Action will use the Power On option and then wait 120 seconds before letting the Group 2 machines begin their startup process. You can also set a requirement to wait for VMware Tools to be ready which ensures that the operating system is fully online before moving on to the next machine group.
Shutdown Actions are managed using the reverse order of the Startup Action. Be careful because the default setting is to use the Power Off option. You may want to adjust that to use the Guest Shutdown option from the droplist:
Editing VMware vApp shut-down options. (Image: Melissa Palmer)
We now have our multi-tier application packaged up nicely in a vApp. When traditional VMware virtualization administrators move towards vCloud in their on-premises deployments, or the new and quickly growing vCloud Air public cloud service, vApps will become standard for workload deployments. This is why it is important for us to understand the features, limitations, and changes in how we manage a vApp compared to a traditional standalone virtual machine.
In my next article we’ll continue with vApp management, including exporting and importing of vApps into your VMware environment.


