


Use PowerShell to Remotely Manage Exchange 2010 from a Windows 8 PC
Logging onto a server remotely, simply to complete an administrative task is unnecessary, inefficient, and pardon the cliché, so passé. By leveraging PowerShell, virtually any task can be completed right from an administrator’s workstation running Windows 7 or 8. Throw a VPN or DirectAccess connection into the mix and these tasks can be completed from virtually anywhere. Keep in mind, remoting isn’t limited to just Windows Server tasks either. In fact, to prove my point, I’m going to explain exactly how to use a Windows 8.1 PC to manage Exchange Server 2010 remotely.
Before I go any further, let me set the stage. There won’t be any downloads, third-party tools, or caveats thrown around today. This article will focus on taking a standard Windows 8.1 Professional laptop and using its built-in PowerShell Host to perform a few common Exchange Server 2010 management tasks.
Using PowerShell to Remotely Manage Exchange
Most Exchange administrators have become comfortable using the Exchange Management Shell to complete their day-to-day tasks. In fact, I would say many prefer the speed and efficiency of the Exchange Management Shell over the slow, but intuitive GUI Exchange Management Console. This is one of the beautiful aspects of using PowerShell to remotely manage Exchange.
Unfortunately, many admins are still either using Remote Desktop to log on directly to their Exchange servers or using only workstations where the Exchange Management Tools have been installed. Admittedly, having the Management Tools installed locally does provide a number of advantages for an Exchange admin. I’m not denying that by any stretch of the imagination. Rather, I’m asserting that just because the tools aren’t installed on a workstation doesn’t mean that it’s useless for Exchange management.
Enough background, let’s get our hands dirty!
1. Begin by opening an elevated PowerShell or PowerShell ISE session. There are a number of ways to do this within Windows 8.1, but I prefer right-clicking the Start Button on my Windows 8.1 Pro Desktop and then clicking Windows PowerShell (Admin). Simple and straightforward, just the way I like it!

2. Odds are, the PC being used isn’t logged on with credentials that have Exchange management rights. Therefore the PowerShell prompt just opened isn’t running with those rights either. To ensure proper credentials are used, use the Get-Credential cmdlet and store the result in a variable for later use.
Type:
$cred = Get-Credential
…and press Enter.

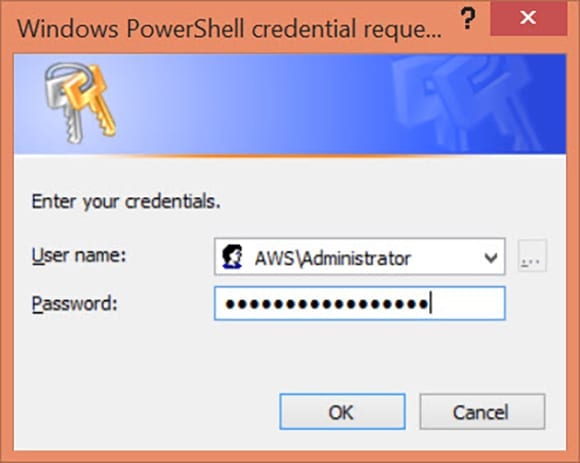
3. Enter credentials that have been configured for administering Exchange. These consist of the domain, username, and password. When everything’s entered, click OK to store them in the $cred variable and return to the PowerShell prompt.
4. Next, create a new session for Exchange management by using the New-PSSession cmdlet with the appropriate parameters and then storing the resulting object in a variable. Use the following syntax:
$Session = New-PSSession -ConfigurationName Microsoft.Exchange -ConnectionUri http://<FQDN of the Exchange Server>/PowerShell/ -Authentication Kerberos -Credential $cred
5. For this example, the FQDN of the Exchange 2010 server is ExchCAS.awssol.com.
Type:
$Session = New-PSSession -ConfigurationName Microsoft.Exchange -ConnectionUri http://ExchCAS.awssol.com/PowerShell/ -Authentication Kerberos -Credential $cred
…and press Enter.

6. Now it’s time to make the magic happen. Import the Exchange management session just created into the current PowerShell session. This is the job of the Import-Session cmdlet.
Type:
Import-PSSession $Session
…and press Enter.
Completion will take a few moments depending on the speed of the connection between the workstation and the server. PowerShell is kind enough to display a progress indicator.

Look closely. Notice that PowerShell imported hundreds of Exchange Management cmdlets. These are the same cmdlets found in the Exchange Management Shell on the Exchange server!
7. When the import completes, don’t be concerned if PowerShell displays an error about unsupported verbs.

8. This message is just a warning. Don’t worry, the entire module was still imported. However, if seeing an error message gives you night sweats and causes you to lose sleep, just add the –DisableNameChecking parameter to the Import-PSSession cmdlet used earlier. Whala! No more unapproved verbs error.

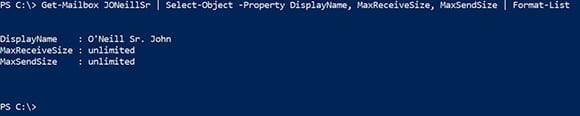
9. What a better way to confirm that everything worked properly than by flexing our Exchange remoting muscles by using some Exchange-specific cmdlets. For instance, take a look at a specific mailbox to determine what send and receive limits are set. Use the Get-Mailbox cmdlet to retrieve a specific user’s mailbox piped to Select-Object to select just the DisplayName, MaxReceiveSize, and MaxSendSize properties. Finally, pass the results to Format-List, just to make the results easier to read. For this example, I’ll retrieve the information about my own mailbox by typing:
Get-Mailbox JONeillSr | Select-Object –Property DisplayName, MaxReceiveSize, MaxSendSize | Format-List
Before I finish, I have a great quick tip just for Petri readers. A question I’m often asked is how to determine what Exchange cmdlets are available.
10. Within the Exchange Management Shell this is accomplished by using the Get-ExCommand cmdlet. Unfortunately, Get-ExCommand doesn’t work within an implicit remoting session such as created above. The trick is to store the results of the Import-PSSession cmdlet in a variable. Then use that variable with the Get-Command cmdlet’s –Module parameter.
For example, type:
$tmpExModule = Import-PSSession $Session –DisableNameChecking
…and press Enter. Once that completes, type:
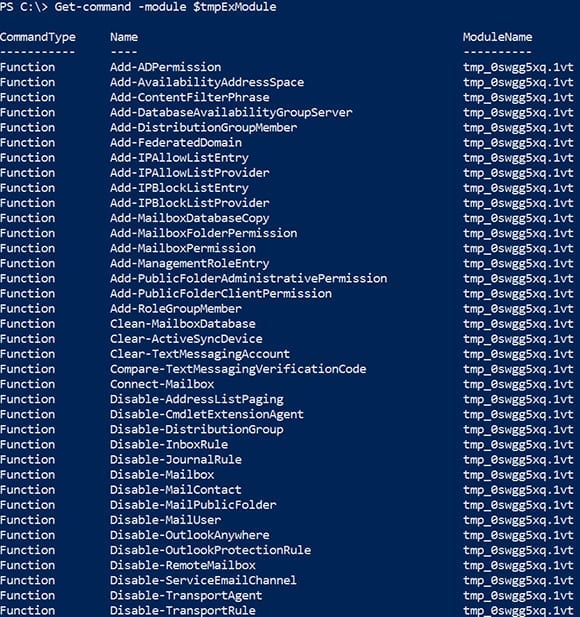
Get-Command –Module $tmpExModule
…and press Enter one more time. Without any further ado, Powershell will scroll the list of imported Exchange cmdlets across the screen for your viewing pleasure!
Accomplishing Exchange admin tasks remotely, without the overhead of an RDP session, can be a great productivity booster. Leveraging PowerShell’s implicit remoting capabilities enables virtually any workstation to become an admin workhorse. My next article will show you how to use the commands in this article to create an Exchange management module for the local PowerShell host. This module can then be imported with a single command, or even automatically, if newer versions of PowerShell are in use. Until then, enjoy the many great articles from the awesome authors here at Petri!