Transport Rules: Adding a disclaimer
Many businesses incorporate a disclaimer or footer at the bottom of their outbound messages. These disclaimers often advise as to the limitation or ramifications of using information within the message for purposes other than they were intended, or to assert ownership of creative works contained in them. While there is always a debate as to how effective these disclaimers are, many businesses use them nonetheless.
Another useful purpose is for the addition of sales and marketing information to the bottom of email messages. Imagine being able to include info about your product’s latest release or other important news. With Exchange 2007 transport rules, you can accomplish this quite easily.
Here, we’ll go through creating a simple disclaimer for outbound mail, then discuss some variations to make it more effective and less intrusive.
Building our Transport Rule
Let’s open the Exchange Management Console, and expand Organization Configuration. Under that, click on Hub Transport. In the Actions pane on the far right, click New Transport Rule to launch the Transport Rule wizard.
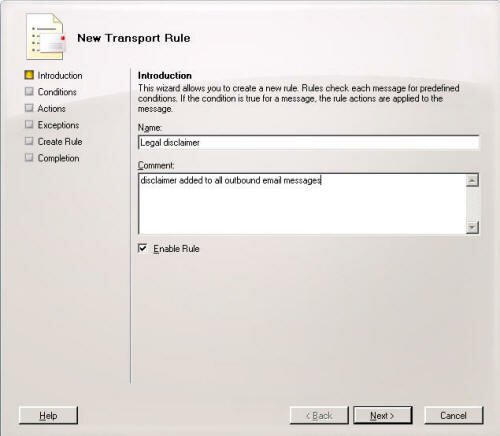
Give the transport rule a name such as Legal disclaimer, and a comment. Ensure the Enable Rule box is checked, as in Figure 1 below, and click Next.
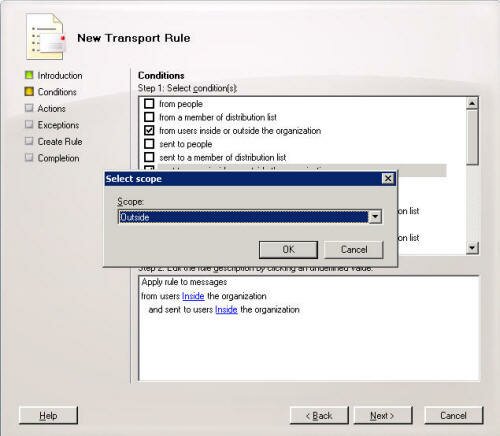
The next screen is the Conditions screen. Select both from users inside or outside the organization and sent to users inside or outside the organization.
In the bottom section, select the second link and change it to Outside, as shown in Figure 2 below.
Then click Ok. This sets the rule to only fire on messages being sent from internal users to people outside your organization. Click Next.
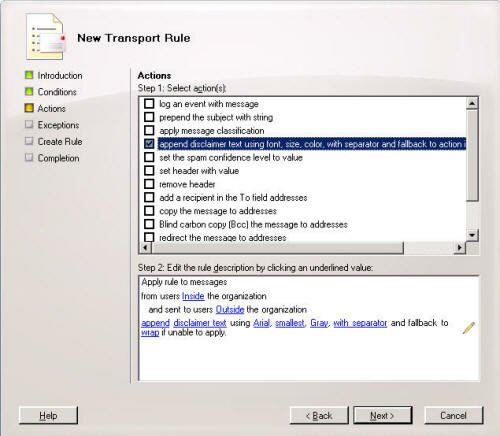
Select append disclaimer text using font, size, color, with separate and fallback to action if unable to apply.
As seen in Figure 3 below, the first link that gets added is the location link for the disclaimer. It defaults to append, and gives us the option of whether to append the disclaimer at the bottom of a message, or prepending it before the message. For this example, we’ll leave it at the default append setting.
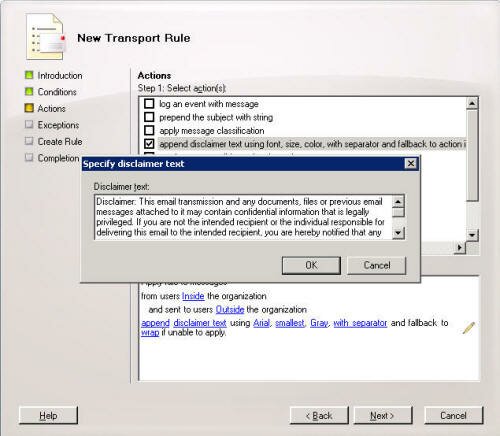
Select the disclaimer text link in the bottom section and insert your desired disclaimer text as shown in Figure 4 below. You can only insert plain text at this point.
Once the text is inserted, click Ok. The next link after that is Arial. You can select that and change the font you’d like the disclaimer to appear in. This only affects the disclaimer text, and not any other text in the body. It also has no effect when the user sends an email in plain text. After that is a link to adjust the font size, with the default being smallest.
Next, click the Gray link and select the color that you’d like the disclaimer to appear in. Be careful of your selection. If any users use a stationary or other option that changes the look of their emails, you’ll want to make sure the disclaimer is visible. Also, you have to be aware of those with visual disabilities that might need high contrast to see the disclaimer.
Following the color link is the with separator link, which will insert a horizontal line between the text of the body of the message and the disclaimer text. This helps show a natural stopping point to the body text. The separator can be enabled (default) or disabled.
Fallback option is next. This controls what happens if the disclaimer cannot be added to a message for any reason, such as with some encryption applications. The options are wrap, ignore, and reject, with the default being wrap. With wrap, a new message is created with the disclaimer, and the original is attached. Ignore will send the message if it can’t be modified, and reject will reject the message with an NDR to the sender if the disclaimer can’t be attached.
Then click Ok. When this is done, you’ll see the disclaimer text added to the bottom section of the rules wizard. Click Next.
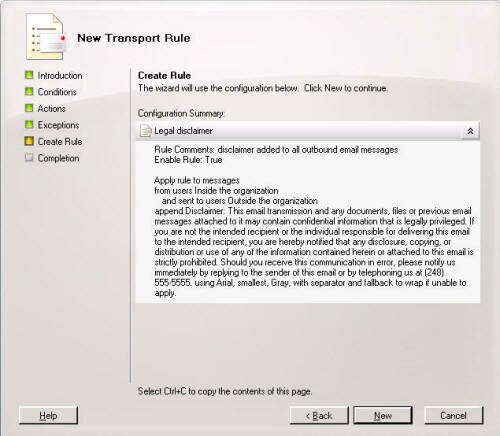
On the exclusions screen, add any exclusion, if needed, and click Next. Verify the disclaimer info, as seen in Figure 5 below, and click New. At this point, the disclaimer is created an enabled. Click Finish to close the Transport Rule wizard.
Limitations
The text that can be used in a disclaimer from transport rules is somewhat limited in style. No RTF formatting other than font family, font size, font color. While a URL may get converted to a link, no fancy formatted hyper linking, fancy HTML code, and no Active Directory fields such as user names, titles, etc., can be used. In a nutshell, transport rules can’t really be used to create a global, consistent email signature for outbound email. It’s best to stick just to disclaimers and advertising.
Testing the new rule
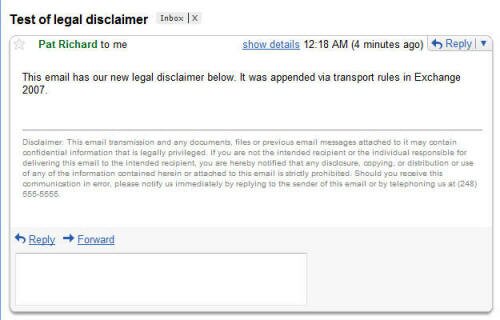
This rule is fairly easy to test. Send an email from an internal email account to an external account such as Hotmail or Gmail. It should have the disclaimer, as seen in Figure 6 below. Also send an email to an internal account – yourself even, to verify that the disclaimer is not included.
Only including the disclaimer once per thread
If you receive email from a mailing list or listserv, you’ve no doubt seen a lengthy conversation thread that has a disclaimer or footer appearing many times. That’s because each time the mailing list server sends out a message, it stamps the footer/disclaimer on the bottom. While that works, it’s not very intelligent, as the repeated disclaimers can often take up more space in the message than the body of the message itself. Here’s how we can solve this problem with transport rules.
Do you remember that Exceptions section we blew right by when creating the transport rule? Well, here’s where this comes in handy. Let’s edit our existing rule.
Start by highlighting the rule in Exchange Management Console and clicking Edit Rule in the Actions pane. Click Next three times to get to the Exceptions screen.
Scroll down and select except when the text specific words appears in the subject or the body of the message.
In the bottom section, click on specific words link at the bottom and enter unique text that appears only in the disclaimer, like the entire first sentence. In my example, we can use Disclaimer: Click Add, then Ok.
Click Next, then Update, then Finish. The change will be immediate, except if there are remote Hub Transport servers, in which case there is some replication lag. Now, when a message thread goes back and forth across a hub transport server, it will only get the disclaimer stamped on it the first time. Much cleaner!
Stacking disclaimers
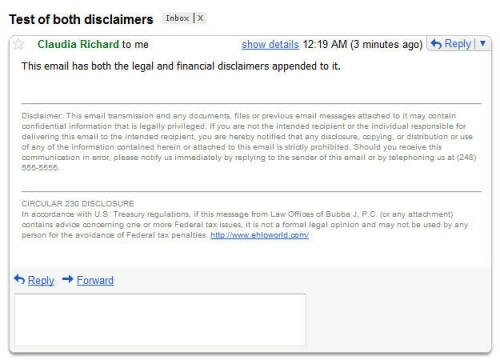
Some organizations may have a default disclaimer that is attached to all outbound messages, but also have other disclaimers used by specific users or groups of users. An example of this might be the financial or tax related positions. Many law professionals will attach what’s called a Circular 230 Disclosure to state that any tax related info contained in a message isn’t a legal opinion, or can’t be used to avoid paying taxes.
Exchange 2007 allows us to have multiple transport rules that attach disclaimers, so a message can have both a generic disclaimer and a narrower focused disclaimer such as the Circular 230 Disclosure. In this instance, we merely set the actions to only include messages sent from the finance or tax department, and set the disclaimer text accordingly. The disclaimers will get applied according to their priority list in Exchange Management Console. This can be seen in Figure 7 below. The legal disclaimer has a priority of 0, and the Financial disclaimer has a priority of 1.
Conclusion
As you can see, creating a disclaimer in Exchange 2007 is both flexible and easy. The options that are provided allow us to customize which disclaimers to use for various purposes, as well as give the disclaimer some limited styling.
Links
Got a question? Post it on our Exchange Server Forums!


