


Restricting Office 365 Content Searches with Permission Filters
One Place for Office 365 Compliance
From July 1, 2017, Microsoft will disable the ability for Office 365 tenants to create new workload-specific eDiscovery searches for Exchange Online and SharePoint Online through the EAC and SharePoint eDiscovery Center. Existing searches will continue to work. The Exchange and SharePoint searches are replaced by Office 365 content searches, a development that reflects Microsoft’s general direction to concentrate development on Office 365 functionality that works across all workloads rather than just one. Overall, it is a positive development.
Tenants manage content searches through the Office 365 Security and Compliance Center. These searches are faster and more functional than either Exchange or SharePoint eDiscovery searches. They can search mailboxes, archives, inactive mailboxes, group mailboxes, SharePoint sites, OneDrive sites, and public folders. The searches are very scalable and exploit the hardware available in Microsoft’s datacenters to handle literally hundreds of millions of items, if needed.
Last week, I wrote about two major updates to compliance functionality that Microsoft has just introduced inside Office 365: a new data governance framework and expanding compliance coverage to Office 365 Groups. Both are important steps forward and plug holes in the Office 365 compliance story. Although these updates received a lot of press, the ability to add permission filters to content searches was added in May 2016 without much comment. I think that search permission filters are a hidden gem that eDiscovery administrators sometimes overlook.
Permissions
A set of permissions collected into “role groups” like “eDiscovery Manager” and “Compliance Administrator” control access to the functionality of the Security and Compliance Center. The setup is like the Role Based Access Control (RBAC) used by Exchange on-premises and online, but the two sets of role groups are quite separate.
Once you have the permission to create and run content searches, you can look for anything across the set of supported locations, including the ability to pry into sensitive mailboxes or hunt for interesting documents stored in document libraries that you would not otherwise be able to see. Permission filters allow tenants to impose control over what those who conduct content searches can see.
Although all tenants likely agree that administrators should not be able to see information that they do not need to, it is probable that most interest in permission filters will come from medium to large enterprises. Large companies often divide administrative and other responsibilities along geographic or divisional lines. When the time comes to conduct content searches, they might not want those who run the search to be able to include search locations outside their business, country, or region. This makes a lot of sense: someone running a content search to respond to a discovery action in France does not necessarily need to look at German mailboxes. Apart from respecting user privacy, permission filters also mean that content searches return less data that investigators must then review.
Permission Filters
A permission filter creates a restrictive view of mailboxes or SharePoint and OneDrive sites within a tenant. When users that conduct searches come within the scope of a permission filter, they cannot see any data returned by searches except that given by the restrictive view. Therefore, we can set things up that U.S.-based eDiscovery administrators only can see results from U.S. based mailboxes or that only certain eDiscovery administrators are able to search particularly sensitive SharePoint sites.
Microsoft has a good guide to setting up permission filters. The key thing is that these filters can only be created and managed using PowerShell. You must be familiar with the set of cmdlets used for the Security and Compliance Center, which are separate to those used with Exchange Online or SharePoint Online. (You can use this excellent script for connecting to the various Office 365 PowerShell endpoints). After making a connection to the Security and Compliance Center endpoint, you can create and manage permission filters.
Before setting up any filters, you need to answer the following questions:
- Who will the filter apply to? You can specify individual users or use the name of a Security and Compliance Center role group, including a role group created specifically for this purpose. You cannot use a distribution group, Office 365 Group, or security group to define a set of users.
- What can the users do? You can restrict users to individual compliance actions (Export, Preview, Purge, Search) or “All”. You cannot specific two or three actions. In most cases, you will want to use Search or All.
- What can the users see? You can specify a mailbox filter or a site filter. You cannot combine the two types into a single filter that works across multiple workloads. In both cases, you can have filters that look for specific objects (mailboxes or sites) or content (based on KQL queries).
Applying a Permissions Filter
To illustrate permission filters in action, I created a simple filter that applies to a single named user, allows that user to perform all compliance actions, and restrict them to searching mailboxes with a specific value in their CustomAttribute6 property. Here is the command to create the permissions filter.
[PS] C:\> New-ComplianceSecurityFilter -FilterName VikFraudSearch -Users "Marc Vigneau" -Filters "Mailbox_CustomAttribute6 -eq 'POI'" -Action All
To add mailboxes to the set that searches can find, we update the property as follows:
[PS] C:\> Set-Mailbox -Identity TRedmond -CustomAttribute6 POI
After updating the mailboxes, you can test the filter to check the set returned with Get-Recipient:
[PS] C:\> Get-Recipient -RecipientType UserMailbox -RecipientPreviewFilter {CustomAttribute6 -eq 'POI'}
Now that we know that the filter is valid and returns a set of mailboxes, we can test it with a search.
Running a Permissions-Limited Content Search
Log into the Security and Compliance Center as one of the user accounts that are restricted by the filter. The user must have the permission to run searches. To make things easier, I created a new role group with the “Compliance Search” and “Compliance Administrator” permissions and assigned the user to the group. When the Security and Compliance Center starts up, it automatically adjusts the functionality displayed to that allowed to the user who logs in.
Create a new search for all mailboxes with a query that you know will find some information. Launch the search and wait for it to complete. The results should reflect the filter in terms of the number of mailboxes and the amount of information found.
Now log into the Security and Compliance Center as another eDiscovery administrator whom the filter does not restrict. Run the same search again. This time the results should be very different. Figure 1 shows an example of a content search run by restricted (left) and unrestricted (right) eDiscovery administrators.

Blocking Preview Access to Sensitive Mailboxes
Microsoft suggests many other examples of permissions filters in its documentation. One that is of obvious interest is a filter that restricts access to confidential mailboxes. The code to create such a filter first gets the distinguished name of a distribution group called the “Senior Leadership Team”. The members of the group are the mailboxes that we want to restrict. We include the distinguished name in the filter to stop anyone who runs a search against these mailboxes from being able to preview items found by the search.
[PS] C:\> $DG = (Get-DistributionGroup -Identity SLTDL).DistinguishedName

[PS] C:\> New-ComplianceSecurityFilter -FilterName NoSLTPreview  -Users All -Filters "Mailbox_MemberOfGroup -ne '$($DG)'" -Action Preview
The Get-ComplianceSecurityFilter cmdlet reveals the details of the filter:
[PS} C:\> Get-ComplianceSecurityFilter -FilterName NoSltPreview

FilterName  : NOSLTPREVIEW

Description :

Action      : Preview

Users       : {all}

Filters     : {Mailbox_MemberOfGroup -ne 'CN=DL Senior Leadership Team,OU=tenant.onmicrosoft.com,OU=Microsoft Exchange Hosted Organizations,DC=EURPR04A002,DC=prod,DC=outlook,DC=com'}
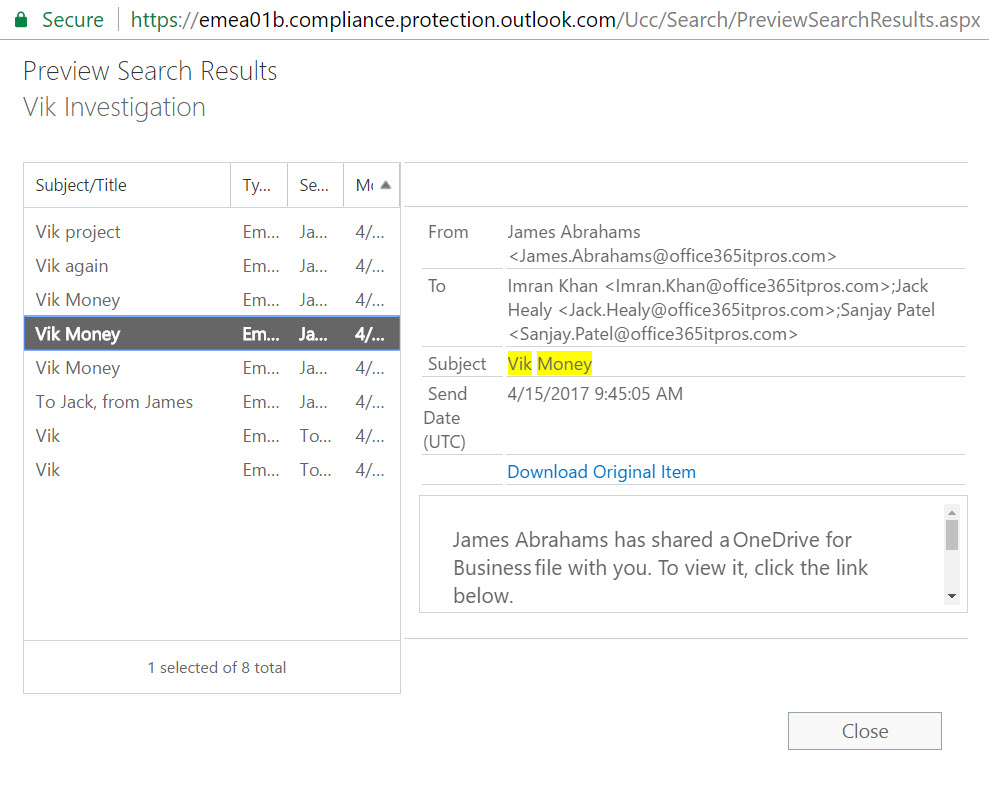
This kind of filter effectively stops casual browsing of sensitive mailboxes by people who should know better. It does not stop searches finding items, nor does it stop eDiscovery administrators being able to export items found by the searches. The only feature prevented is the ability to browse search results with a special preview viewer (Figure 2).
The downside of a filter is that it applies to all content searches, including those executed by people that might legitimately have reason to preview content found in the sensitive mailboxes. For this reason, it is best to define the users to whom the filter applies whenever possible.
No user can preview mailbox items found by a content search in the designated mailboxes, but because you cannot combine a mailbox filter with a site filter, they can still preview documents and other items (like PDFs) found in sites covered by searches. To ensure full confidentiality for the Senior Leadership Team, you need to define a site filter to protect these locations. Something like:
[PS] C:\> New-ComplianceSecurityFilter -FilterName NoSLTPreviewDocs -Users All -Filters "Site_Site -eq 'https://tenant.sharepoint.com/sites/SLTGroup'" -Action Preview
Don’t Overcomplicate Filters
In its documentation, Microsoft explains that:
“The permissions filter is added to the search query when a Content Search is run. The permissions filter is essentially joined to the search query by the AND Boolean operator.”
And:
“In a Content Search query, multiple permissions filters are combined by OR Boolean operators. So results will be returned if any of the filters are true. In a Content Search, all filters (combined by OR operators) are then combined with the search query by the AND operator.”
In other words, it is easy to over-complicate your life by combining a set of permissions filters that to limit people in a way you might not think possible.
People who think about queries on a full-time basis will not agree, but it is easy to create a scenario where searches omit important results because of filters, especially when layers of filters obfuscate processing.
As in life, although permissions filters are a great feature for content search, it is wise to keep things simple whenever possible.