


Nano Web-Based GUI Management Tools Preview

In today’s Ask the Admin, I’ll show you how to set up the web-based server management tools for Windows Server 2016 TP4.
As part of the buzz around Windows Server Nano at last year’s Ignite conference, a set of web-based GUI management tools were also announced. While largely intended to make managing the headless Nano easier, the tools can also be used to manage Server Core. It’s important to understand that while in preview, the tools cannot be installed locally but are accessed from the Azure management portal. Microsoft may make the tools available as part of Azure Stack at a later date.
A server is required to act as a gateway to the devices you’d like to manage, so that might be a significant drawback. Don’t forget that these tools are designed for convenience and largely for big DevOps environments that will be deploying Nano in the future. If that’s not you, these tools might not be the right fit. Additionally, considering the tools are still in preview, setup involves jumping through enough hoops that unless you really need these tools right now, it might not be worth the effort.
In this preview, the tools offer the following features:
- View and change system configuration
- View performance across various resources and manage processes and services
- Manage devices attached to the server
- View event logs
- View the list of installed roles and features
- Use a PowerShell console to manage and automate
Before starting, you’ll need a minimum of two servers on the same local network. One server will act as a Server management tools gateway, and the second will be the server you want to manage using the tools. For the purposes of this demo, both servers will be deployed in Azure. For more information on how to deploy Windows Server VMs in Azure, see Deploy VMs Using Azure Resource Manager on Petri.
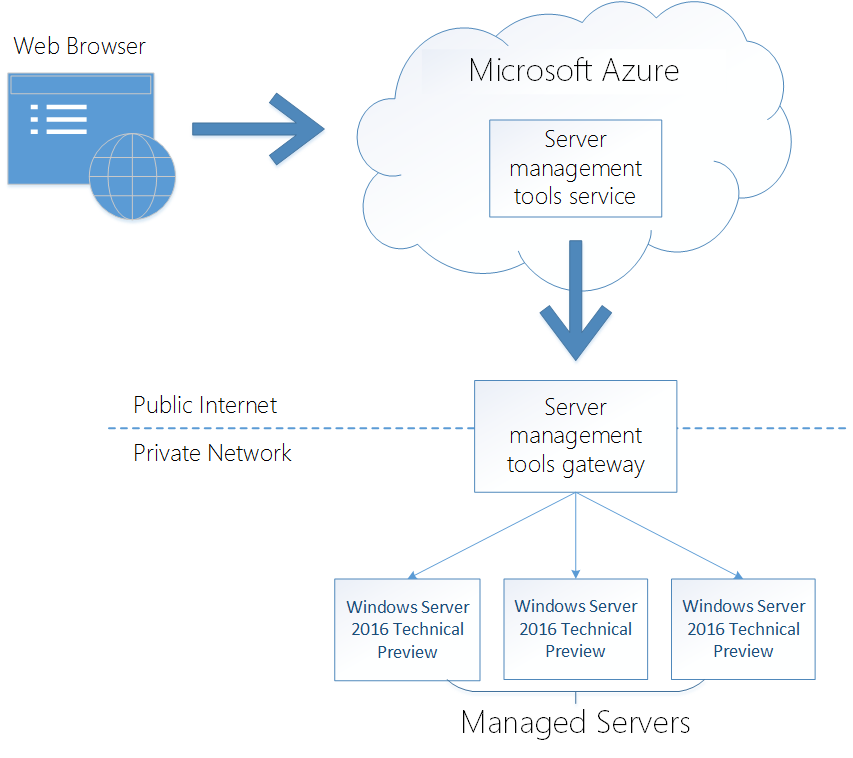
The server to be managed must be running Windows Server 2016 TP4 or later. The gateway server can be running Windows Server 2016 TP4 or Windows Server 2012 R2 with the Windows Management Framework (WMF) 5.0 installed. Both servers are members of an Active Directory domain.
Create a new Server management tools connection
To manage a server using the tools, you need to set up a connection object in Azure.
- Log in to the Azure management portal here.
- Click + NEW in the panel on the left.
- In the New panel, type server management tools in the search box.
- Click Server management tools from the list of search suggestions to search for the tools.
- In the Everything panel, click Server management tools in the list of results.
- In the Server management tools pane, click Create.
- In the Create Server management tools panel, enter the computer name, FQDN or private IP address of the Windows Server 2016 you want to manage.
- In the Resource group menu, either select an existing resource group (RG) or click +NEW and type the name of a new group.
- This is the first time we’re using the web-based GUI tools, so type a name for a new Server management tools gateway.
- Select a location. At the time of writing only East US and Central US are supported.
- Click Create.
Configure the gateway and add credentials
Once the connection has been created, a panel will appear in the management portal window showing the connection’s details. You’ll notice an error ‘Gateway not detected.’ To connect the gateway to the server specified during setup, you’ll need to perform some extra steps:
- Click the Gateway not detected error message in the portal window.
- In the Gateway configuration pane, click Generate a package link.
- Click the copy icon to the right of the generated link.
- Log in to the Windows Server VM that you’ve designated to be the Server management tools gateway and paste the link into a browser window.
- Unzip the downloaded file and run the GatewayService.msi package.
- Accept the license agreement in the installer window and then click Install.

- Click Finish once the install has completed.
- Back in the Azure management portal, click Refresh in the gateway configuration pane and you should be prompted to add management credentials for the connection.
- Click Manage as in the gateway connection pane.
- Enter a local administrator username and password credentials of the server you plan to manage and click OK. Note that by default you cannot make WinRM connections using the built-in administrator account.
Connection notes
If the server you want to manage is not part of an Active Directory domain, you’ll need to add the server’s IP address to the Windows Remote Management (WinRM) TrustedHosts list on the gateway server using the set-item PowerShell cmdlet, replacing 10.0.0.4 with the IP address of the server you want to manage.
set-item wsman:\localhost\client\trustedhosts 10.0.0.4 -concatenate –force
Note that you if you specify an IP address using the set-item cmdlet, you must also specify an IP address when creating the connection object in Azure, as opposed to a computer name or Fully Qualified Domain Name (FQDN).