


With quick migration, you can rapidly migrate a running virtual machine from one physical host system to another with minimal downtime.
Using Windows Server Hyper-V or Windows Server 2008 with Hyper-V, and the quick migration capability, you can consolidate physical servers while maintaining the availability and flexibility of business-critical services during scheduled maintenance, or quickly restore services after unplanned downtime.
In order to use this method you must install System Center Virtual Machine Manager 2008 (preferably R2, and this is the version I will be referring to from now on), and use it to perform the migration.
When used on a failover cluster, Quick Migration is an automatic process:
For a planned quick migration, the operation saves the state of a running guest VM (memory of original server to disk/shared storage), moves the storage connectivity from one physical host to another, and then restores the guest VM to the second host (disk/shared storage to memory on the new server). When migrating the VM, there will be some downtime for the migrated VM. The length of this downtime is related to the amount of RAM that is configured for the VM and the speed of the network subsystem.
In the case of unplanned downtime, the system cannot save the state of the workload and running VM. Instead, the entire VM would be failed over to another host in the cluster, automatically, and there it will be booted from a cold state.
Important: You do NOT need to have a failover cluster of 2 or more Hyper-V hosts to allow Quick Migration. However, without deploying a failover cluster, there will be no solution for unplanned server failure, and the entire process will need to be a manual process. If you do decide to use a failover cluster, you must use Windows Server 2008 Enterprise or Windows Server 2008 Datacenter editions.
Note that this article only deals with Hyper-V R2, and not with the RTM version of Hyper-V. Therefore, there may be changes in functionality, and if you’re using the RTM version (isn’t it time to upgrade already?), you may find that some of the options listed here are not available to you.
Also, I will not deal with the automatic failover feature of Quick Migration, and instead I will use it to move a VM from one host to another with as little downtime as possible for this type of migration.
Considerations before performing the migration
When you want to move a virtual machine from one Hyper-V host to another, you must use the built-in migration option from SCVMM. Also, there are basically 2 things you should do to make the import process go smoothly:
Make sure the same Virtual Network is defined on the target host – this means it will connect the moved VM to the correct network on the target host. Without doing this, you will need to manually set the network on the VMs’ Settings page.
Make sure you use processors from the same manufacturer on the source and target hosts. If the CPUs are from the same manufacturer but not from the same type, you may need to use Processor Compatibility. More about this in a future article.
Performing the migration
Open the SCVMM 2008 R2 console, and expand Virtual Machines > All Hosts. Find the host on which the VM is running.
The VM that you’re about to move does not need to be turned off or in a saved state. It can be running, servicing users and applications. However, remember that there will be some minimal downtime while the migration takes place, so users connected to that machine might experience some symptoms related to a machine loosing temporary network connection. For most applications, the timeout of the application is longer than the downtime, therefore the users will not need to reconnect to the machine.
Right-click the VM and select “Migrate”. Note that this command will either do a Quick Migration or a Live Migration, based upon the system’s settings. In this case, because I do not have Failover Clustering in place, it will do a Quick Migration.

You will get a message telling you that there’s going to be a temporary downtime for the VM. Click “Yes”.

You’ll be presented with a list of all your Hyper-V (and actually – VMware ESX/ESXi hosts – which I do not have in place for this example). Select the host you wish to migrate the VM to. Note how SCVMM automatically generates performance ratings based upon CPU, disk, memory and network loads for the target hosts. Select the target host and click “Next”.

Select the path of the VM on the target host. Ideally, this should be identical with the source host, but I don’t think they must be identical. Make sure you’ve got enough disk space. Click “Next”.

If networking is properly configured, the target network will be automatically selected and identical to the source network. If not, you’ll need to manually select it (more on this in a future article). Click “Next”.

Examine the summary and when satisfied, click “Move”. Note you can also copy the PowerShell script used to perform the migration and use it in the future. Clicking “Cancel” at this point cancels the process without making any change.
The Jobs window will open showing you the completion percentage of the job.

Back in the SCVMM console, you can see a progress bar. Note how the status is “Under Migration”.

During this time, the VM is actually running with no downtime yet. In the background, SCVMM creates a snapshot (or more precisely – a checkpoint) of the VM. This causes all new hard disk I/Os to be written to a temporary AVHD snapshot file. Then, the VM’s VHD files are copied to the target host. This takes some time, depending on the size of VHDs and on the network speed.

Notice how during this time, the VM is still active, however by looking at the Network tab in Task Manager we see that there is some massive network activity going on.

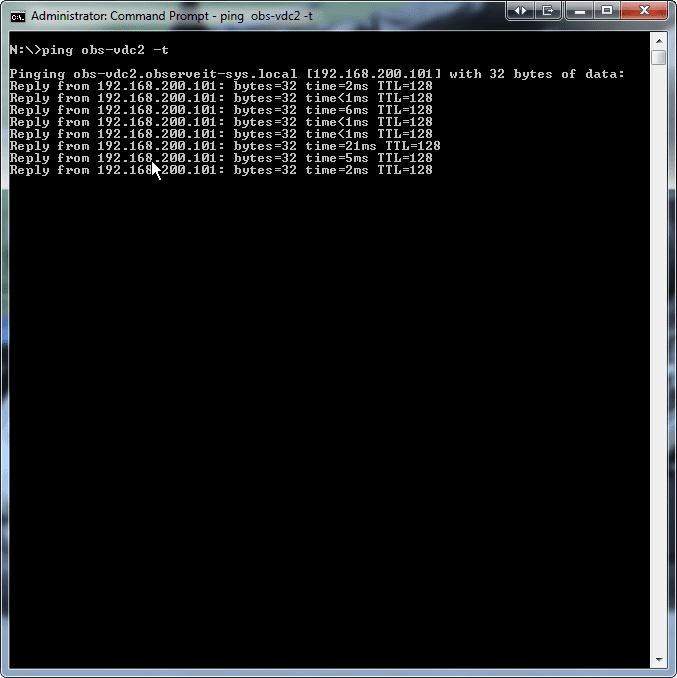
If we ping the machine during this time, you will receive a reply (unless ICMP replies were disabled in the firewall).
The moment the VHD copying is over, the VM state will be saved, meaning there can be no more writing to the AVHD file.

The VM’s state is then sent to the target host. This will take several seconds, depending on the amount of activity, network speed and so on.

When the transfer of the saved state is over, we see how the VM is restored from its saved state on the target host.

During that time, we see a temporary loss of connectivity, but it soon comes back online when the VM is fully loaded from the saved state.

Bingo. Virtual Machine is now up and running on the target host.
