Microsoft has released the Azure PowerShell 1.0 Preview, which provides better support for Resource Manager, separates Service Management and Resource Manager cmdlets, and can be installed from the PowerShell Gallery amongst other improvements. In today’s Ask the Admin, I’ll show you how to install the new preview cmdlets in Windows 10, and how to sign in to Azure Resource Management from the PowerShell console.
Before starting with Azure PowerShell 1.0 Preview, you’ll need to remove any existing version of Azure PowerShell on your system using the Control Panel. Remember that Azure PowerShell 1.0 is in preview and not supported on production systems or for mission critical tasks, and can be uninstalled at any time so that you can revert to a supported version of the cmdlets.
Install Azure PowerShell Preview
Once you’ve removed any existing version of the cmdlets, follow the instructions below to install the preview:
Log in to Windows 10.
Search for PowerShell in the taskbar, right click Windows PowerShell in the search results and select Run as administrator from the menu. Enter credentials for an administrator account, or confirm elevation if prompted.
Set the PowerShell script execution policy to Remote-Signed by running typing Set-ExecutionPolicy RemoteSigned and pressing ENTER in the PowerShell console window, and then click Yes to change the execution policy when prompted.
Now Install Azure PowerShell 1.0 Preview by running Install-Module AzureRM in the console window, and click Yes when prompted to install the module from the PowerShell gallery.
You should note that Azure PowerShell 1.0 Preview can only be installed in systems with the Windows Management Framework (WMF) 5.0, which is included in Windows 10 by default. To download or get more information on WMF 5.0, see Microsoft’s website.
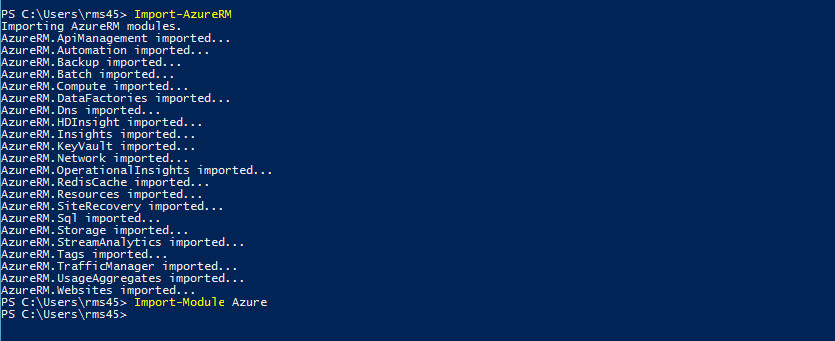
Import the Azure Resource Manager and Service Management modules (Image Credit: Russell Smith)
Now load the Azure Resource Manager modules: Install-AzureRM
Install the Azure Service Management module, and click Yes when prompted to confirm the operation: Install-Module Azure
Close the elevated PowerShell prompt.
Before you can import the new modules, you’ll need to log out of Windows and back in again. Once logged back in, open a PowerShell prompt without elevating privileges, and import the Azure Service Management and Resource Manager modules:
Sign in to Azure Resource Manager
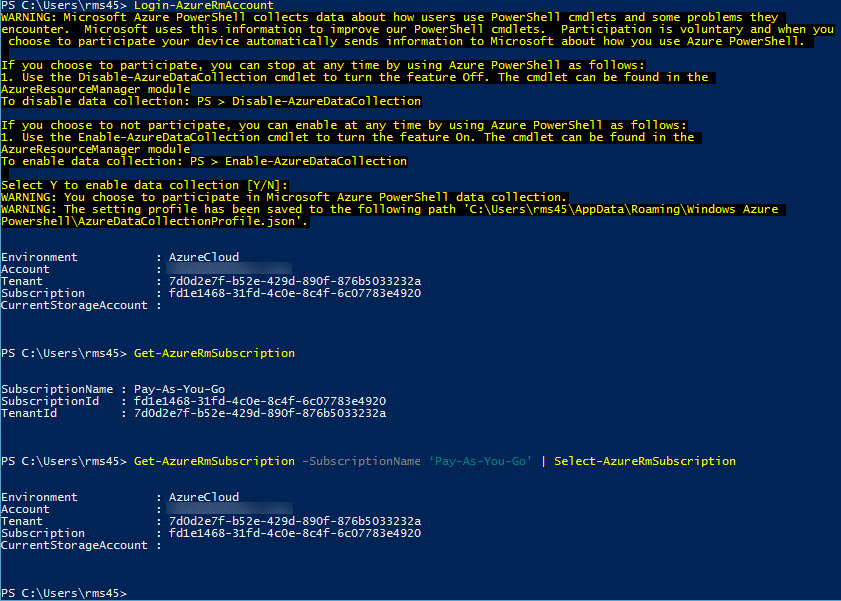
Resource Manager doesn't support certificate-based authentication, so if you've used PowerShell to manage Azure on the device in the past using a certificate, you'll need to log in instead. The good news is that you can use a Microsoft account without setting up Azure AD to log in. In the PowerShell console, type Login-AzureRmAccount and press ENTER. Now enter a tenant username and password into the dialog box.
Sign in to Azure Resource Manager using a Microsoft, or work or school account (Image Credit: Russell Smith)
If you have more than one subscription associated with the account, you can choose the subscription you want to work with using the command below, replacing Pay-As-You-Go with the name of your subscription.
If you are not sure about what subscriptions are available under the account you used to sign in to Azure Resource Manager, just type Get-AzureRMSubscription and press ENTER to get a complete list.
Sign in to Azure Service Management
The procedure to sign in to Service Management is similar, but uses a different cmdlet. Type the cmdlet below, and enter your username and password when prompted:
You can now work with Azure PowerShell as with previous versions.
Uninstall Azure PowerShell Preview
To uninstall Azure PowerShell 1.0 Preview, open a PowerShell prompt with elevated privileges and run the cmdlet below: