Creating and running a virtual machine is one of the first things that you will want to do after deploying Hyper-V. In this article, I will show you a basic way to manually install a guest OS in Hyper-V virtual machine (VM).
How to Install a Guest OS in Hyper-V Virtual Machines
One of the most common ways to get your first guest operating system is to mount an ISO file and install the operating system by hand, just as you would with a physical server using a DVD.
The first step is to obtain your media. If you purchased an OEM license, then create an ISO file using a third-party tool using the original Microsoft media. If you bought a volume license, then download the ISO file for your version of Windows Server from the Microsoft Volume Licensing Service Center (VLSC). If you are using MSDN media, then download the ISO from there.
Now save the ISO file where the virtual machine can mount it. The quick and easy location is on the host. The more complicated solution that’s better in the long term is to store the ISO in a library, where a file share will require you to implement SMB constrained delegation.
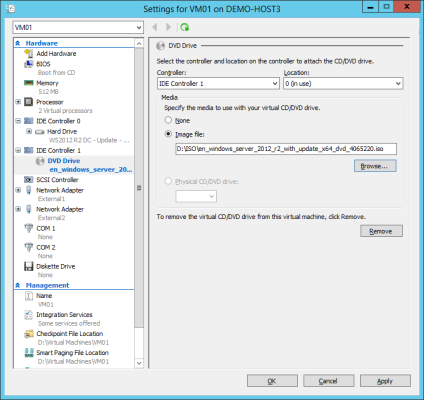
Next, edit the properties of the VM. The ISO file will be mounted by a virtual DVD drive. Generation 1 VMs have a virtual DVD drive on IDE controller 1. In the case of a generation 2 VMs, you will need to add a virtual DVD drive to the VM. Browse to the SCSI Controller, add a DVD drive, and click Apply.
Browse to the DVD Drive, then navigate to the ISO file. Click OK to save your change and start the VM. Once you connect to the VM, you will then be able to use your keyboard and mouse to install the operating system.
Tip: If you are not using KMS or automated activation, then it’s a little tricky to enter the activation key. First, copy the product key into your clipboard. In the virtual machine Connect window, use the Type Clipboard Text entry from the Clipboard menu to paste in the product key when it’s required.
Connecting a Hyper-V virtual machine to an ISO file. (Image: Aidan Finn)
You are not finished when the installation is complete. Make sure that you:
- Update the Hyper-V integration services.
- For Windows VMs run Windows Update, reboot as required until there are no remaining updates to install.
Creating a Virtual Machine Template
If you use System Center, then you will create a template for the virtual machine. In this article, I’ll show you how to create a VM template running Windows using basic OS deployment methodology. This will save you countless hours in the future.
Most administrators should be familiar with OS cloning tools, such as ImageX, Windows Deployment Services, Microsoft Deployment Toolkit, System Center Configuration Manager, or Ghost. An operating system is generalized using Sysprep, and an image is created from the contents of the hard disk. The good news is that your guest OS is already captured in an image — the VHD or VHDX file. That makes this basic VM deployment process very easy.
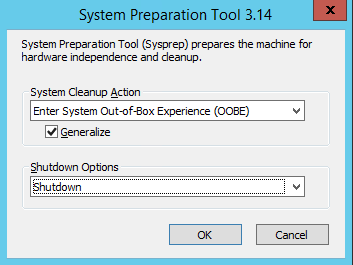
When you have finished prepping your golden VM, create a checkpoint of your virtual machine, and then run Sysprep. This will open Explorer to C:WindowsSystem32Sysprep. Start SYSPREP.EXE from this folder. Sysprep should be configured to:
- Enter System Out-of-Box Experience (OOBE)
- Generalize
- Shutdown
Running Sysprep in a Hyper-V virtual machine. (Image: Aidan Finn)
It might take a few minutes for Sysprep to strip the identity of your VM and shut it down. Once the machine is powered off, copy the VHD/VHDX file to a safe location. That is your virtual machine image. The following instructions outline the deployment process:
- Create a VM without a virtual hard disk.
- Copy the golden VHD/VHDX to the new VM’s storage location.
- Edit the VM’s settings and connect the virtual hard disk.
- Power up the VM and customize it by defining the computer name, network settings, and so on.
Now you can deploy ready-to-rock VMs in a matter of minutes, where they’re already loaded with Windows Updates and your preferred configuration.
Why did I create a checkpoint (aka a snapshot) earlier? When you test your virtual machine image, you might find that you want to change something. Instead of recreating the virtual machine, you simply apply the snapshot and reverse all the changes that were done by Sysprep. Now you can make your small change and start the capture process again, starting with Sysprep.
Tip: You can also minimize the manual configuration that’s required by creating an unattended answer file and saving that into your golden image before you run Sysprep.


