


PowerBI has quickly become a top platform for data analytics within the Office 365 set of applications. With the ability to consume data from a variety of sources, manipulate, visualize, and publish that data, PowerBI stands out as an easy to use and powerful data visualization platform. With the ability to utilize PowerShell as a means to ingest data and manipulate PowerBI, system administrators and users alike gain powerful new abilities to utilize data through programmatic means. In this article, we explore how to send in data to a PowerBI dataset through PowerShell.
Installing and Connecting the PowerBI Module for PowerShell
Using the [MicrosoftPowerBIMgmt](<https://docs.microsoft.com/en-us/powershell/power-bi/overview?view=powerbi-ps>) module and installed to the CurrentUser scope, we can install PowerBI PowerShell tools without using administrator modules.
Install-Module -Name 'MicrosoftPowerBIMgmt' -Scope 'CurrentUser'
Import-Module -Name 'MicrosoftPowerBIMgmt'
The next step will be connecting to the PowerBI workspace. You will use the Connect-PowerBIServiceAccount and pass in the credentials that you use to login to your Office 365 tenant.
$credential = Get-Credential
Connect-PowerBIServiceAccount -Credential $Credential
Now that we are connected, we need to create the dataset and structure.
Retrieving the PowerBI Workspace & Crafting a Dataset
We will use the Get-PowerBIWorkspace cmdlet to retrieve the Id of the workspace that we will be adding a dataset to and populating with data.
$Workspace = Get-PowerBIWorkspace | Where-Object Name -EQ 'Test Team' | Select-Object ID, Name

Retrieve the workspace to add the dataset to.
To create a dataset, think SQL database, within PowerBI we need to define a table for the data to populate and the columns, think fields, that the data will use.
$Columns = @()
# Data Types Allowed: Int64, Double, Boolean, DateTime, String
$ColumnMap = @{
'ID' = 'Int64'
'Name' = 'String'
'Value' = 'String'
}
$ColumnMap.GetEnumerator() | ForEach-Object {
$Columns += New-PowerBIColumn -Name $_.Key -DataType $_.Value
}
$Table = New-PowerBITable -Name "ExampleTable" -Columns $Columns
$DataSet = New-PowerBIDataSet -Name "ExampleDataSet" -Tables $Table
This is all just setup, we haven’t actually created the dataset. To do so we need to use the Add-PowerBIDataSet and pass in the constructed $DataSet variable.
$DataSetResult = Add-PowerBIDataSet -DataSet $DataSet -WorkspaceId $Workspace.Id
As you can see from the below screenshot, the dataset has been added into the Test Team and is now available.
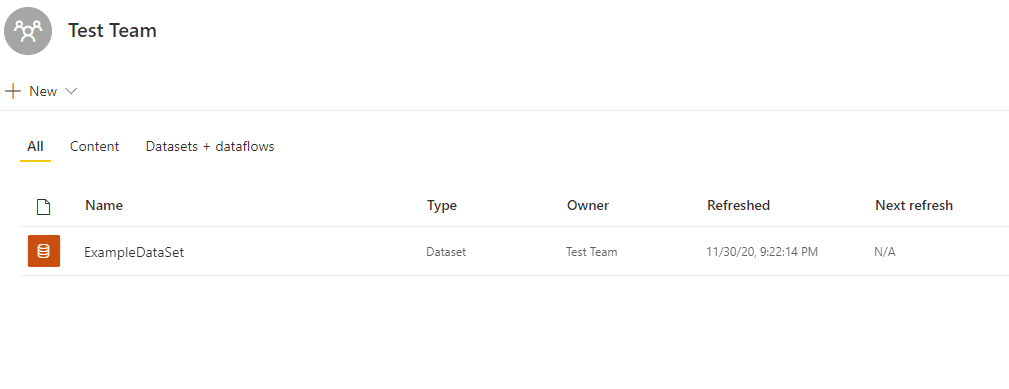
Demonstrate that the dataset has been created in the workspace.
Without data, PowerBI is not that useful, so let’s discover how to add data via PowerShell!
Adding Data to the DataSet
Of course, to make any dataset useful, we need data. Using the Add-PowerBIRow, we can add a row of data. There are two ways to add the data.
- Pipe in each individual row data
- Using the
Rowsparameter, pass in a bulk set of rows
Out of the two methods, the second which is passing in a bulk set of data, is the more efficient and preferred method.
$Rows = @(
@{
'ID' = 1
'Name' = 'First Entry'
'Value' = 'Value 1'
}
@{
'ID' = 2
'Name' = 'Second Entry'
'Value' = 'Value 2'
}
@{
'ID' = 3
'Name' = 'Third Entry'
'Value' = 'Value 3'
}
)
$Params = @{
'DataSetId' = $DataSetResult.Id
'TableName' = $Table.Name
'Rows' = $Rows
'WorkspaceId' = $Workspace.Id
}
Add-PowerBIRow @Params
Using the editor online, you can show that the data in a table. As you can see below, the three columns that we originally defined are shown with the values appropriately assigned.
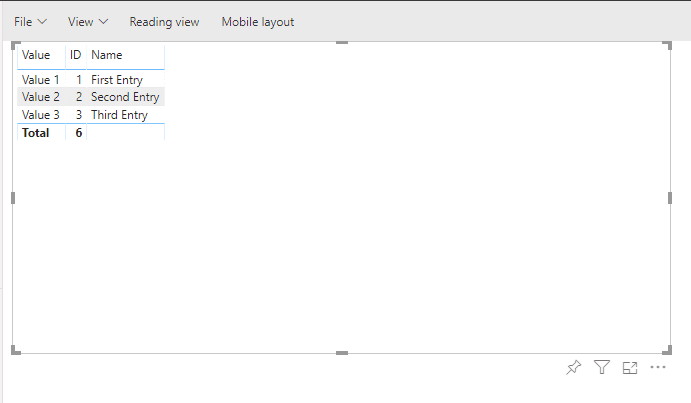
Demonstrate that the data has been added to the dataset.
What about removing data from the dataset? Read on to learn how to remove rows.
Removing Rows of Data from a PowerBI DataSet
Unfortunately, you cannot remove a single row from a dataset. But you can clear the dataset and truncate the data. This is done using the Remove-PowerBIRow. Why might you do this? If you need to change the structure of the dataset and repopulate the data is one reason. Let’s demonstrate this by using the command and adding a column to the dataset.
Remove-PowerBIRow -DataSetId $DataSetResult.Id -TableName $Table.Name -WorkspaceId $Workspace.Id
Now that the data has been cleared, we need to add a new column to the data and update the data. To update the schema we need to use the Set-PowerBITable command.
$Columns = @()
$ColumnMap = @{
'ID' = 'Int64'
'Name' = 'String'
'Value' = 'String'
'Active' = 'Boolean'
}
$ColumnMap.GetEnumerator() | ForEach-Object {
$Columns += New-PowerBIColumn -Name $_.Key -DataType $_.Value
}
$Table = New-PowerBITable -Name "ExampleTable" -Columns $Columns
Set-PowerBITable -WorkspaceId $Workspace.Id -DatasetId $DataSetResult.Id -Table $Table
Now that the data has been updated, let’s once again send in some data, but this time with the added Active column.
$Rows = @(
@{
'ID' = 1
'Name' = 'First Entry'
'Value' = 'Value 1'
'Active' = $True
}
@{
'ID' = 2
'Name' = 'Second Entry'
'Value' = 'Value 2'
'Active' = $True
}
@{
'ID' = 3
'Name' = 'Third Entry'
'Value' = 'Value 3'
'Active' = $False
}
)
$Params = @{
'DataSetId' = $DataSetResult.Id
'TableName' = $Table.Name
'Rows' = $Rows
'WorkspaceId' = $Workspace.Id
}
Add-PowerBIRow @Params
As you can see in the below screenshot, the new column shows and with the updated data.

Show that the added column and data has been added.
Conclusion
PowerBI offers a powerful platform to manipulate and visualize data. With the ability to input data via PowerShell, the ability to send data from third-party tools and outside data sources becomes even easier. Explore all the ways to integrate data via PowerShell into PowerBI.