


How to Install Windows Subsystem for Linux
Windows Subsystem for Linux (WSL) lets you run a lightweight Linux environment on Windows without the overhead of a VM. And while it’s possible to run Linux GUI programs using an X Server, WSL isn’t intended for average users who wants to spin up their favorite GUI Linux apps. WSL is for developers and sysadmins that need Linux interoperability in Windows. WSL provides a layer for mapping Windows kernel system calls to Linux kernel system calls, allowing Linux binaries to run in Windows unmodified. WSL also maps Windows services, like the filesystem and networking, as devices that Linux can access.
WSL virtualizes a Linux kernel interface on top of the Windows kernel, so it only requires a minimal amount of RAM. And when not in use, the WSL driver isn’t loaded into memory, making it much more efficient than a solution based on a VM or container. In addition to giving access to the Bash shell, or other shell of your choice, and the tools included with whichever Linux distro you choose to install, WSL can also run system level daemons (services) in the background. You can even install multiple Linux distributions and switch between them.
Install Windows Subsystem for Linux
Before installing a Linux distribution from the Microsoft Store in Windows 10, you’ll need to install the Windows Subsystem for Linux.
- In the search box on the taskbar, type control panel and select Control Panel from the list of results.
- In the Control Panel, click Programs.
- Now click Turn Windows features on or off. Give consent or provide an administrator password if prompted.
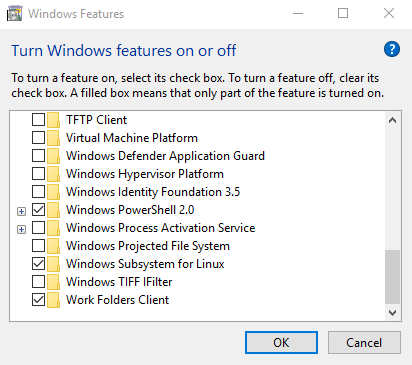
- In the Windows Feature dialog, select Windows Subsystem for Linux and then click OK.
- Reboot the device when prompted to complete the installation process.
Alternatively, you can install WSL using PowerShell using the Enable-WindowsOptionalFeature cmdlet. You’ll need to open a PowerShell prompt with administrator privileges.
Enable-WindowsOptionalFeature -Online -FeatureName Microsoft-Windows-Subsystem-Linux
Install a Linux Distribution
Now you can install a Linux distribution from the Microsoft Store. At the time of writing, Ubuntu, Debian, Kali, SUSE Enterprise, and openSUSE are mainstream distributions that work with WSL. There is also WLinux, which isn’t free. It is based on Debian and was created by software startup Whitewater Foundry. It offers access to over 25,000 open source packages that can be installed and managed using apt-get. Also included is the wlinux-setup tool, which allows you to set up a working environment quickly, including tools like Python, Go, Ruby, NodeJS, PowerShell, and Azure Cloud tools.
In this article, I will install Ubuntu. The process is the same regardless of Linux distribution you choose.
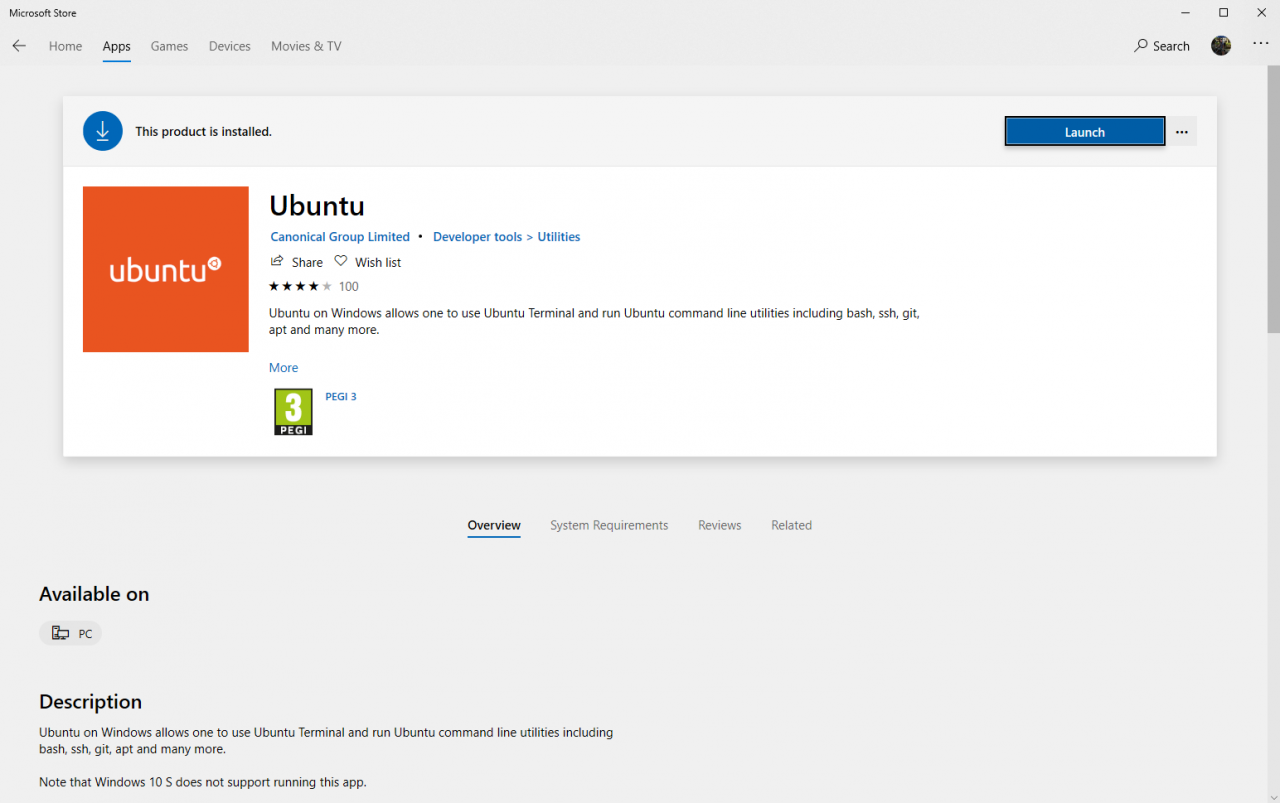
- Open the Microsoft Store.
- Click Search in the top right corner of the Store and type Ubuntu.
- Under Apps, click Ubuntu.
- Now click Get to install Ubuntu on your system.
- Once the install has completed, click Launch.
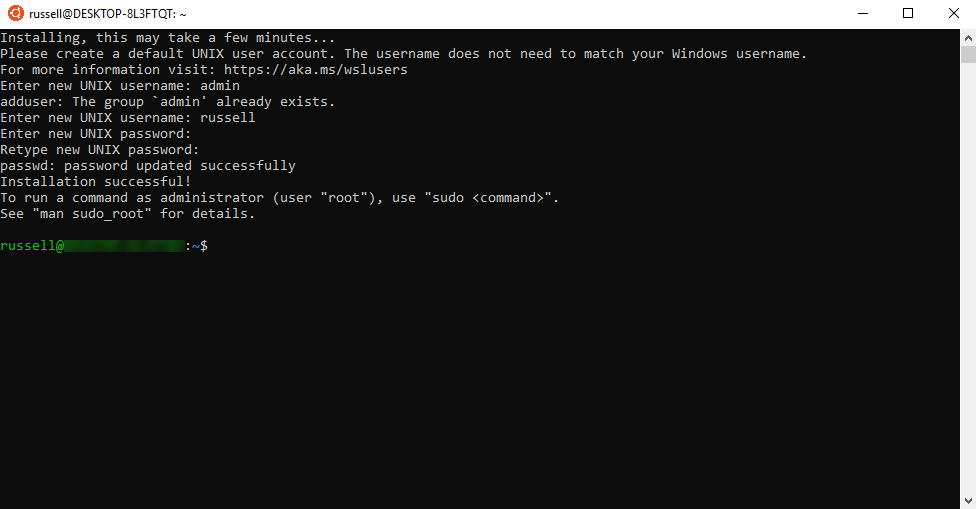
A console window will appear. It will take another few minutes to complete the install. When Ubuntu is ready to use, you’ll need to create a user account.
- Enter a new username as prompted and confirm the password twice. The new user is an administrator and will be automatically logged on each time you start Linux. It is also added to the sudo
As you can see in Figure 3, the new user cannot be called ‘admin’.
Now you can use Linux on your Windows devices without starting a virtual machine.