


How to Create a Windows Virtual Desktop Tenant with Windows Virtual Desktop

In the first part of this series, I described what Microsoft’s Windows Virtual Desktop (WVD) service is and the basic requirements. If you haven’t already read that article, I suggest you do before continuing with WVD because there are some important prerequisites that need to be in place.
Before you can create a host pool in the Azure management portal, you need to create a Windows Virtual Desktop tenant. There are several steps to this process:
- Give Azure Active Directory permissions to the Windows Virtual Desktop enterprise app.
- Assign an AAD user the Windows Virtual Desktop TenantCreator application role.
- Create a Windows Virtual Desktop tenant.
Please note that everything in this article is subject to change because Windows Virtual Desktop is in preview. Additionally, when using an AAD user account, make sure that it is a work or school account and not a Microsoft Account (MSA). I’ll remind you about this again.
Grant Azure Active Directory Permissions to Windows Virtual Desktop Service
Giving ADD permissions to the WVD service lets it query the directory for administrative and end-user actions. All you need to do is click here to open the Windows Virtual Desktop consent page in a browser.
- There are two consent options: Server App and Client App. Make sure that Server App is selected.
- In the AAD Tenant GUID or Name box, type the name or GUID of your AAD and click Submit. If you are not sure what your AAD name is, open the Azure AD management portal here and click Azure Active Directory on the left of the portal.

- You’ll be prompted to sign in to AAD. Use a Global Administrator account that is a work or school account. I.e. Not a Microsoft Account (MSA). If you are not sure which AAD users are work and school accounts, open the Azure AD management portal here, click Users on the left of the portal, and you’ll see the user type listed in the Source column for each user account. Work and school accounts will be listed as Azure Active Directory under Source.
- Once signed in, you’ll be asked to accept a series of permissions for the Windows Virtual Desktop app. Click Accept. You’ll be redirected to a confirmation page.
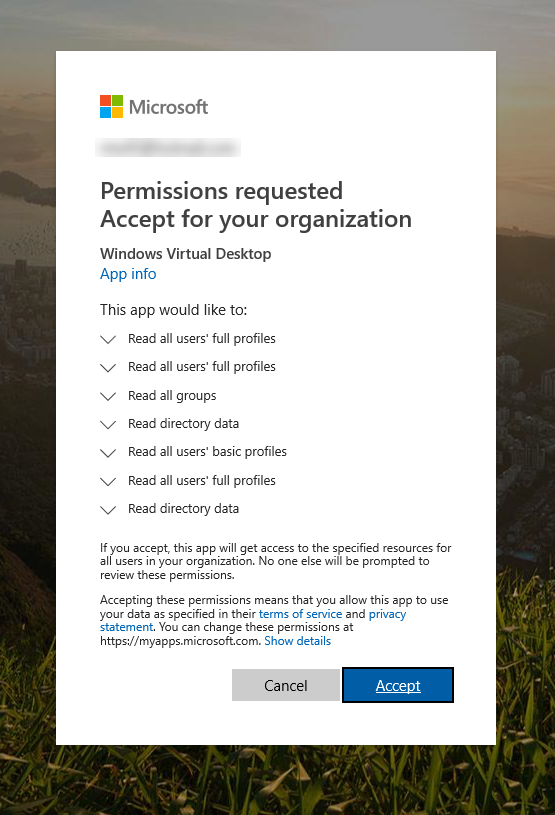
- Wait one minute for the Server App permissions to register in AAD and then repeat this process for Client App.
Assign TenantCreator Role to AAD User
Now you need to assign the TenantCreator application role to an AAD user.
- Open the Azure AD management portal here.
- Sign in to AAD with a global administrator account.
- Click Enterprise Applications on the left of the portal.
- In the list of apps, you should see Windows Virtual Desktop and Windows Virtual Desktop Client. Click Windows Virtual Desktop.
- Click Users and groups on the left of the portal window.
- Click + Add user.
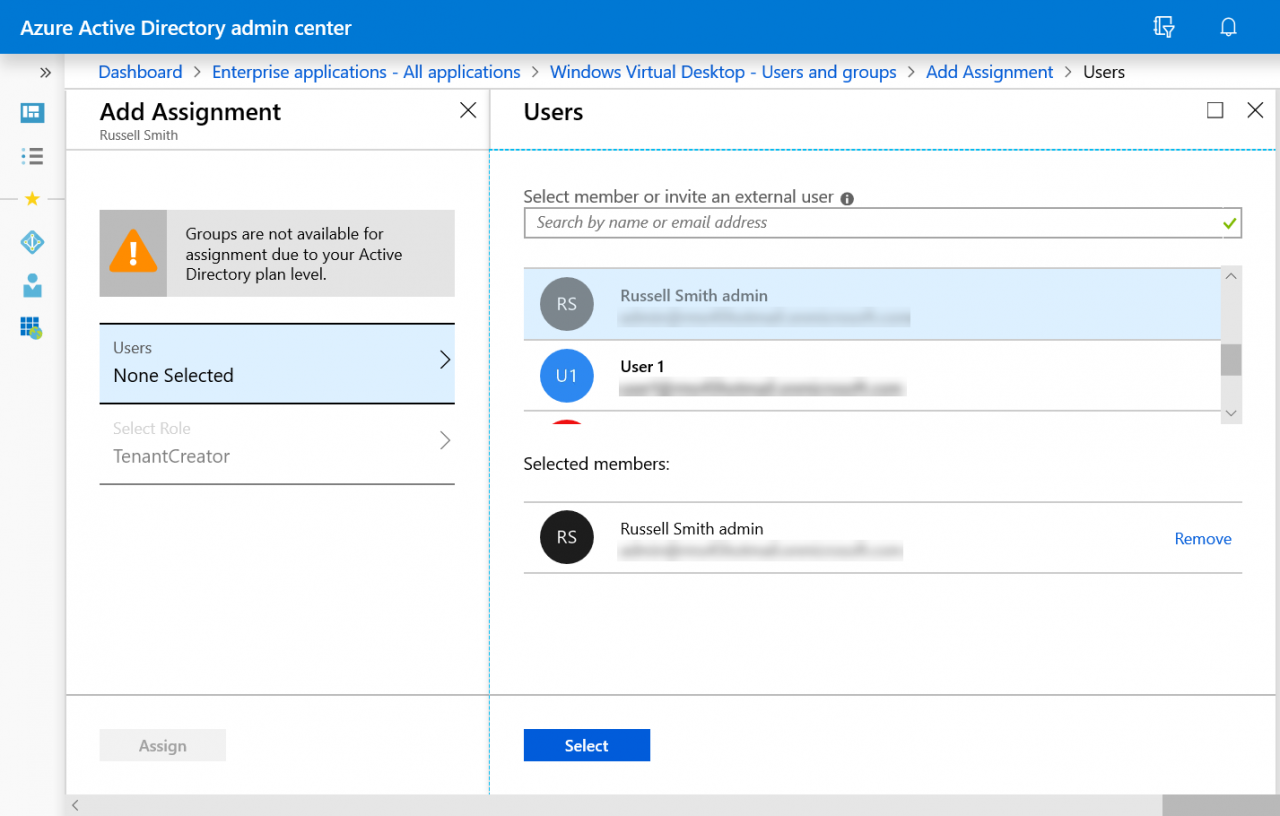
- Under Add Assignment, click Users.
- Select a Global Administrator work or school account from the list, i.e. not an MSA account, and then click Select.
- Click Assign under Add Assignment.
- Close the AAD management portal.
Create a Windows Virtual Desktop Tenant
The last step is to create the tenant itself.
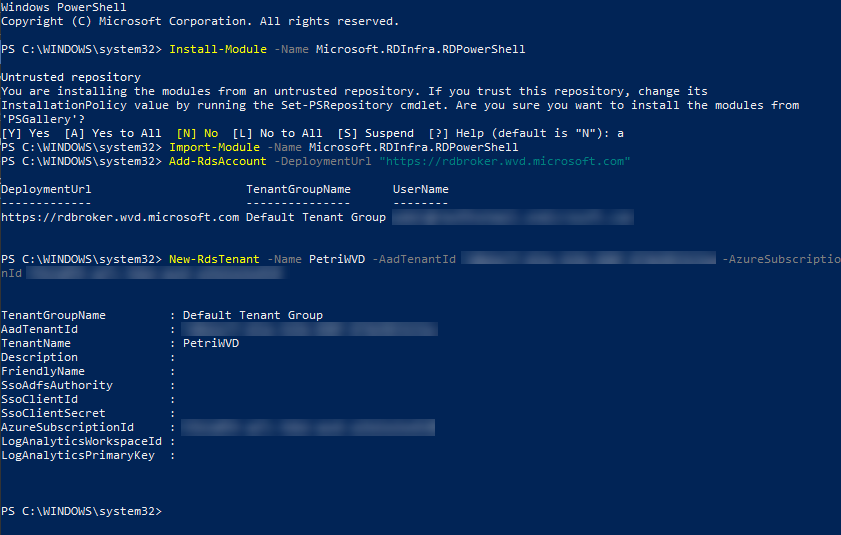
- Open a PowerShell prompt in Windows 10.
- Download and import the Windows Virtual Desktop PowerShell module.
Install-Module -Name Microsoft.RDInfra.RDPowerShell
Import-Module -Name Microsoft.RDInfra.RDPowerShell
- Sign in to Windows Virtual Desktop using the AAD account to which you assigned the TenantCreator application role above.
Add-RdsAccount -DeploymentUrl "https://rdbroker.wvd.microsoft.com"
- Create a new tenant using the New-RdsTenant cmdlet as shown here, replacing the AadTenantID with your Azure AD directory ID and the AzureSubscriptionId with your subscription’s ID. You can find your Azure subscription ID in the Subscriptions section of the Azure management portal. Similarly, you can find your Azure AD directory ID in the Azure AD portal under Azure Active Directory > Properties.
New-RdsTenant -Name PetriWVD -AadTenantId xxxx-xxxx-xxxxx-xxxxx -AzureSubscriptionId xxxx-xxxx-xxxxx-xxxxx
And that is it! Now you are ready to create a hosting pool in the Azure management portal. As you can see, the process of creating a tenant isn’t exactly intuitive or straightforward. Which is a shame because creating a hosting pool is easier. But this is just the preview stage and Microsoft will hopefully make this process simpler and integrate it with the Azure management portal before general availability.
In the third part of this series, I’ll show you how to create a hosting pool in the Azure management portal.
Related Article: