


How to Back Up NAS to Azure Storage
If you have a network attached storage (NAS) device in your office, it’s important to make sure that you have at least one off-site copy of that data so that it can be restored in the event of a disaster or if files are accidentally deleted. If you have a Windows Server or Windows Storage Server-based NAS, you should look at using the MARS agent for Azure Recovery Services to back up your data.
If your NAS runs an operating system other than Windows, then you should look at whether it has built in synchronization or backup support for Azure or another cloud service. Some NAS devices allow you to install apps, so you might find a third-party solution for backing up your NAS.
Create an Azure Storage Account
Before you can configure storage in the NAS device, you need to set up a storage account in Azure. If you don’t already have an Azure subscription, you can sign up here for a free trial.
- Log in to the Azure management portal.
- Under Azure services at the top of the portal window, click Storage accounts.
- On the Storage accounts page, click + Add.
- On the Create storage account page, select the Azure subscription that you want to use from the Subscription dropdown menu.
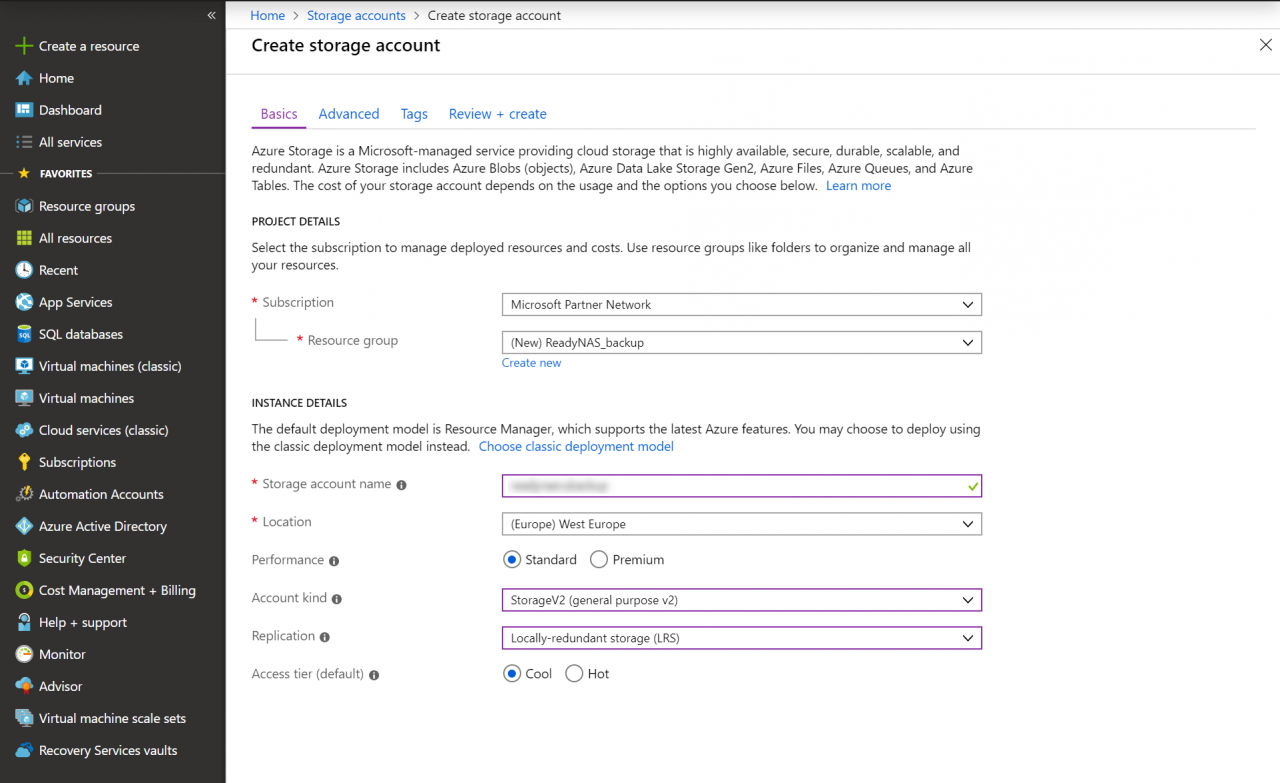
- In the Resource group box, use the dropdown menu to select an existing resource group, or click Create new and type the name for your new resource group in the popup dialog and then click OK.
- Under INSTANCE DETAILS, type a name for the new account in the Storage account name field.
- Set the location for the storage account using the Location dropdown menu.
- Set Performance to Standard and Account kind to StorageV2 (general purpose v2). StorageV2 storage accounts give you access to all types of Azure storage in a unified account.
- Set Replication to Locally-redundant storage (LRS) using the dropdown menu. LRS is the cheapest redundancy option.
- Finally, set the default Access tier to Cool.
There are three access tiers: Hot, Cool, and Archive. For more information on the tiers, check out Microsoft’s website here. Archive blobs are offline storage so cannot be used for regular NAS backups or synchronization.
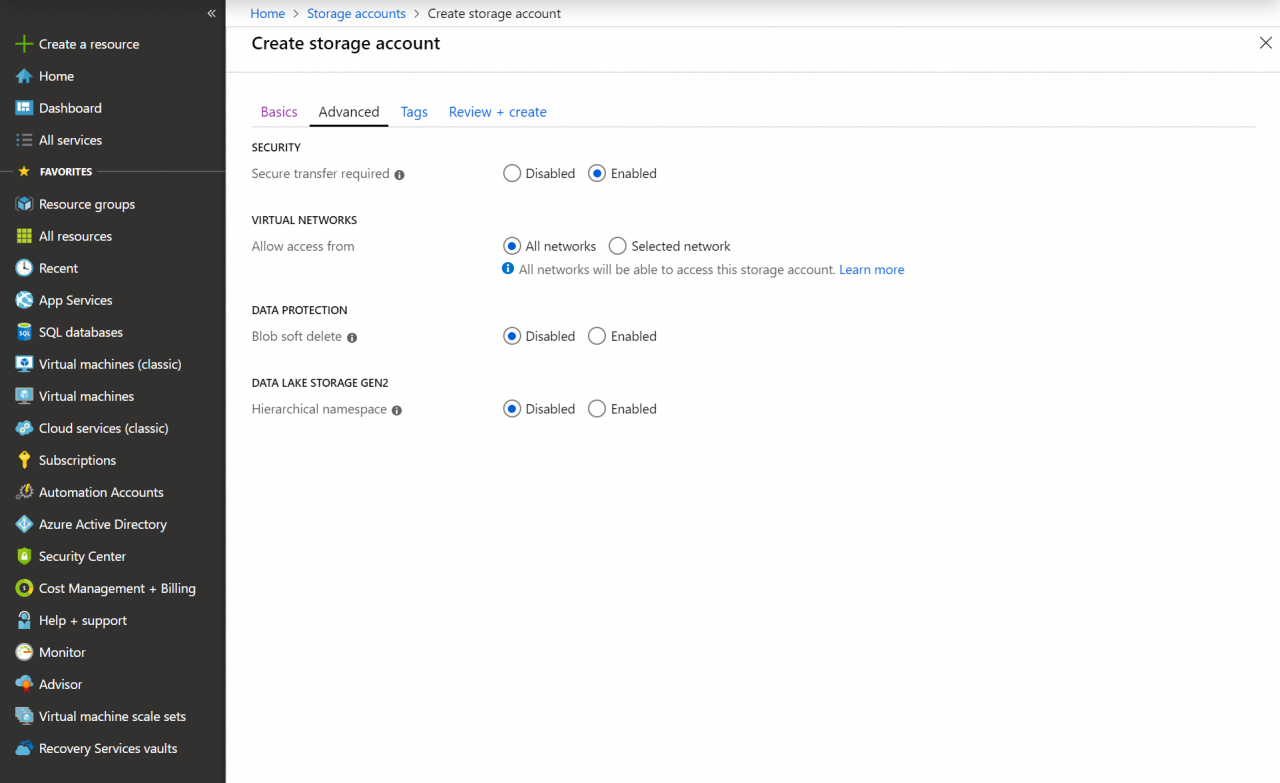
- Click Next: Advanced > to continue.
- On the Advanced tab, check the settings meet your requirements and then click Review + create.
- Azure will run a validation check on your chosen settings. Click Create to finish the process.
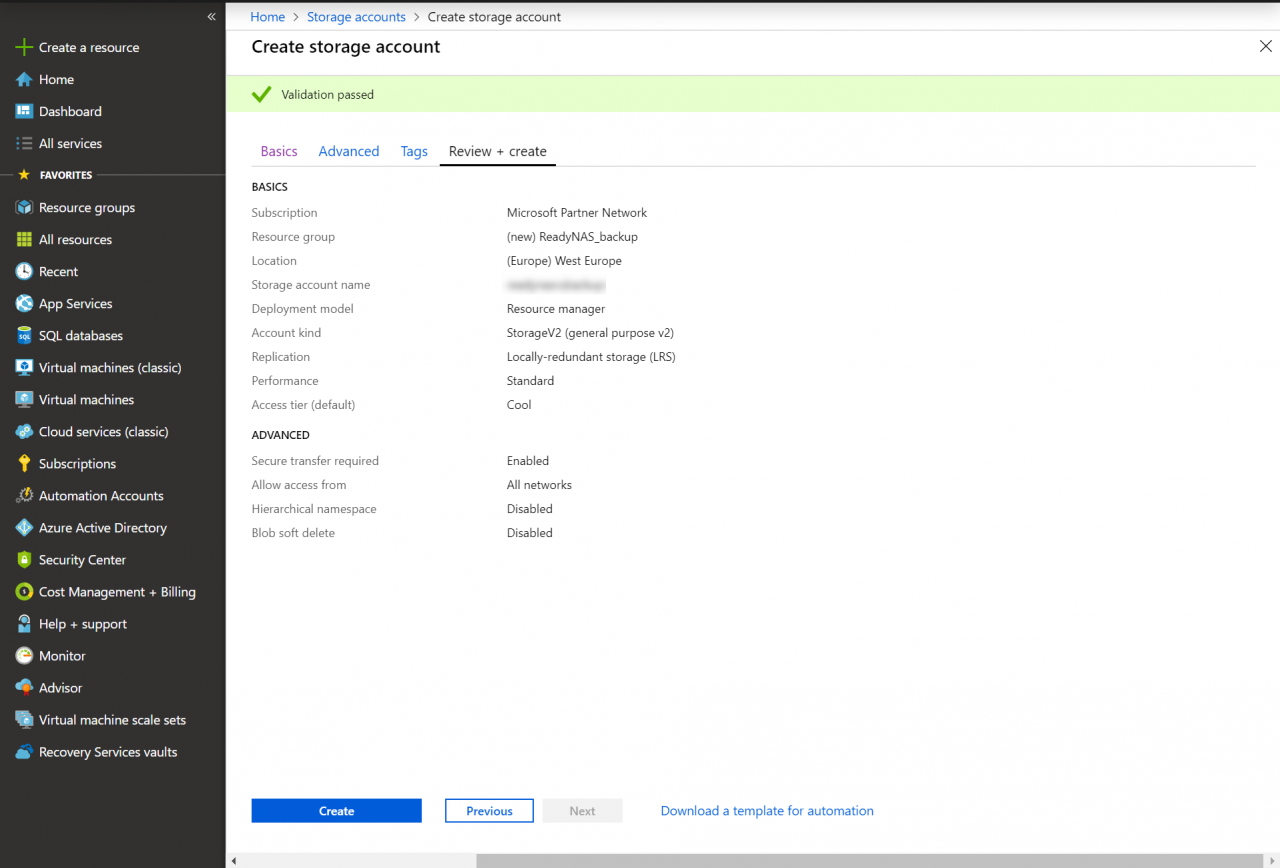
Creating the new storage account will take a few minutes. You should see a notification in the top right of the management portal when the account is ready to use.
Get the Access Key for the Azure Storage Account
To link your NAS to the Azure storage account, you will need the account’s access key.
- Under Your deployment is complete, click Go to resource.
- On the storage account page, click Access keys under Settings.
- Under key1, click the blue copy icon to the right of the Key field to copy the access key.
Set Up a NAS Device to Synchronize to Azure Storage
In this example, I’m going to back up a Netgear ReadyNAS to Azure. Other NAS devices may or may not support back up to Azure. You will need to check before buying or determine whether there is an app for your NAS that supports back up to Azure if there’s no built-in Azure backup support. It’s worth noting that the built-in Azure support in ReadyNAS devices is synchronization rather than backup but you can configure it to upload local storage changes only.
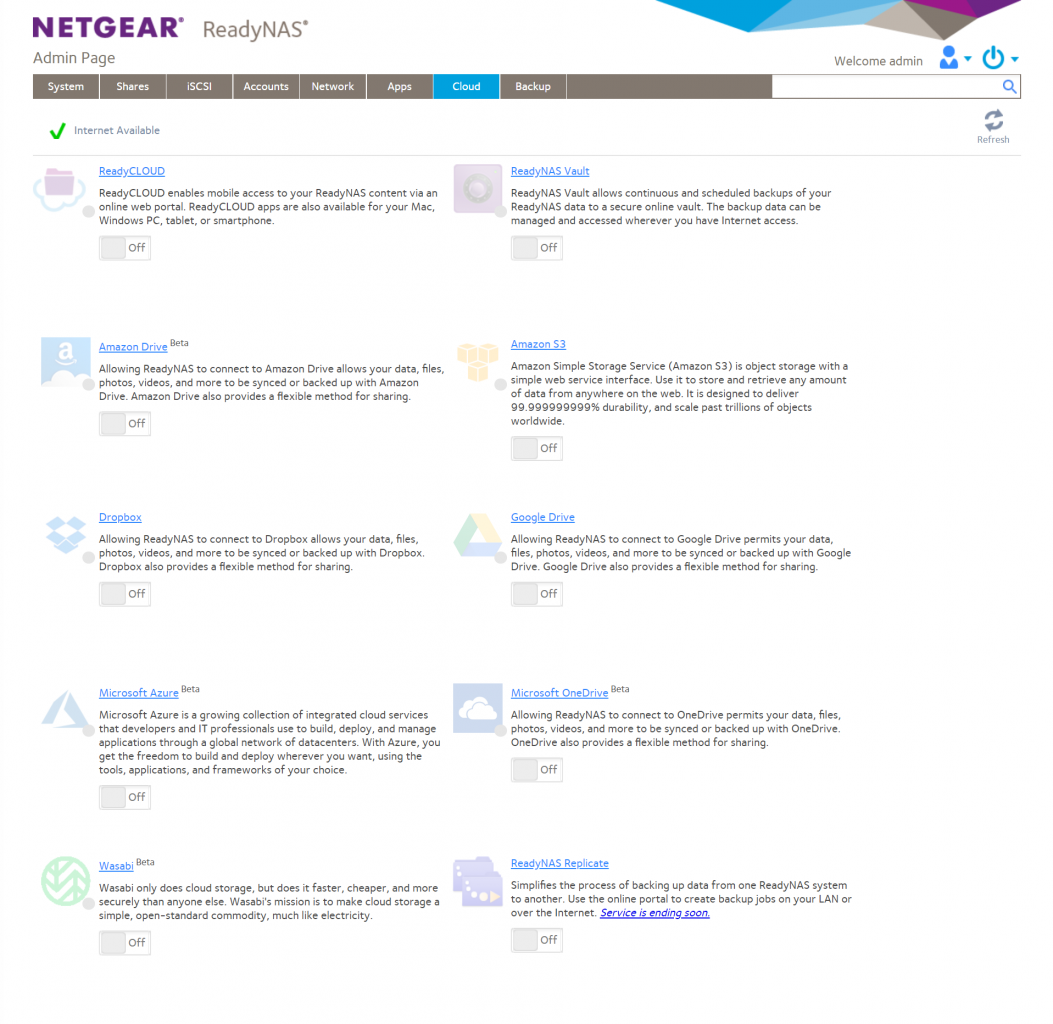
- Log in to the admin page for your ReadyNAS.
- Switch to the Cloud
- Find Microsoft Azure in the list of services and toggle it to On.
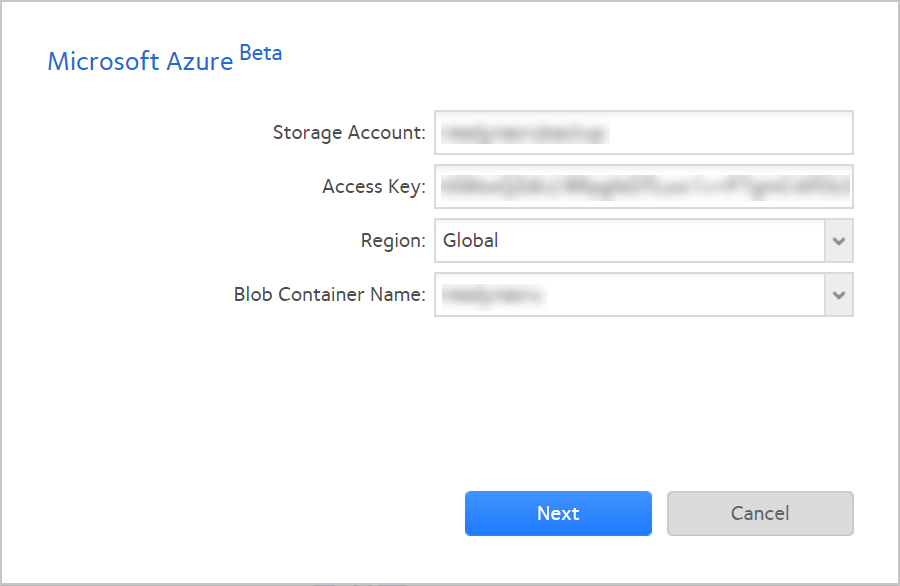
- In the popup dialog, enter the Azure storage account name and access key in the respective fields.
- Set the Region to Global using the dropdown menu.
- Click the dropdown menu to the right of the Blob Container Name field and then select Create a new Blob container.
- In the New Blob Container dialog, enter a name for the new blob and then click Create.
- Click Next in the Microsoft Azure dialog.
- If you want to configure any upload or download speed limits, you can set them here. If not, click Create.
- In the Microsoft Azure – Session dialog, choose a local folder that you want to back up to Azure using the Browse Note that you cannot back up the entire NAS in one session. You must create separate sessions for each folder that you want to back up.
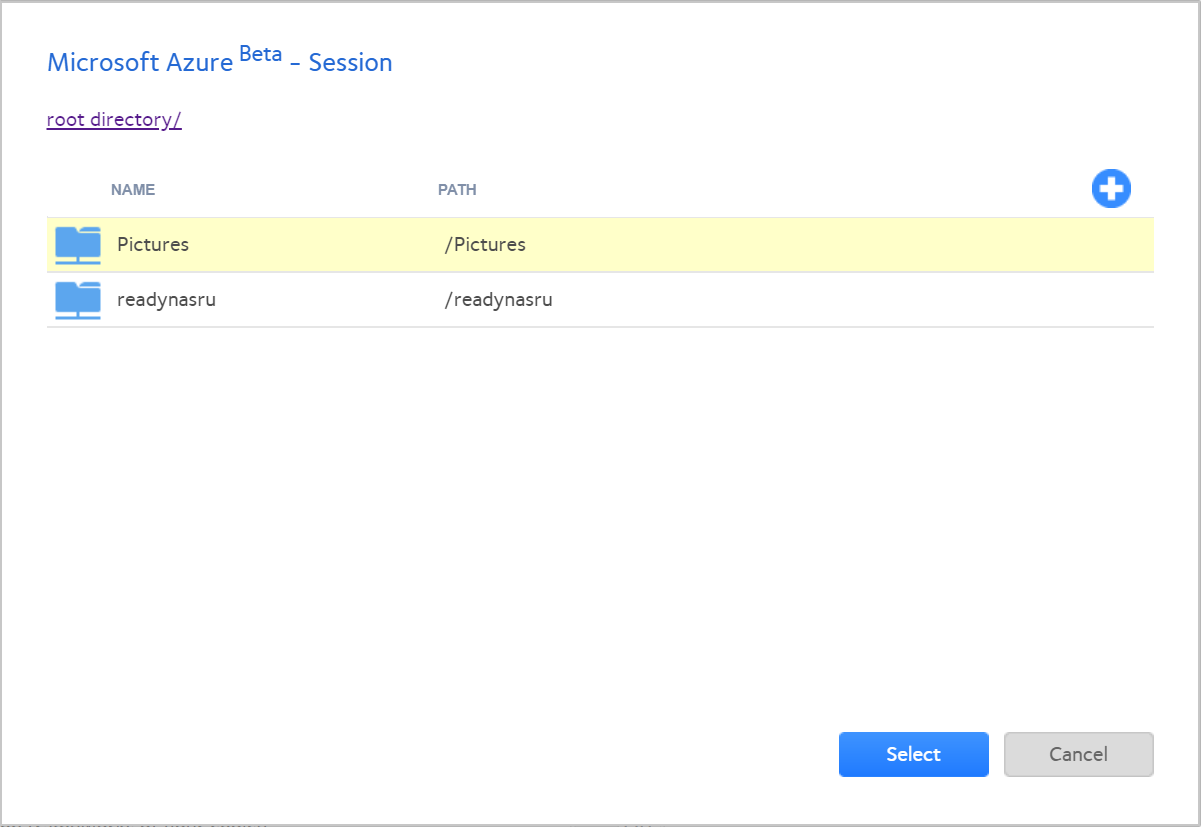
- Now click the Browse button to the right of Cloud Storage Path.
- In the new dialog window, click the + button to the right to add a new folder.
- Type a name for the new folder in the New Folder dialog and click Create.
- In the Session dialog, select the new folder and then click Select.
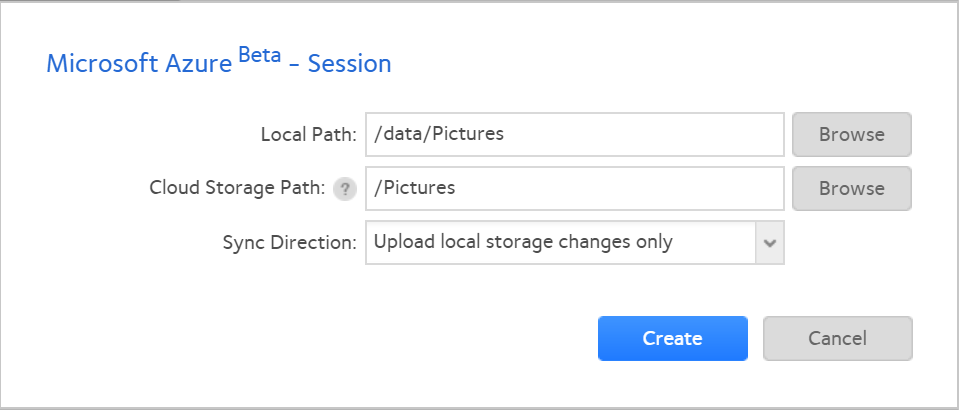
- Finally, select Upload local storage changes only from the Sync Direction dropdown to make sure changes in the cloud are not synchronized back to the NAS.
- Click Create to add the new session.
And that’s it! If you want to add sessions or modify the existing session(s), click Settings under Microsoft Azure on the Cloud tab.
Synchronization is not Backup
While the built-in support for Azure in ReadyNAS isn’t a proper backup solution, you could configure synchronization to Azure storage and then periodically create snapshots of your blob using PowerShell and Azure Automation so that if files are accidentally deleted from the NAS, they can be restored from a blob snapshot.
Related Article: