


How can I configure RPC over HTTP/S on Exchange 2003 (single server scenario)?
RPC over HTTP/S is a cool method for connecting your Outlook 2003 client to the corporate Exchange Server 2003 from the Internet or WAN, without the need to establish a VPN session to the corporate LAN and/or needing to open many ports on your corporate firewall. The only ports you’ll need to open on your firewall are TCP 80 and, if using SSL, TCP 443.
Note: This procedure is not required on SBS and that SBS fully configures Exchange for RPC over HTTPS and also provides instructions to connect an Outlook client on the ‘Configure Outlook over the internet’ link on RWW https://sbs/remote.
Note: While RPC over HTTP does not require SSL, you must modify the registry to enable RPC over HTTP if you do not want to use SSL. This is why I’ve used the term “RPC over HTTP/S” in this set of articles.
Basically, there are 2 configurations possible when configuring RPC over HTTP/S:
- Multiple servers – In this scenario, you have multiple servers in your organization. These servers are configured to function as Domain Controllers, Global Catalog servers, Exchange front-end servers, Exchange back-end servers, and RPC proxy servers. See Exchange Server 2003 RPC over HTTP Deployment Scenarios

- Single server – In this scenario, you have only one server that is configured to function as a Domain Controller, a Global Catalog, an Exchange computer, and an RPC proxy server. This article discusses the single-server configuration in detail.
MS KB 833401 has more info, but as always, I’ve written an article in order to make the configuration process easier, as the original KB tends to be too technical.
Outline
When configuring RPC over HTTP/S, you must follow these steps:
- Verify that your server computer and your client computer meet the requirements to use RPC over HTTP/S.
- Configure Exchange to use RPC over HTTP/S.
- Configure the RPC virtual directory in Internet Information Services.
- Configure the RPC proxy server to use specific ports.
- Configure your client computers to use RPC over HTTP/S (see Configure Outlook 2003 to use RPC over HTTP/S for more information).
Requirements to use RPC over HTTP/S
To use RPC over HTTP/S, your computers must meet the following requirements.
Server requirements
RPC over HTTP/S requires Windows Server 2003 and Exchange Server 2003. RPC over HTTP/S also requires Windows Server 2003 in a Global Catalog role.
Client requirements
- The client computer must be running Microsoft Windows XP Professional Service Pack 1 (SP1) or later.
If you’re running SP1, you must install the following update package:
Outlook 2003 Performs Slowly or Stops Responding When Connected to Exchange Server 2003 Through HTTP – 331320![]()
If you have installed Windows XP SP2, you do NOT have to install the update package. You can also run Windows Server 2003 as the client operating system.
- The client computer must be running Microsoft Office Outlook 2003.
Recommendations
Here are some of Microsoft’s (and my) recommendations when using Exchange with RPC over HTTP:
- Use basic authentication over Secure Sockets Layer (SSL) – You should enable and require the use of SSL on the RPC proxy server for all client-to-server communications.
- Use an advanced firewall server on the perimeter network – A dedicated firewall server is recommended to help enhance the security of your Exchange computer. Microsoft Internet Security and Acceleration (ISA) Server 2000 is an example of a dedicated firewall server product.
- Obtain a certificate from a third-party certification authority (CA) – When using the Basic Authentication you MUST use an SSL-based connection, and you will have to configure a Digital Certificate for your Default Website. Read Configure SSL on Your Website with IIS for more on this issue.A Digital Certificate needs to be obtained from a CA (Certification Authority), either a 3rd-party commercial CA such as Verisign, Thawte and others, or from an internal CA.Windows 2000/2003 has a built-in CA that can be installed and used, however, when issuing a Digital Certificate from your internal CA you MUST be 100% sure that the client computers that are going to connect to the server are properly configured to trust this CA.Most operating systems are pre-configured to trust known 3rd-party CAs such as Verisign, Thawte and others. However unless these computers are made members of the Active Directory domain where you’ve installed your CA, they will NOT automatically trust your internal CA, and thus your connection will fail! In these scenarios, when a user tries to connect by using RPC over HTTP/S, that user loses the connection to Exchange and is NOT notified.In such scenarios you must import the ROOT CA Digital Certificate into the client computers in order to make them trust your CA.When using 3rd-party trusted CAs, in most cases you won’t be required to import anything to the client computers, however you will be required to pay a few hundred dollars for such a Digital Certificate.
Additionally, if you use your own certification authority, when you issue a certificate to your RPC proxy server, you must make sure that the Common Name field or the Issued to field on that certificate contains the same name as the URL of the RPC proxy server that is available on the Internet.
Configure the Exchange computer to use RPC over HTTP/S
The RPC proxy server processes the Outlook 2003 RPC requests that arrive from the Internet. To successfully process RPC over HTTP requests, you must install the Windows Server 2003 RPC over HTTP Proxy networking component on your Exchange computer.
Note: The RPC Proxy component does not have to be installed on the Exchange server. It can in fact be installed on a totally different server. In this article we’ll ignore these possibilities and concentrate on the single server scenario.
To install this component, follow these steps:
- On the Exchange Server 2003 computer that is running Windows Server 2003, click Start, point to Control Panel, and then click Add or Remove Programs.
- Click Add Remove Windows Components, click Networking Services, and then click Details.
- Click to select the RPC over HTTP Proxy check box, click OK, and then click Next. Note that you must have either the Windows Server 2003 installation CD ready, or the i386 folder from that CD accessible while installing this component.
- When Windows Component Wizard has completed configuring components, click Finish.
Configure the RPC virtual directory in Internet Information Services
After you configure the Exchange computer to use RPC over HTTP/S, you must configure the RPC virtual directory in Internet Information Services (IIS).
To do this, follow these steps:
- Click Start, point to Administrative Tools, and then click Internet Information Services (IIS) Manager.
- Expand servername (local computer), expand Web Sites, expand Default Web Site, right-click Rpc, and then click Properties.
Note: Windows Server 2003 Service Pack 1 (SP1) adds a new virtual directory called RpcWithCert. This virtual directory points to the same location as the Rpc virtual directory. You do NOT need to modify this virtual directory.
- Click the Directory Security tab, and then click Edit under Authentication and access control.

- Click to clear the Enable anonymous access check box.
- Click to select the Basic authentication (password is sent in clear text) check box.
You receive the following message:
The authentication option you have selected results in passwords being transmitted over the network without data encryption. Someone attempting to compromise your system security could use a protocol analyzer to examine user passwords during the authentication process. For more detail on user authentication, consult the online help. This warning does not apply to HTTPS(orSSL) connections. Are you sure you want to continue?
Click Yes
- I recommend entering the domain name in the Default Domain box (you can press Select to browse to the domain name).
- Click OK.
- Click Apply, and then click OK.
The RPC virtual directory is now configured to use basic authentication. As stated in the Recommendations section of this article, you must configure SSL on your RPC Proxy server (i.e. on your single server). To enable SSL on the RPC virtual directory you must obtain and publish a certificate. Follow the guidelines on the Configure SSL on Your Website with IIS article for more info on this issue (This procedure assumes that you have obtained and published certificate).
After setting up a Digital Certificate for the Default Website you will need to configure the RPC virtual directory to require SSL for all client-side connections.
To configure the RPC virtual directory to require SSL for all client-side connections, follow these steps:
- In Internet Information Services (IIS) Manager expand Web Sites, expand Default Web Site, right-click Rpc, and then click Properties.
- Click the Directory Security tab, and then click Edit under Secure communications.

- Click to select the Require secure channel (SSL) check box and the Require 128-bit encryption check box.
- Click OK, click Apply, and then click Ok.
Configure the RPC proxy server to use specific ports
After you configure the RPC over HTTP networking component for Internet Information Services, configure the RPC proxy server. Configure the RPC proxy server to use specific ports to communicate with the directory service and with the information store on the Exchange computer.
| Warning! |
| This document contains instructions for editing the registry. If you make any error while editing the registry, you can potentially cause Windows to fail or be unable to boot, requiring you to reinstall Windows. Edit the registry at your own risk. Always back up the registry before making any changes. If you do not feel comfortable editing the registry, do not attempt these instructions. Instead, seek the help of a trained computer specialist. |
Tip: Instead of manually editing the registry, reader Harry Bates has most cleverly designed a small utility that will allow you to perform all these changes by pressing a couple of buttons. The tool is called RPCNoFrontEnd (19kb).
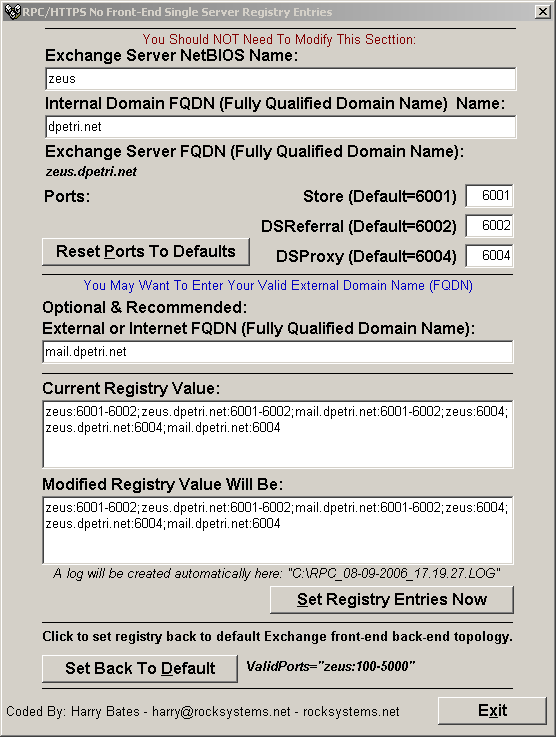
Run the tool on your Exchange server, input the server’s names and you’re done! Thanks Harry!
If you’ve used the above tool you no longer need to perform any manual registry changes and you can safely skip the rest of this guide till the Global Catalog configuration section below.
However, if you’re still interested to know what’s going on for your information, here are the required changes and information:
No action required – for your information only!
When you run Exchange Server 2003 Setup, Exchange is configured to use the ports in the following table:
| Server | Port | Service |
| Exchange Server (Global Catalog) | 6001 | Store |
| 6002 | DSReferral | |
| 6004 | DSProxy |
The three registry values that follow are automatically configured by Exchange Server 2003 Setup. Although you do not have to configure these registry values, you might want to verify that these registry values are configured correctly.
HKEY_LOCAL_MACHINE\System\CurrentControlSet\Services\MSExchangeIS\ParametersSystem
Value name: Rpc/HTTP Port
Value type: REG_DWORD
Value data: 0x1771 (Decimal 6001)
HKEY_LOCAL_MACHINE\System\CurrentControlSet\Services\MSExchangeSA\Parameters
Value name: HTTP Port
Value type: REG_DWORD
Value data: 0x1772 (Decimal 6002)
HKEY_LOCAL_MACHINE\System\CurrentControlSet\Services\MSExchangeSA\Parameters
Value name: Rpc/HTTP NSPI Port
Value type: REG_DWORD
Value data: 0x1774 (Decimal 6004)
Do NOT modify these registry values. Just make sure they exist. Action required – configure the RPC proxy server to use specific ports
To configure the RPC proxy server to use specific ports, follow these steps.
- On the RPC proxy server (i.e. your Exchange server – this is a single server scenario), start Registry Editor.
- Locate and then click the following registry subkey:
HKEY_LOCAL_MACHINE\SOFTWARE\Microsoft\Rpc\RpcProxy
- In the right pane, right-click ValidPorts, and then click Modify.
Note: The default value for the ValidPorts key is:
ServerNETBIOSName:100-5000
Where ServerNetBIOSName is the NetBIOS name of your server.
- Remove all the information from the Value data box, and then type the following information:
ServerNETBIOSName:6001-6002;ServerFQDN:6001-6002;ServerNetBIOSName:6004;ServerFQDN:6004
Replace ServerNetBIOSName with the NetBIOS name of your server. Replace ServerFQDN with the fully qualified domain name (FQDN) of your server.
Note: The above text is ONE LONG LINE. Copy and paste it into Notepad, and edit it there. Once done, copy it from Notepad and enter it in the Registry editor.
Note: This is the part where most administrators fail. Take a look at the following table and enter the correct values based upon this example:
| Role | Names | ||
| Windows Server 2003 SP1 + Exchange 2003 SP1 + DC, FSMO, GC + RPC Proxy | NetBIOS name:zeus | FQDN – Internal:zeus.dpetri.net (this is just an example, the name is bogus) |
FQDN – External:mail.dpetri.net (this is just an example, the name is bogus) |
Note: In the above table I’ve used the same domain name internally as externally (dpetri.net). This is NOT a best practice, as one SHOULD keep these two domain names separate, mostly for security and DNS issues. For example, if I would have to re-write this guide, I’d probably use dpetri.local for the internal domain name, and dpetri.net externally.
Text to enter in the registry:
zeus:6001-6002;mail.dpetri.net:6001-6002;zeus:6004;mail.dpetri.net:6004
Note: Some guides and articles instruct you to also add the external FQDN of the RPC Proxy, i.e. the FQDN used to access the server from the Internet. For example, in the above scenario, you should use:
zeus:6001-6002;zeus.dpetri.net:6001-6002;mail.dpetri.net:6001-6002;zeus:6004;zeus.dpetri.net:6004;mail.dpetri.net:6004
I’ve experimented with both settings, both work. To be on the safe side I’d recommend using the longer version.
- Click OK, and then quit Registry Editor.
Note: You can also use the Rpccfg tool to set and to troubleshoot port assignments. The Rpccfg tool is included in the Windows Server 2003 Resource Kit tools (Download Windows 2003 Reskit Tools):
C:\WINDOWS\rpccfg /hd Server Name Port Settings --------------------------------------------------------- mail.dpetri.net 6001-6002 6004 zeus 6001-6002 6004 zeus.dpetri.net 6001-6002 6004
Configure all your global catalogs to use specific ports for RPC over HTTP for directory services
Exchange Server 2003 Service Pack 1 note: Exchange Server 2003 Service Pack 1 has a new built-in RPC over HTTP/S GUI setting on the Exchange Server properties page in Exchange System Manager. If you configure the RPC over HTTP/S option from the GUI, there is NOT need to make any manual changes in the Registry.
To make the changes via the GUI follow these steps:
- Click Start, point to Microsoft Exchange, and then click System Manager.
- Expand your organization, expand Administrative Groups > First Administrative Group > Servers.
- Right-click on your server name and select Properties.
- On the General tab, verify that you have SP1 installed. Verify that a tab called RPC-HTTP is present.
- On the RPC-HTTP tab, click on RPC-HTTP Back-End Server.

You might get an error:
Exchange System Manager There is no RPC-HTTP front-end in your Exchange organization. There must be at least one RPC-HTTP front-end server in the organization before the RPC-HTTP back-end server can be accessed.
Acknowledge the error.
- Click Ok all the way out.
- You need to reboot your server for the settings to take place.
If you did not install Exchange Server 2003 SP1, or if you did not configure the RPC over HTTP/S option from the GUI, then you MUST manually perform the changes in the Registry.
To do this, follow these steps:
- Start Registry Editor.
- Locate and then click the following registry subkey:
HKEY_LOCAL_MACHINE\SYSTEM\CurrentControlSet\Services\NTDS\Parameters
On the Edit menu, point to New, and then click Multi-String Value.
Note Make sure that you select the correct value type for the registry subkey. If the registry subkey type is set to anything other than Multi-String Value, you may experience problems.
- Name the new registry value NSPI interface protocol sequences.
- Right-click NSPI interface protocol sequences, and then click Modify.
- In the Value data box, type
ncacn_http:6004
and then click OK.
- Quit Registry Editor, and then restart the computer.
Configure the Outlook 2003 computer to use RPC over HTTP/S
You must now configure a client computer that meets the requirements specified at the beginning of this article to use RPC over HTTP/S.
Follow the instructions found in the Configure Outlook 2003 to use RPC over HTTP/S article.
Test the RPC over HTTP/S connection
Next, the natural step is to test your configuration. Testing can be done on the LAN or on the WAN.
Follow the instructions found in the Testing RPC over HTTP/S Connection article.

If a successful connection is made then you can start deploying your Outlook clients and begin using RPC over HTTP/S.
Related articles
You may find these related articles of interest to you:
- Configure Outlook 2003 to use RPC over HTTP/S
- RPC over HTTP/S Error 401.3 after Windows 2003 SP1
- Testing RPC over HTTP/S Connection
Links
Exchange Server 2003 RPC over HTTP Deployment Scenarios![]()
How to configure RPC over HTTP on a single server in Exchange Server 2003 – 833401![]()
RPC over HTTP Security![]()
RPC over HTTP Deployment Recommendations![]()