


Deploying Windows Server 2016 Containers Using Azure and Docker

In today’s Ask the Admin, I’ll show you how to work with containers in Windows Server 2016. More specifically, I will show you how to use an image from the Azure gallery that has the Windows Containers feature. It also has a ready-to-use Server Core along with Nano Server Docker images already installed.
Docker is a system for managing containers. This technology was borrowed from Unix-based operating systems and is now included in Windows Server 2016 in the form of Windows Containers. For more information on Docker and Windows Containers, see What is Docker? and Are Docker Containers Better than VMs? on the Petri IT Knowledgebase.
The instructions in the article show you how to work with Windows Containers and Docker in an Azure Windows Server 2016 image. It has also been pre-configured to get you started quickly. If you’d like to configure Windows Containers and Docker engine yourself in Windows Server, see First Steps: Docker and Containers in Windows Server 2016 on Petri.
Provision Windows Server 2016 with Containers in Azure
Before continuing, you’ll need an Azure account. If you don’t already have one, sign up for a free 30-day trial here.
- Log in to the Azure management portal here.
- In the list of options on the far left, click Virtual Machines.
- In the Compute panel, type windows containers into the search field at the top.
- Select Windows Server 2016 Datacenter – with Containers from the results.
- On the Windows Server 2016 Datacenter – with Containers panel, make sure that Resource Manager is selected in the Select a Deployment Model drop-down menu. You will need to click Create to deploy the VM.

- On the Create Virtual Machine panel, make sure that Basics is selected. Give the new VM a name on the Basics panel in the Name field.
- Set a username for the VM’s administrator account in the User field. You will need to type and confirm a password for the account.
- In the Resource Group field, make sure that Create new is checked, and type a name for the new Resource Group.
- Change the Location using the drop-down menu, if required.
- Click OK.
- In the Choose a size panel set a size for the new VM. I would select A1 Standard to keep costs down. Click Select at the bottom of the panel.
- In the Settings panel, under Storage, set Use Managed Disks to Yes.
For more information on using Managed Disks, see What Are Azure Managed Disks? on Petri.
- Click OK at the bottom of the Settings panel.
- Click OK at the bottom of the Summary panel to deploy the VM.
Connect to the VM Using RDP
Once the VM has been deployed, the VM’s configuration panel will automatically open in the management portal.
- In the Virtual Machine panel, click Connect to open an RDP session to the VM.
- Save the RDP file to your PC and open it.
- Click Connect in the Remote Desktop Connection dialog box.
- Enter the admin username and password for the VM in the Windows Security dialog box and click OK.
- In the Remote Desktop Connection dialog, check Don’t ask me again for connections to this computer. Then click Yes to verify that you want to connect to the VM even though its identity can’t be verified.
- In the Remote Desktop window, open a PowerShell prompt by clicking the Windows PowerShell tile on the Start menu.
Create a Windows Container Using Docker
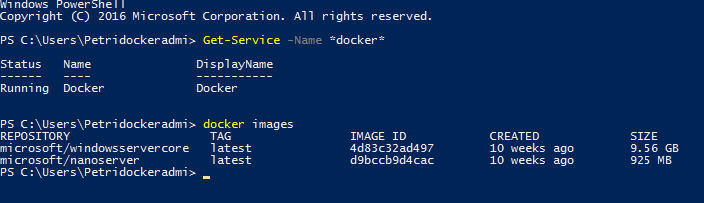
In the PowerShell console in Windows Server 2016, type docker images and press ENTER to see the list of pre-installed images. You’ll see there are two images, one for Windows Server Core and another for Nano Server.
Let’s create a new container based on Windows Server Core:
docker run -it --name testcontainer microsoft/windowsservercore cmd
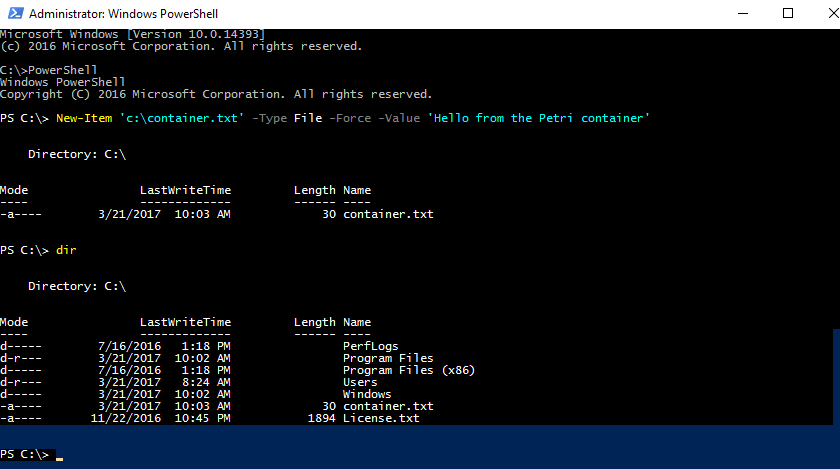
A command prompt will now replace the PowerShell console. Notice how the prompt changes color, and the directory changes to C:\, which is the root of the system drive in the container. Anything you run in the command prompt now is in action in the container, not the host server. Let’s prove it by writing a file to the container. Switch to PowerShell and use the New-Item cmdlet to create a file as shown here:
PowerShell
New-Item 'c:\container.txt' -Type File -Force -Value 'Hello from the Petri container'
Now run type dir and press ENTER to see a list of files in the c:\ directory. You’ll see container.txt in the list.
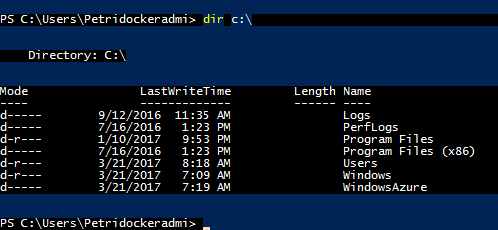
Let’s exit the container. You’ll need to type exit and press ENTER twice. The first exit quits the PowerShell session in the container, the second returns you to the host server’s command prompt. Now type dir c:\ and press ENTER to list the files in the root of the server’s system drive. Notice that container.txt is missing because it’s only present in the Petri container.
To see the list of containers on the server and their status, type docker ps -a –no-trunc and press ENTER. Containers can be stopped and started by name or ID as shown below:
docker stop 2a2d11a0bc53
docker start petricontainer
In this article, I showed you how to quickly get up and running with Containers in Windows Server 2016.