


Customize a New XP Installation
How can I customize a new Windows XP installation?
When installing a brand new Windows XP Pro computer (read my Install Windows XP Pro page) I end up making many changes to its interface and some of its interior settings.
Some of these changes are for made for performance reasons while others are purely visual and made only for my convenience.
Some of these tips can be easily modified without the need to go into registry changes. For example, in order to disable the "Windows XP Tour" you can simply click on "Cancel" when it first pops up. However, if you want to disable this "feature" for all users on the workstation, or would like to disable if for many computers, you will need to programmatically do it.
Either way, here are some of the steps I take to customize my own XP machine. I did not list ALL available tweaks or changes, I just wrote about the ones that I use the most and that help me get a better working experience with my own XP machine.
BTW, some settings will also work on W2K and Windows 2003.
You might also want to read Free Tweaking Tools for more info.
Get rid of the Tour prompt
The "Take Tour of Windows XP" prompt can drive you mad.
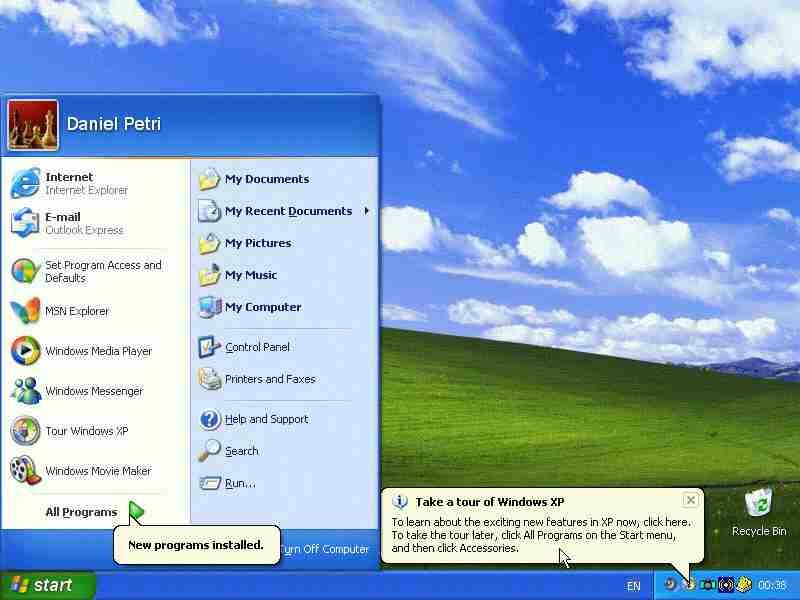
To disable it follow the next steps:
-
Open the registry editor and go to
HKEY_CURRENT_USER\Software\Microsoft\Windows\CurrentVersion\Applets\Tour
-
Create a new value with the name of
RunCount
Data Type: REG_DWORD
-
Give it a value of 0
P.S: You can download THIS file, unzip it and double click the .REG file found inside.
Get rid of the MSN Passport creation prompt
Windows XP can drive you nuts with the idiotic Passport reminder balloon. If you don’t use Microsoft Messenger for your IM needs, or use a different client (see Replace Windows/MSN Messenger for some examples) then you might want to disable that reminder.
![]()
-
Start Registry Editor (Regedit.exe).
Note: As always, before making changes to your registry you should always make sure you have a valid backup. In cases where you’re supposed to delete or modify keys or values from the registry it is possible to first export that key or value(s) to a .REG file before performing the changes.
-
Locate the following key in the registry:
HKEY_LOCAL_MACHINE\SOFTWARE\Microsoft\MessengerService
-
On the Edit menu, click Add Value, and then add the following registry value:
Value Name: PassportBalloon Value Type: REG_BINARY Data: 0a (hexadecimal)
Note: 0a as in "zero a" not "oh a"…
-
Close the registry editor.
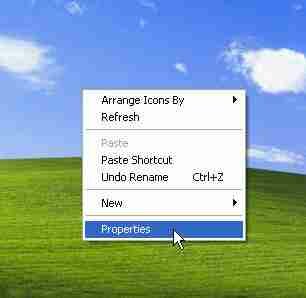
Restore my Desktop icons!
XP hides you regular desktop icons. I don’t know why, but some sick mind in Seattle thought that a desktop without Internet Explorer, My Computer, My Documents and the My Network Places icons looks nicer.
I don’t.
So I want to get them back.
Follow the next steps:
-
Right-click an empty space on your desktop. Choose Properties.
-
In the Display Properties window go to the Desktop tab and click the Customize Desktop button.
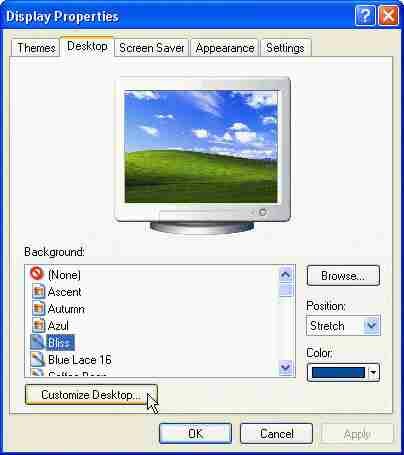
-
In the Desktop Icons section click to select all the icons you want.

-
Click Ok all the way out.
-
Your icons are back.

Copy the I386 source folder to your HD and change the source path
If you installed XP from your CD then whenever it needs a source file (such as when you add an un-installed feature) it will ask you for the CD. You can make life easier if you just copy the I386 source folder from the CD to a partition on your HD.
Follow the next steps:
-
Open Windows Explorer and navigate to the I386 folder on your installation CD (make sure it’s in the drive you moron!).
-
Right click the I386 folder and choose Copy.

-
Browse to the partition where you want to copy the files to. I use C:\
-
Right click the destination partition or folder and select Paste.

Let it finish to copying process. The folder is approximately 482mb in size (can differ depending on your SP version – read the Windows 2000/XP SP Slipstreaming page for more info).

-
Download THIS zipped file. Extract it and run the enclosed VB script. The script (written by Bill James) will let you change the default path where XP looks for the I386 folder from the original location on the CD to the new destination folder.
![]()
![]()
Done!
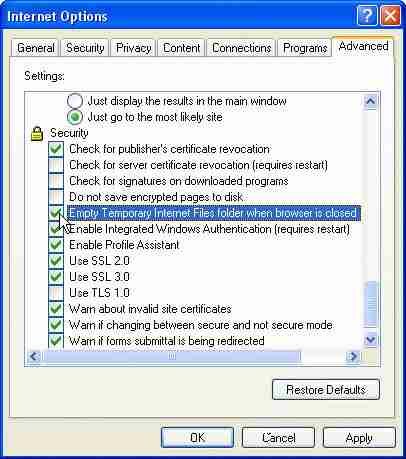
Delete Temporary Internet Files (and make the temporary storage space smaller)
By default, IE uses a lot of storage space for temporary Internet files. Today, with the availability of broadband connections, storing old and cached content is not a must as it was in the old modem-days. Make that folder smaller. Also, we want to clear up the content of the folder each time we close XP, just to make things right.
Follow the next steps:
-
Right-click Internet Explorer on the desktop and choose Properties.
-
In the General tab , in the Temporary Internet Files section click Settings.
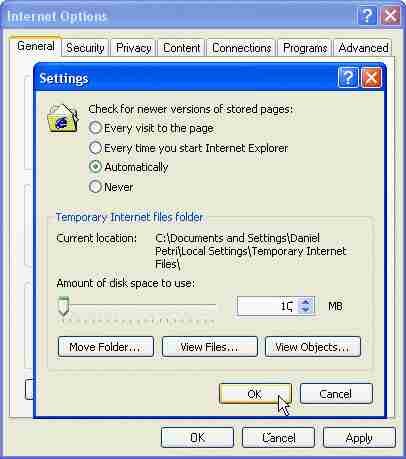
-
In the Amount of disk space to use enter the number 10 (for 10mb, you can make it smaller or larger if you want). No need to use 600mb…
-
Click Ok.
-
Go to the Advanced tab and look for the Empty Temporary Internet Files check-box. Mark it.
-
Click Ok all the way out.
Configure IE to download more than 2 concurrent files
IE 6 has a nasty habit of preventing us from downloading more than 2 files at once. Sounds idiotic? Believe it or not, it’s true! To configure IE to allow up to 10 simultaneous downloads (it only allows 2 at a time) do the following:
-
Open Registry Editor.
-
In Registry Editor, navigate to the following registry key:
HKEY_CURRENT_USER\Software\Microsoft\Windows\CurrentVersion\Internet Settings
-
On the Edit menu, click Add Value, and then add the following registry value:
"MaxConnectionsPer1_0Server"=Dword:0000000a "MaxConnectionsPerServer"=Dword:0000000a
You can change 0000000a to any other value as long as it’s hexadecimal.
-
Close the registry editor.
Download THIS zipped file and double click it’s contents to merge it to your registry. The file will allow for a maximum of 10 simultaneous downloads.
Configure a larger number for the grouping of Taskbar buttons
XP will group similar opened windows into one nested Taskbar buttons. This can be quite annoying when you have multiple windows and you want to easily see which windows you need to work with.
![]()
To change this behavior run THIS VBS script (written by Doug Knox – see other great scripts HERE). Unzip the file and run the included script. Enter the number of windows that you want XP to group.
![]()
Any number below what you enter will remain as separate Taskbar buttons, just the way we want.
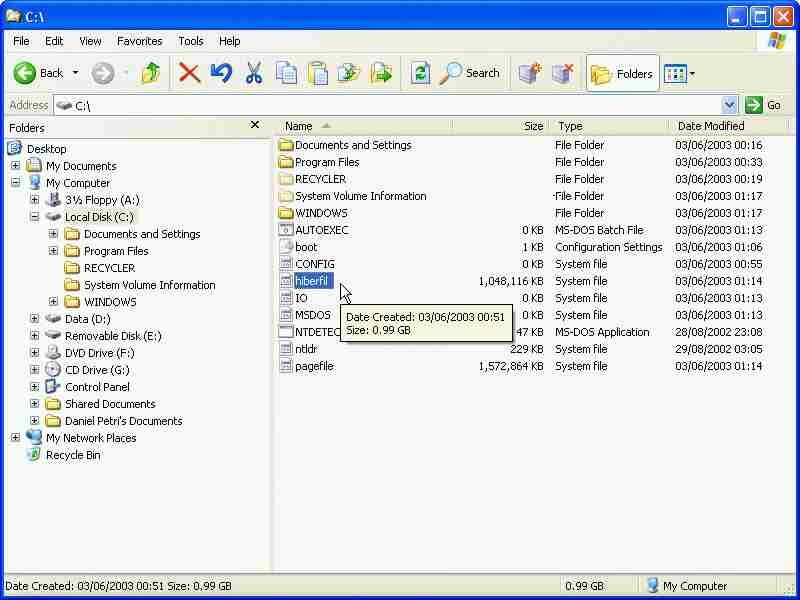
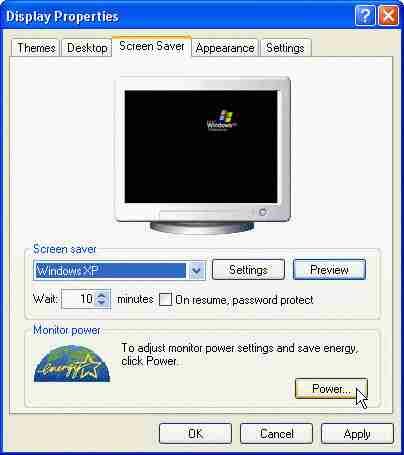
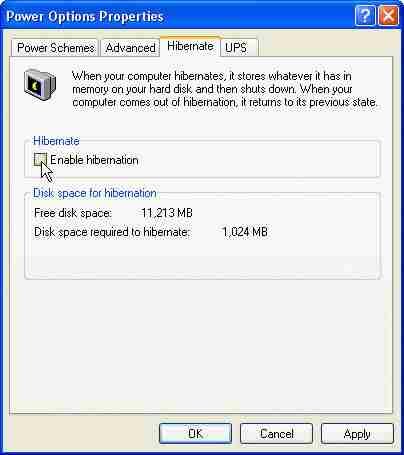
Get rid of the Hibernation support
XP auto-enables hibernation support on your machine. Although this might be a good thing on a portable computer, you do NOT need it on a desktop machine. Furthermore, a very large file called HIBERFIL will take a lot of space on your system partition (as big as your installed RAM), and we really don’t need it to be there if we don’t require the hibernation support.
To get rid of the hibernation support follow the next steps:
-
Right-click an empty space on your desktop. Choose Properties.
-
Go to the Screen Saver tab and click the Power button.
-
Un-check the Enable Hibernation check-box.
-
Click Ok all the way out.
-
Notice that the HIBERFIL is gone from the system partition.
Customize Windows Explorer views and buttons
MS thinks that viewing a folder’s contents with super-huge icons is cool. I don’t. MS thinks that it’s cool to only have a few irrelevant buttons on the Explorer’s toolbar. I don’t. MS thinks that you don’t need the Status Bar in Explorer. I do.
To get Windows Explorer to behave the way WE want it follow the next steps:
-
Open My Computer and right-click an empty spot on the Taskbar and select Customize.
![]()
-
In the Customize Toolbar window, select any of the available toolbar buttons.
-
In the Current Toolbar buttons section select the spot where you want the new button to be placed.
-
Click the Add button. You can also drag-and-drop the new button to where you want to place it. You could also try double-clicking the new button to place it on the right-hand pane.
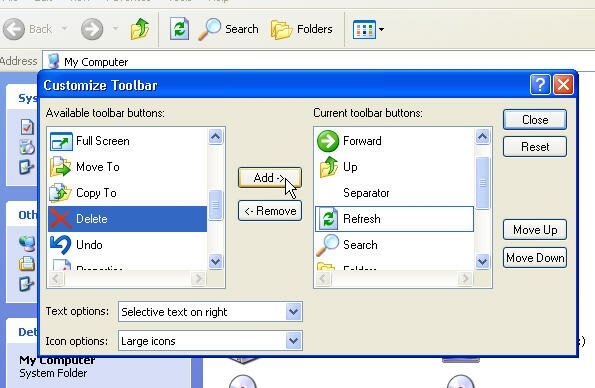
I use the following settings:
![]()
-
When you’re done click Close.
-
You can also move your buttons up or down if you want.
-
Back in the My Computer window, click View and select the Status Bar option.

-
Do NOT close the My Computer window with the top-right-hand X button this time! Go to File and select Close. You only need to do this ONCE, not all the time.
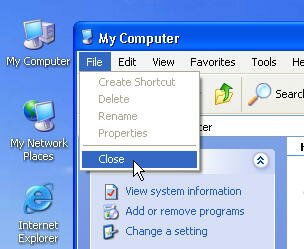
That’s it, your Explorer views are customized.
Add a the Quick Launch toolbar
The Quick Launch toolbar was a good thing. We had it on since Active Desktop in Internet Explorer 4.01, and really got used to it in W2K. I use it all the time. I don’t know why the MS folks thought I didn’t need it anymore. I do.
To get the Quick Launch toolbar follow the next steps:
-
Right-click an empty spot on the Taskbar.
-
In the Toolbars sub-menu select Quick Launch.

To make room for additional icons and shortcuts we need to drag the right-hand side of the Quick Launch toolbar a bit more to the right. But the MS people made clear that wasn’t a good idea, so the locked the Taskbar. We need to un-lock it.
To make the Quick Launch toolbar wider follow the next steps:
-
Right-click an empty spot on the Taskbar.
-
Un-check the Lock Taskbar option.

Notice how the Taskbar becomes a bit wider and that now you can see a small border marked with small black dots that marks the end of the Quick Launch toolbar.
-
Place your mouse pointer on that border, click it and drag it to the right while holding the left mouse button.
![]()
Add a shortcut to Control Panel and the Administrative Tools to the Quick Launch toolbar
Follow the next steps:
-
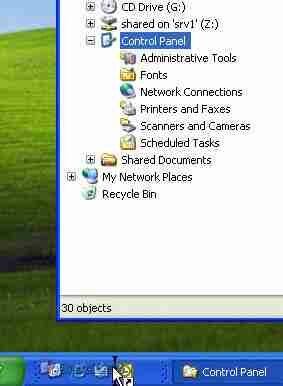
Open My Computer or Windows Explorer. Expand it to show the Control Panel. It should appear under the last Hard disk drive letter icon, or just under the CD drive icon (if you have one).
-
Place your mouse pointer on the Control Panel icon, right-click it and drag it to down the the Quick Launch toolbar, while holding the right mouse button.

-
Make sure you see a small black line BEFORE you let go of the right mouse button. When you do, you will be asked to select to create a shortcut. Do so.

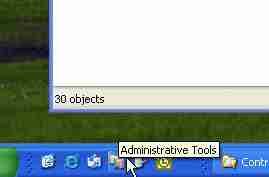
-
Do the same with the Administrative Tools sub-folder. Caution: Do NOT drag the Administrative Tools folder from the Start menu unless you want to get in trouble and lose it…

-
You can add more shortcuts. I usually add the CMD (see next tip) and a Notepad shortcut.
![]()
Add a shortcut to Command Prompt to the Desktop and to the Quick Launch toolbar
I need Command Prompt. I use it all the time. I CAN run it by typing CMD in the Run menu, but I need a faster way.

Follow the next steps:
-
Right-click an empty spot on the desktop and choose New > Shortcut.
-
Type CMD and press Next then Finish. A new shortcut appears on the desktop.
-
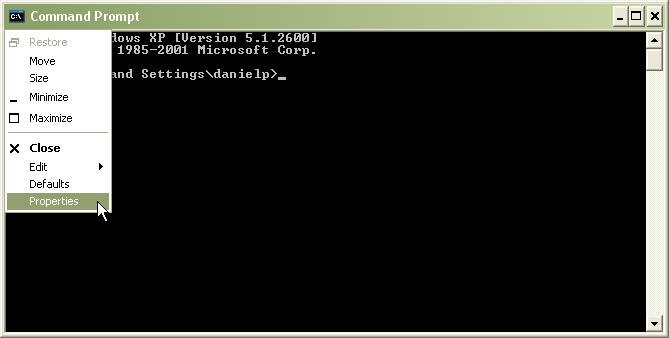
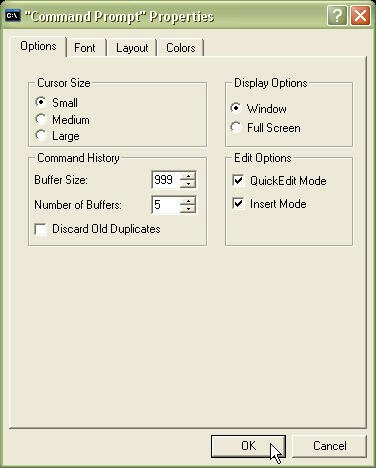
To customize the CMD shortcut right-click it and choose Properties.
-
In the Options tab make sure the QuickEdit mode check-box is selected. NT 4 does NOT have this option selected. QuickEdit lets you perform Copy/Paste operations in a CMD window by right-clicking the text within the window.

-
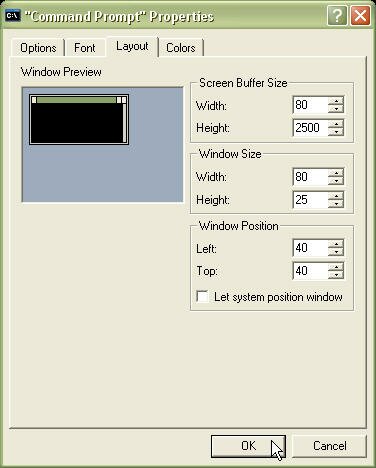
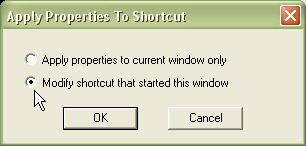
In the Layout tab make the Width of both the Screen Buffer and the Window Size to 90, and make the Screen Buffer Height 999. This will let you scroll up and down within the CMD window. NT 4 does NOT have this option selected.

-
In the Shortcut tab, in the Target pox, add a "/f:1" to the target (without the quotes). This will let you perform Auto Complete actions in the CMD window. If you want to enter a filename with a long name, type in the first 2-3 letters of the filename and press CTRL+F to scroll the available filenames. Do the same to folder names by pressing CTRL+D.

-
While you’re in the Shortcut tab, you can also enable a shortcut key sequence to fire the CMD shortcut. I use CTRL+ALT+F4 but you can select your own favorite sequence.
-
Drag the CMD shortcut the right mouse button and place it on an empty spot in the Quick Launch toolbar.
![]()
-
Let go of the right mouse button. Select Copy Here.
![]()
You now have a nice and working CMD shortcut.
Add a Command Prompt option to the default Explorer right click context menu
One of the musts! This option enables you to right-click on a folder within Windows Explorer and choose the Command Prompt – which opens a Command Prompt window with that folder as your active directory.
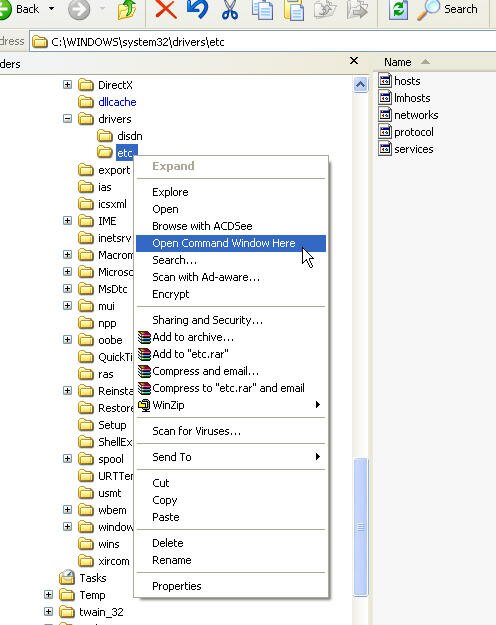
Use the old Microsoft Powertoy called "DOSHERE". You can download it from HERE (1kb). Unzip it and then right click the INF file and choose install.
You can also use the newer MS Powertoys found HERE. Download the Open Command Window Here file and install it.
Install the Microsoft Powertoys suit
The Microsoft Powertoys are small tools/gadgets from Microsoft that enhance Windows. Powertoys have been around since windows 95 and are a must for power users. Read more about them on the Microsoft Powertoys Suit page.
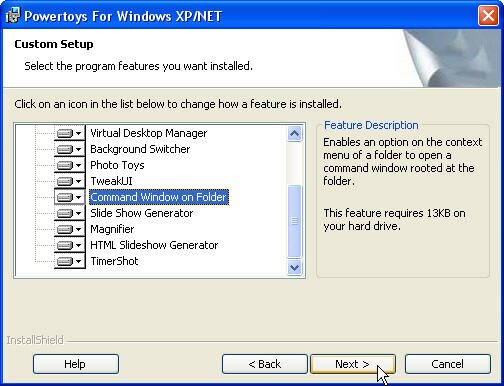
Get them HERE.
Add Local Area Connection icons to your system tray
Instead of right-clicking the Network Places icon and then re-right-clicking your LAN icons – make these icons appear on your system tray area for quicker access to the LAN and protocol settings (such as changing TCP/IP settings).
Follow the next steps:
-
Right-click an My Network Places on the desktop.

-
In the Network Connections window – right click the Local Area Connection icon. If you have more than one NIC installed you can do the same for all NICs.
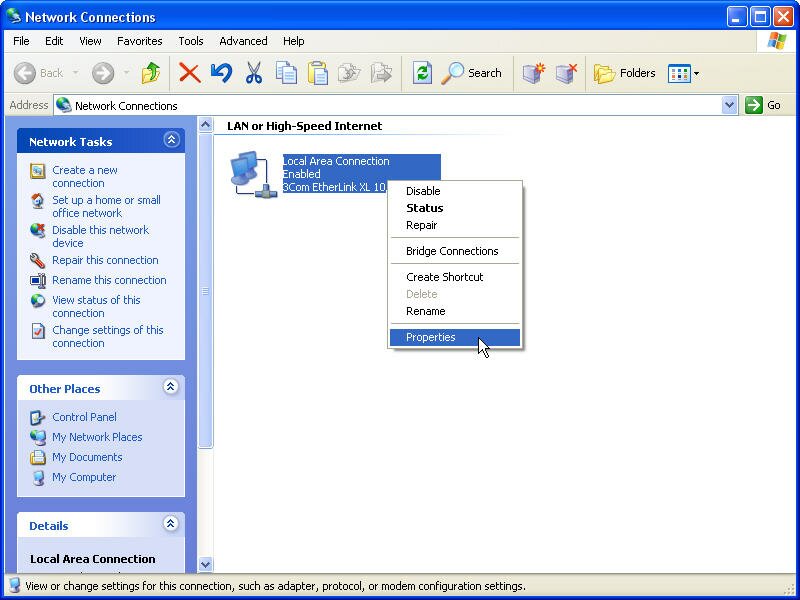
-
In the Local Area Connection Properties window select the "Show icon in the notification…". Click Ok.

-
A new icon appears in the tray area near the clock. Right click it and choose Properties to quickly access your network settings.
![]()
![]()
BTW, each time the NIC is disconnected it will tell you that it is and you will see a red X over the icon.
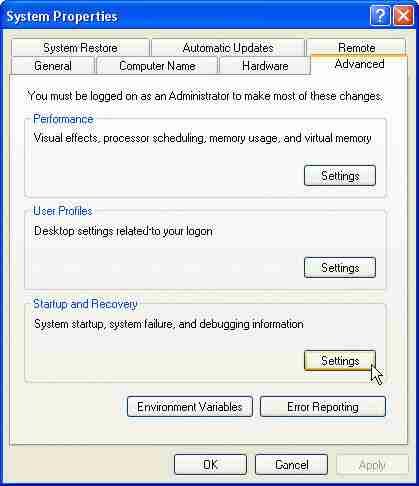
Disable the Memory Dump file creation
Unless you plan to have continuous Blue-Screens-of-Deaths (BSOD) and unless you have good debugging skills – you don’t need the memory dumping feature in case of a system failure.
Follow the next steps:
-
Right-click My Computer and select Properties (or press the Windows logo key ÿ and the Pause/Break key together).
-
In the Advanced tab, under the Startup and Recovery section, press the Settings button.
-
In the System Failure section under the Write Debugging Information drop down list select None.

-
Press Ok all the way out.
-
You may need to reboot in order to finish the configuration.
Disable the Error Reporting option
I don’t want Microsoft to know about the errors I have (if any) on my system You don’t either. Disable this option and stop those annoying pop-up screens that ask you if you want to report this or other error to Microsoft. Read more about it on the Turn-Off Error Reporting in Windows XP/2003 page.
Follow the next steps:
-
Right-click My Computer and select Properties (or press the Windows logo key ÿ and the Pause/Break key together).
-
In the Advanced tab press the Error Reporting button.
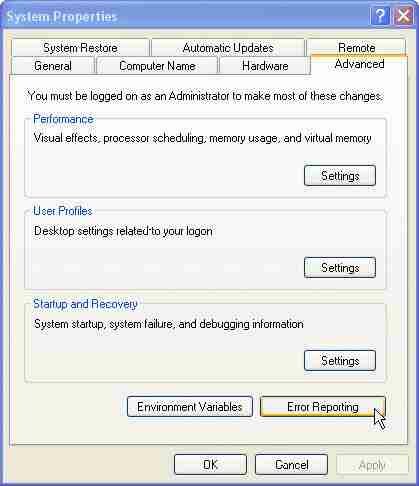
-
Select Disable Error Reporting. If you want you can select the option to let you know what happened (in case of an application error).
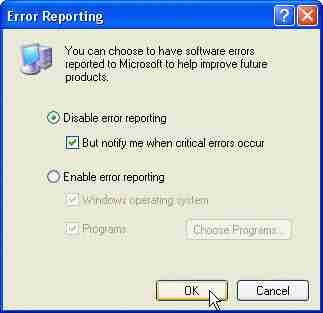
-
Click Ok all the way out.
Enable the Auto Update option
Many people seems to be a bit too paranoid about Microsoft’s control over what’s installed on your computer and what’s not. I’m not. I don’t mind if my XP looks for updates on Microsoft’s site and auto-downloads them
Furthermore, I use a SUS server combined with the excellent GFI LANguard N.S.S. product and both of these give me complete control over what I want patch or hotfix I want to install and what not. Read more about these products on the Microsoft Software Update Services (SUS) and GFI LANguard Network Security Scanner pages.
Follow the next steps to enable the Auto Update feature (or undo them if you want to disable it):
-
Right-click My Computer and select Properties (or press the Windows logo key ÿ and the Pause/Break key together).
-
In the Automatic Update tab make sure you select the "Keep my computer…" check-box (it is selected by default), and select the "Download the updates automatically…" radio-box (it is selected by default).

-
Click Ok all the way out.
BTW, you can configure this setting and many more from the Group Policy console. Read the Configure Auto Windows Update page for more information.
Disable the Fast User Switching mode and the Welcome Screen (Workgroup only)
The Microsoft design team thought that it would be nice if 2 or more people could share the same computer while not disturbing one another’s running applications.
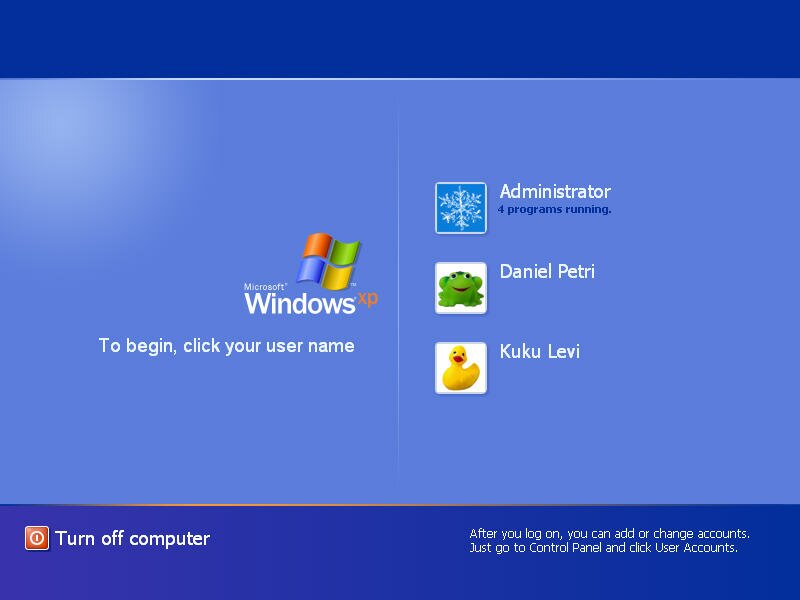
This is called Fast User Switching and the Welcome Screen – and I hate it. One reason is that it hogs down your system resources. Fast User Switching is available only when the Welcome screen is turned on. Read more about it on the Disable Fast User Switching in XP Pro, Disable the Welcome Screen in XP Pro and Bypass the Welcome Screen in Windows XP Pro pages.
Follow the next steps:
-
Open User Accounts in Control Panel.
-
Click Change the way users log on or off.

-
In the Select Logon and Logoff options screen un-select both the Use Welcome Screen and the Use Fast User Switching check-boxes.
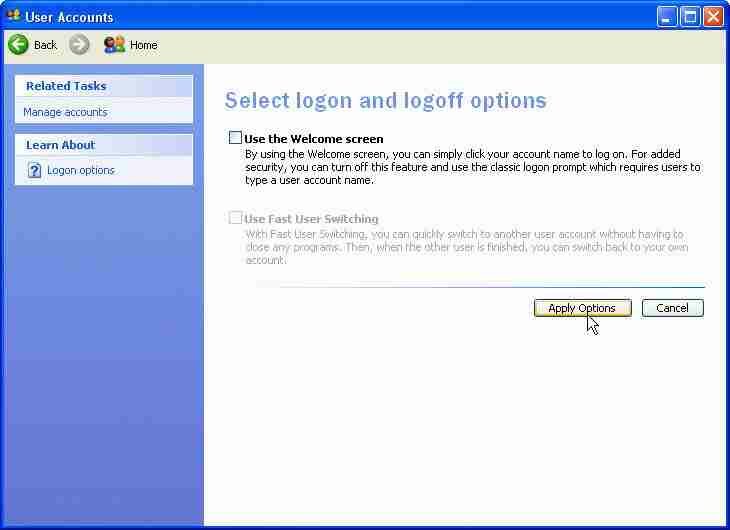
-
Click Apply.
Disable the administrative shares
Microsoft has the bad habit of auto-sharing the roots of your partitions as C$, D$ and so on. It will also create shares of your WINNT folder and call it ADMIN$. I don’t need these shares, especially because of their security threat. The problem is that although they are only accessible by members of the Administrators group, they cannot be simply removed, as at the next reboot they will re-appear!
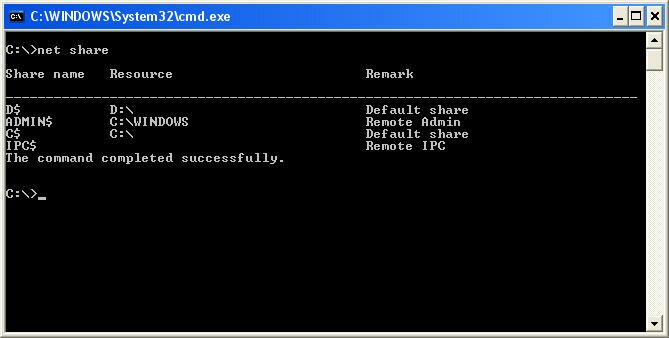
Read more about it on the Disable Administrative Shares page.
To delete the administrative shares download THIS zipped file. Unzip the file and run the included WS_Stop.reg file. You must reboot in order for the tweak to work.
Set the location of the My Documents folder
My Documents is usually located under the C:’Documents and Settings folder, in a sub-folder named with the same name as your username. I usually move the location of My Documents to another physical disk, on a partition called D:\Documents.
Why?
Simply because that way I don’t need to worry about ever formatting my C:\ drive and loosing precious information. I run a daily backup of my D:\Documents drive and burn images of my important information to CD. If for any reason I need to format C:\ and re-install – I only need to copy some minor files and updates and I’m done.
Follow the next steps:
-
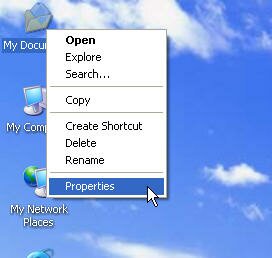
Right-click My Documents and choose Properties.
-
In the General tab notice the default location for the My Documents folder. Click the Move button.

-
In the Select a Destination window – browse for the destination. I chose D:’Documents. Click Ok.
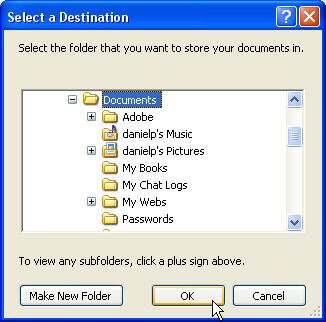
-
The Move Documents windows will open asking you if you want to move all the content of the current My Documents folder to the new location. If you have any files you want to move click Yes. Otherwise click No.
![]()
-
Open Windows Explorer and check the location of the My Documents folder.

Configure local user options
I hate the Users icon in the Control Panel. I rather edit the user properties myself and not let a dumb wizard do it for me.
Follow the next steps:
-
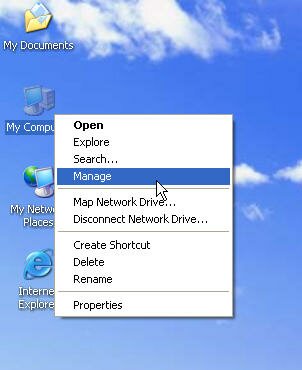
Right-click My Computer and choose Manage.
-
In the Computer Management window (there’s much you can do from that window – look around if you haven’t by now) click the Local Users and Groups console, and then click the Users sub-folder (double-click to expand it if it hasn’t by now).
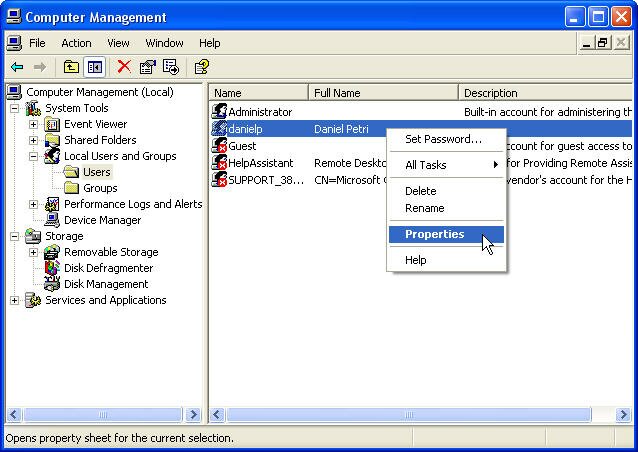
-
In the right-pane select any user and right-click it. Choose Properties.
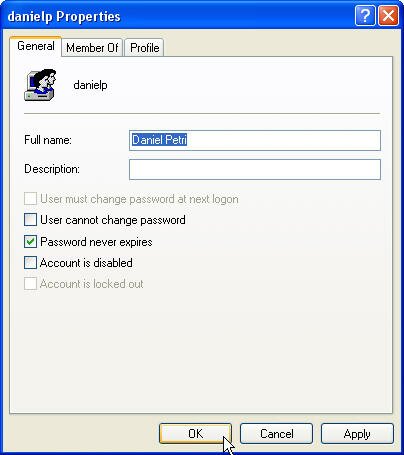
-
You can make some changes to the selected user, including disabling it, resetting his password and so on.
Warning! Do not play around with the Administrator and the Guest built-in users nor with the built-in groups unless you know exactly what you’re doing. You might lock yourself out and then come crying to me. I won’t support you. Be warned!
Configure local user options – extended
I told you I hate the Users icon in the Control Panel. Now that you know about the LUSRMGR.MSC tool (yes, try to run that from the Run menu) you’re probably wondering what else there is to do with a simple local user.
Well, for one thing – how about configuring his or her logon hours?
"Well ok" you say. "How do we do that? Local Users and Groups console, right?"
No! These wise guys from MS figured that you don’t need that much control over local users. Why would you? Local users are for workgroups and thus don’t need that many setting to be configure.
Wrong!
Sometimes you do want to change a user setting for one reason or another. Why don’t we have a GUI interface for that?
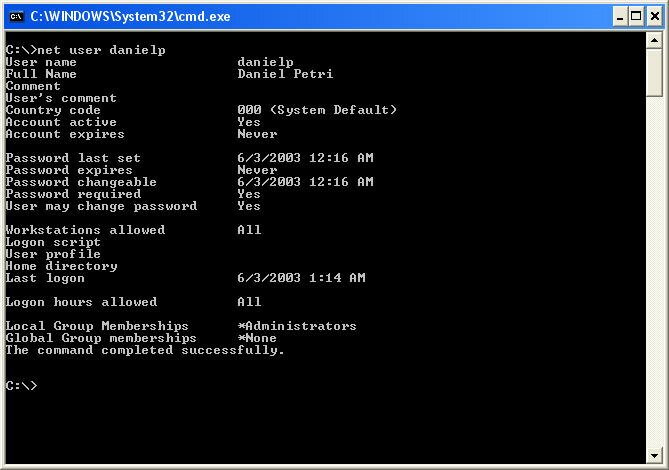
Well, we don’t. We need to use the NET USER command from the CMD console.
Follow the next steps:
-
Run the CMD command from the Run menu (or from the Quick Launch toolbar if you’ve followed my tips so far).
-
Type in
net user xxxxxx
(where xxxxxx is the username you want to edit)
The command displays the user’s properties, all of them, not just the ones MS wants you to see. For instance, you can see when was his or her last logon, when he or here have changed their password etc.
-
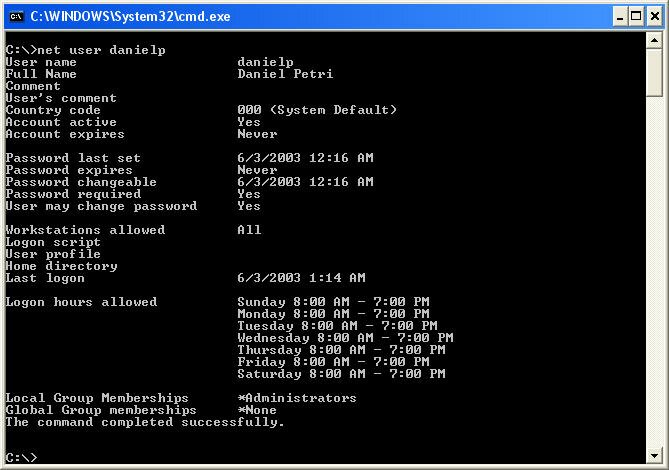
Type in
net user xxxxxx /times:s-f,8-19

(where xxxxxx is the username you want to edit, the s-f means Sunday to Friday and 8-19 means the hours of the day when you want the user to be able to log-on)
Again, run
net user xxxxxx
and see the difference.

Type in
net user xxxxxx /times:all
to get the user logon hours back to default.9
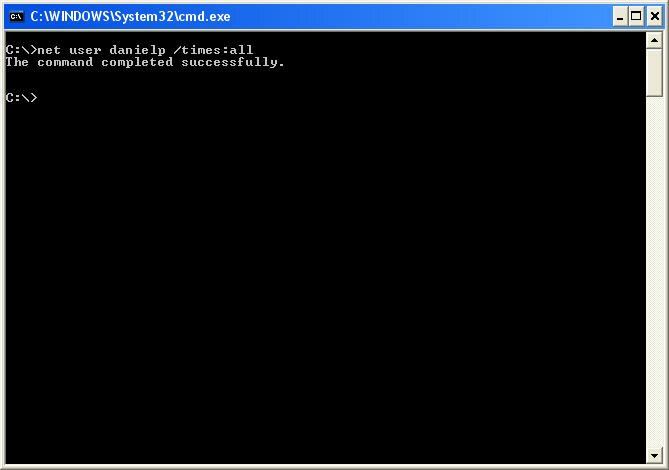
-
Play around with the NET USER command. You can get it to do very nice things (read the Create Users for Testing Purposes page for an example).
Configure the Pagefile (virtual memory) location
XP, as W2K and NT before, make use of up to 4gb of address space. Even if you don’t have that much RAM available, XP will allocate and use parts of your hard disk in the form of a very large file called PAGEFILE.SYS. Read the Pagefile Optimization page for more info.
One quick tweak you can use is to move the Pagefile from it’s default place – the System partition – to a different HD (if you have one).
Follow the next steps:
-
Right-click My Computer and select Properties (or press the Windows logo key ÿ and the Pause/Break key together).
-
In the Advanced tab, in the Performance section – click the Settings button.

-
In the Advanced tab on the Virtual Memory section – click Change.
-
I the Virtual Memory window select your other physical HD (It’s D in my case) and in the Custom Size Initial box enter a size that’s 1.5 times your RAM size. See the Pagefile Optimization page for more info. In the Maximum size enter the same amount + 1mb. Click Set.

-
Click all the way out.
-
You must reboot in order for the change to work.
Configure Remote Desktop access
XP comes with a Terminal Service called Remote Desktop. Read the What’s Remote Desktop in Windows XP/2003? page for more info.
I want to be able to remotely connect to my computer via the Internet or LAN.
Follow the next steps:
-
Right-click My Computer and select Properties (or press the Windows logo key ÿ and the Pause/Break key together).
-
In the Remote tab, on the Remote Desktop section – select the "Allow users to connect…" check-box.

-
A warning window will appear. Read it and make sure you understand it. Click Ok.
![]()
-
By default, only the local Administrator has the ability to remotely connect to the computer, but you can also select other users in the future.
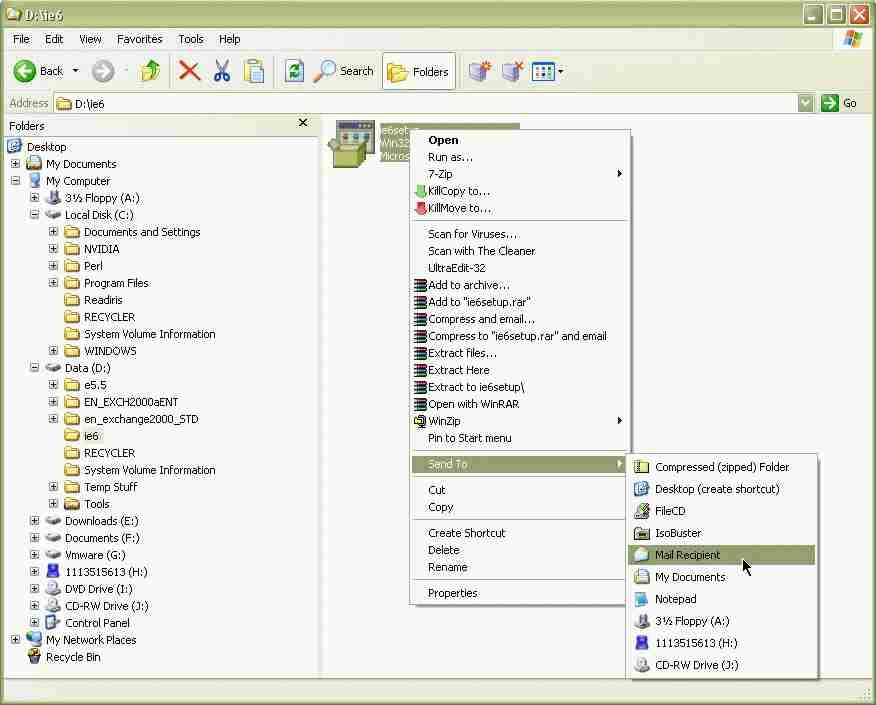
Create a Send To Notepad and Send To MAPI shortcuts
This is one of my favorite tweaks, and it will amaze you how you lived all these years without knowing it (or did you? you wouldn’t be here if you did…)
The easiest way of all is to do the following:
- Go to %SystemDrive%\documents and settings\%username%\sendto
- Right-click in the right hand panel and select New > Shortcut
- Create a new shortcut to Notepad.exe in the sendto folder.
Now if you right-click any TXT, VBS, CMD, DAT, NFO etc. file, you can choose the Send To menu and send the file to Notepad which will immediately open it for editing.

To send any file as an attachment to a mail recipient via MAPI you can do the following:
- Go to %SystemDrive%\documents and settings\%username%\sendto (or \Windows\SendTo in Win9X).
- Right-click in the right hand panel and select New > Text Document
- Name the new file in any name you want (e.g. MAPI Mail or similar) as long as you give it a .MapiMail extension.
When you want to Mail files as attachments:
-
Select the files you want to send.
-
Right-click the files.
-
Select Send to and the Mail name you just created (e.g. MAPI Mail or similar).
-
An Outlook window will pop out with the required file set as an attachment. Enter the recipient’s e-mail address and send the e-mail.

Note: This will only work if you’re running Outlook 98, 2000, XP or 2003 as your default mail client.
BTW, you can download THIS zipped file. Unzip it and run the enclosed QUICKFIX.CMD file to set up these shortcuts.
Enable EFS Encryption by right-click
You can tweak Explorer to have a new right-click add-on and thus to quicken your clicking. See it in the following screenshot:
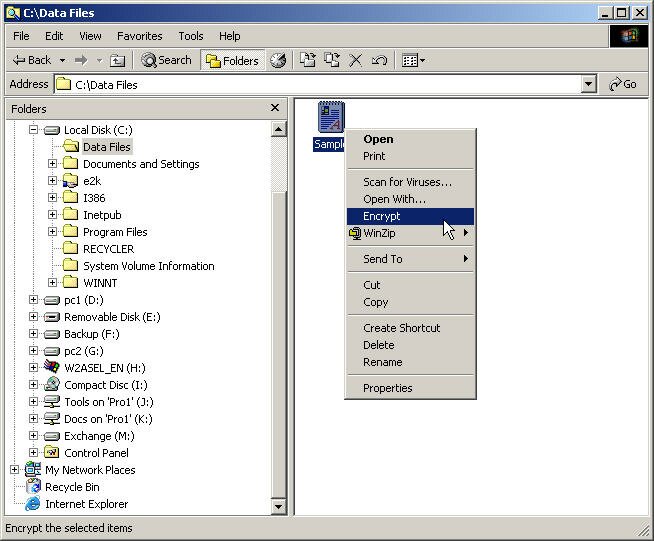
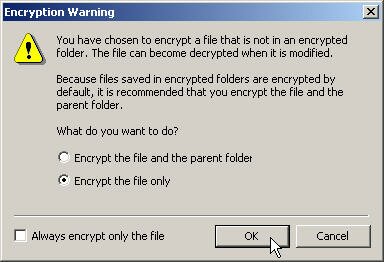
When you choose to encrypt a file the following dialog appears:
To configure this tweak do the following:
-
Start Registry Editor (Regedit.exe).
-
Locate the following key in the registry:
HKEY_LOCAL_MACHINE\SOFTWARE\Microsoft\Windows\CurrentVersion\Explorer\Advanced
-
On the Edit menu, click Add Value, and then add the following registry value:
"EncryptionContextMenu"=dword:00000001
-
Close the registry editor.
-
No reboot is required.
Read more about EFS on the following pages: What’s EFS?, How does EFS Work?, Quickly Check EFS Attributes, Data Protection and Recovery in Windows XP.
Restore the W2K-style search window
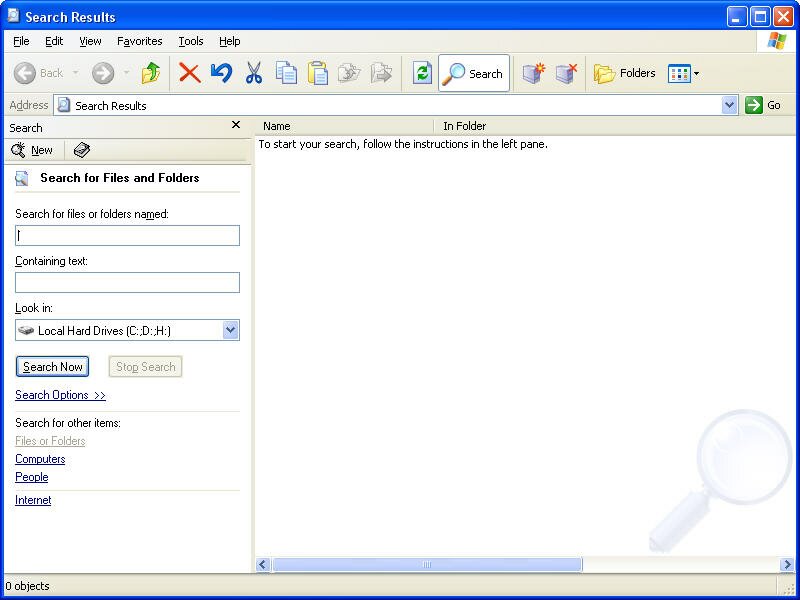
Windows XP has a sick and ugly search window which not only slows down your system but also personally makes me sick (not to mention that sorry-looking excuse of a dog they have there…)

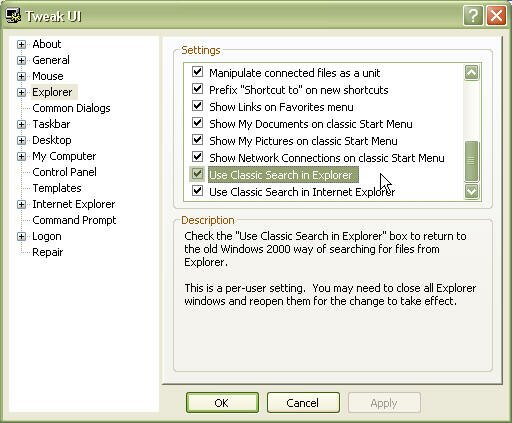
To go back to the good old Windows 2000-style search window do the following:
-
Download the Microsoft Powertoys for Windows XP. All you need for this tip is Tweak UI which gives you access to system settings that are not exposed in the Windows XP default user interface, including mouse settings, Explorer settings, taskbar settings, and more. You can also get it from HERE).
-
Install TweakUI.
-
Run TweakUI.
-
Go to the Explorer sub-menu. In the details pane find "Use Classic Search in Explorer" and select it.
-
Click Apply then Ok.
Press ÿ +F to open the Search dialog box and see for yourself.
Install the ISO Burner PowerToy
If you have a CDR-W on your XP computer, you should also try the ISO burner PowerToy to enable ISO file-burning as a native XP command. You can also get it from HERE (145kb – Local download).

ISO Recorder PowerToy is a UI component that allows to use CD-Recording capabilities of Windows XP to record ISO images and copy CD to CD – a piece of functionality missing in Windows XP. The ISO Recorder itself does not record CDs but instead uses existing OS features. This software works on Windows XP only!
You can use this tool to record ISO images. Right-click on an ISO file and select "Copy Image to CD". The wizard will open up. The file name should appear in the "File name" edit box.
You can use this tool to create ISO images. Right-click on a CD drive icon in My Computer and select "Copy CD to Image File".
You can also use this tool to copy CDs. Right-click on a CD drive icon in "My Computer" and select "Copy Disk to CD".
Install the Windows Server 2003 RDP 5.2 client
This software, when run, allows other Windows platforms to remotely connect to a computer running Windows XP Professional or Windows Server 2003. The version of this software is 5.2.3790.0.
The Remote Desktop Connection software will be installed to the Program Files directory of the target computer. On Windows XP machines this package will not replace the system installed version of Remote Desktop Connection. Instead they will be installed side by side. The start menu icon for Remote Desktop Connection, however will point to the new version in the Program Files directory. This download is the same executable that is offered in Windows Server 2003 and can be used to connect to Windows XP Professional machines or other legacy Terminal Server platforms.

Download RDP 5.2 (3.5mb)![]()
This page is not yet finished. I will add more to it in the next couple of days.
Related articles
You may also want to read: