


Connect Two Azure Resource Manager Virtual Networks Using VPN

In this post I will show you how to connect two Azure virtual networks that are in the same subscription using a VNet-to-VNet VPN tunnel.
The Solution
This solution allows two VNets in two different regions to be connected at the network layer. A gateway is created in each VNet, and the gateways are configured to connect to each other using a VPN tunnel. This provides a secure tunnel through which virtual machines on each VNet can communicate with each other. There are no security filters by default, but you can add or modify Network Security Groups to allow/block traffic.
![An Azure VNet-to-VNet VPN [Image Credit: Microsoft]](https://petri-media.s3.amazonaws.com/2016/09/VNet-to-VNetVPN.png)
Prerequisites
The solution shown in this post allows you to connect VNets that are in the same Azure subscription. You will follow a slightly different process if the VNets will reside in different subscriptions.
There are some prerequisites for configuring a VNet-to-VNet VPN connection:
- IP Addressing: The two VNets must not use overlapping network addresses. For example, you cannot connect a 10.0.0.0/16 VNet to another 10.0.0.0/16 VNet.; this should make sense because how would those networks route? Always plan network addresses in advance, allowing for the fact that, one day, a VNet might need connectivity to either another VNet or a customer LAN, even if that day is far in the future.
- Gateway: Each VNet will require a gateway. It takes 45-60 minutes for Azure to deploy a gateway appliance. I typically schedule my time around this; for example, going home, getting lunch, or finding something else to do.
- Route-Base Gateway: VNet-to-VNet VPN requires that you use a route-based (aka dynamic) gateway. If you are using site-to-site VPN to connect on-premises networks, then verify that your firewall can support route-based VPN — not that a VNet can only have 1 gateway. Don’t make assumptions — some big names and well-known devices (Cisco ASA, for example) are limited to outdated policy-based VPN. You might find that you need to replace your on-premises firewalls.
- Scalability: Traffic between the VNets will be limited by the maximum supported VPN speed of the gateway. Note you can create a mesh of VNet (3+) connections up to the limits of the gateway. The maximum bandwidth of the gateway will be shared by those connections.
- Pricing: There is a charge for running VPN gateways. There is no charge for cross-VPN traffic if both VNets are in the same region. The outbound data transfer charge applies if the VNets are in different regions.
I used a pair of VNets, one in East US (Virginia) and one in North Europe (Dublin), to demonstrate the inter-VNet VPN connection in this post.
Create Public IP Addresses
Each VNet will have a gateway. Each gateway will require a public IP (PIP) address to allow a cross-Internet connection. I like to create these PIP addresses in advance and ensure that they are configured with a static (or reserved) address.
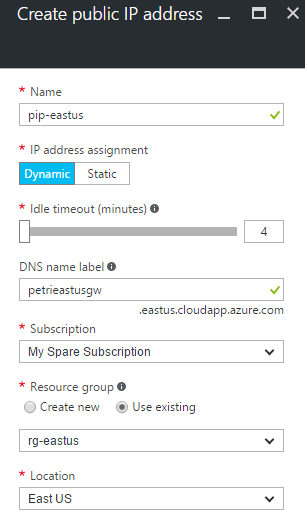
Open the Azure Portal and create a public IP Address for the first gateway:
- Name the PIP address.
- Leave the address as dynamic.
- Give the new PIP address a unique DNS name.
- Add the PIP to the resource group that you will create the gateway in. I use the same resource group that the VNet is in.
- Make sure that the region will match the VNet’s region.
Create Gateways
The gateway initiates and terminates the VPN tunnel, connecting the local network to the remote network using a secured tunnel via the Internet.
Create a virtual network gateway for the first VNET:
- Enter the name of the new gateway.
- Ensure that the Gateway Type is set to VPN and the VPN Type is set to Route-Based.
- Set the SKU according to the required VPN speed and number of VPN connections.
- Identify the region of the VNet that this gateway will be directly connected to — that is the local network, not the remote one that the gateway will connect to via VPN. Set the Location to the match the VNet’s region.
- Select the VNet.
- Set the subnet; I like to use the last VNet and set the subnet mask to be as small as is supported (/29 or 8 addresses).
- Select the PIP address that you previously created for this gateway.
- Click Create.
![Creating a new VPN gateway in Azure [Image Credit: Aidan Finn]](https://petri-media.s3.amazonaws.com/2016/09/CreateAzureVPNGateway.png)
Configure VPN Connection
Browse to the first virtual network gateway, and click Connections. Click Add to create a connection. Enter the following details:
- Name: Give the connection a meaningful name.
- Connection type: Set this to VNet-to-VNet.
- First virtual network gateway: This should be the current gateway.
- Second virtual network gateway: Select the gateway of the remote VNet.
- Shared key: Enter some long random string that both gateways will require — save this key because you will need it again.
Verify that the resource group is correct for the first gateway and click OK.
![Creating an Azure VNet-to-VNet VPN connection [Image Credit: Aidan Finn]](https://petri-media.s3.amazonaws.com/2016/09/CreateAzureVNetToVNetConnection.png)
![A VNet-to-VNet tunnel is started in Azure after both connections are created [Image Credit: Aidan Finn]](https://petri-media.s3.amazonaws.com/2016/09/AzureVNetToVNetConnections.png)