How to Configure DNS on a Domain Controller with Two IP Addresses
How can I configure DNS on a DC with two IP addresses?
Sometimes it’s unavoidable to run an Active Directory domain controller (DC) on hardware that is configured with two network cards (NICS). While not a recommended configuration, it is possible to run a domain controller with two IP addresses. In this Ask an Admin, I’ll show you how to configure the NICs and DNS so that AD runs smoothly. This lab assumes you have one DC in your AD domain running DNS, configured with two NICs, each with one IPv4 address.
Decide on One IP Address to Use with Active Directory
Even if you have two NICS, and two IP addresses on your DC, only one of those IP addresses should be registered in DNS. In this example, my DC is assigned 192.168.0.117/24 on the first network adapter, and the second 172.16.0.6/24. I want AD to use 172.16.0.6/24 on the second adapter, so the first task is to stop the other address being automatically registered in DNS.
🎬 Watch This Week in IT.
One option is to leave the DNS server properties for the adapter empty. Alternatively, if that’s not an option, following these instructions.
- Log on to your Windows Server 2012 DC as a domain administrator.
- Right-click the network icon in the bottom right of the taskbar and select Open Network and Sharing Center from the menu.
- In the left of the Network and Sharing Center, click Change adapter settings.
- In the Network Connections window, right-click the adapter you want to exclude from DNS registration and select Properties from the menu.
- On the Networking tab of the adapter’s properties dialog, highlight Internet Protocol Version 4 (TCP/IPv4) and click Properties.
- On the General tab of the Properties dialog, click Advanced in the bottom right corner.
- In the Advanced TCP/IP Settings dialog, switch to the DNS tab.
- On the DNS tab, deselect Register this connection’s addresses in DNS and click OK.
- Click OK in all the remaining open dialogs, close the Network Connections window and the Network and Sharing Center.
Configure DNS to Listen on One IP Address
Now that I have stopped the unwanted address from registering itself with DNS, I’ll configure the DNS server running on the DC to listen exclusively on the 172.16.0.6 address.
- Open Server Manager from the desktop taskbar or Start screen.
- Select DNS from the Tools menu in Server Manager.
- In the left pane of the DNS Manager MMC, right-click your DNS server and select Properties from the menu.
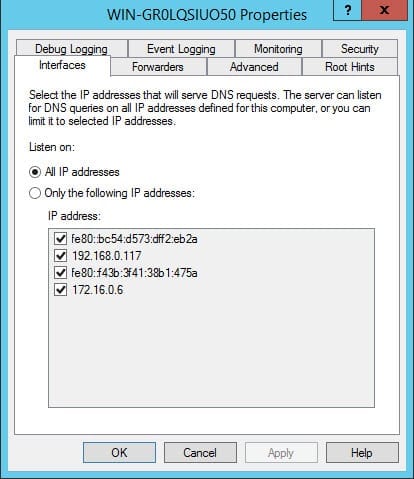
- In the Properties dialog, switch to the Interfaces tab.
- Under Listen on, select Only the following IP addresses: and then deselect all but the IP address you want the DNS server to listen on (in my case, 172.16.0.6).
- Click OK to continue.
- In DNS Manager, expand your DNS server, then the Forward Lookup Zones container, and click AD DNS name in the left pane.
- In the central pane of DNS Manager, delete any Host (A) records with the unwanted IP address, in this case 192.168.0.117.
- Close DNS Manager.
Verify DNS Resolution
Now that we have only one IP address registered in DNS, old records deleted, and the DNS server listening on one IP address, let’s tidy up the DNS settings on the DC with some ipconfig commands.
- Open a command prompt with domain administrative privileges from the Start menu.
- Type ipconfig /flushdns and press Enter. This command will clear any cached DNS requests in the local DNS client.
- Now type ipconfig /registerdns and press Enter to register the local NICs with DNS. Only one NIC and IP address should register.
- Type dcdiag /fix and press Enter to make sure DNS for AD is functioning correctly with this domain controller.
- Now ping your AD’s DNS domain name and you should get a reply on the desired IP address.
Don’t forget that you will likely need to reboot clients and member servers to make sure that they use the updated DNS configuration and don’t resolve to the wrong address.
FAQs
How does having multiple DNS servers affect the process to configure DNS on a domain controller with two IP addresses?
When you configure DNS on a domain controller with two IP addresses in an environment with multiple DNS servers, you’ll need to ensure proper DNS replication, configure forwarders appropriately, and set up conditional forwarding between the servers. This helps maintain consistency across your DNS infrastructure and prevents resolution conflicts.
What security considerations should I keep in mind when I configure DNS on a domain controller with two IP addresses?
Implementing DNSSEC, setting up proper DNS filtering, and configuring access control lists (ACLs) are crucial security measures when you configure DNS on a domain controller with two IP addresses. Additionally, ensure that DNS zone transfers are restricted to authorized servers only.
Can I configure DNS on a domain controller with two IP addresses in a hybrid cloud environment?
Yes, you can configure DNS on a domain controller with two IP addresses in a hybrid setup by implementing split-brain DNS, setting up proper DNS conditional forwarders, and ensuring correct subnet configurations between on-premises and cloud environments.
What backup strategies should be implemented when you configure DNS on a domain controller with two IP addresses?
Regular DNS zone backups, maintaining secondary DNS servers, and implementing DNS event logging are essential backup strategies when you configure DNS on a domain controller with two IP addresses. This ensures business continuity and quick recovery in case of failures.
How does IPv6 implementation affect the process to configure DNS on a domain controller with two IP addresses?
When implementing IPv6 while you configure DNS on a domain controller with two IP addresses, you’ll need to set up AAAA records, ensure proper dual-stack configuration, and verify that both IPv4 and IPv6 DNS resolution works correctly across your network infrastructure.
Russell Smith, the Editorial Director at Petri IT Knowledgebase, has over two decades of hands-on experience in IT, in both small business settings and government IT infrastructure projects. Russell started writing for Windows IT Pro Magazine in t...


