Boot a Hyper-V Virtual Machine Using PXE
In a previous post I showed you how you can deploy a Hyper-V virtual machine manually, and then create an image using Sysprep that you can deploy. In a medium to large network, we will normally use System Center Virtual Machine Manager (SCVMM) to do that work for us, and add a few extra bells and whistles to the deployment and automation processes. But there are some scenarios where we will want to boot virtual machines off of a network using the preboot execution environment (PXE) to start a boot image and do some work. We will look at how you can use PXE to boot Hyper-V virtual machines off of the network in this post.
Why Boot Virtual Machines From The Network?
As I said in the introduction, in a medium to large environment we will normally use SCVMM to deploy virtual machines; not only will SCVMM deploy the virtual machine, but it will configure the guest OS (including the post-Syprep specialization), name the computer, join a workgroup/domain, and possibly even do other work for us if we configure it. But there are situations were using PXE can be useful, including:
- First virtual machine: While you can deploy your very first virtual machine by hand or even using a VHD/VHDX image in SCVMM, you might already have a system such as System Center Configuration Manager (SCCM), Microsoft Deployment Toolkit (MDT), Windows Deployment Services (WDS), or another PXE capable deployment system that has the ability to deploy a Windows operating system, already configured with Windows Updates and other specializations. If so, you might want to use that mechanism to create your first virtual machine, and then capture that virtual machine as a template that can be rapidly deployed from a library.
- Operating System Deployment Lab: When I am asked to work on a deployment project, I always ask for a number of virtual machines to be provisioned. Some of these will have no guest OS installed, and some will have the legacy “standard image” deployed. This gives me a hardware neutral lab that I can quickly reset (using Hyper-V checkpoints) after each capture, deployment or test.
- Demo/class lab: There have been many times where I have needed to demonstrate OS deployment, and having Windows Client Hyper-V on my laptop with a bunch of PXE capable virtual machines on an SSD has proven very useful.
Enabling PXE Boot
Remember that since Windows Server 2012 R2 (WS2012 R2) Hyper-V and Windows 8.1 Client Hyper-V, there are two generations of virtual machine hardware specification. Generation 1 virtual machines (the only generation on legacy versions of Hyper-V) make things a little tricky when it comes to PXE booting. The default (and better performing) synthetic Network Adapter (that leverages the Hyper-V integration components) does not support booting off of the network in Generation 1 virtual machines. If you do want to boot this type of virtual hardware using PXE then you must add an emulated Legacy Network Adapter:
- Shut down or turn off the virtual machine.
- Edit the settings of the virtual machine.
- Browse to Add Hardware, select Legacy Network Adapter, and click Add.
- Click OK to save your changes.
Now the virtual machine is PXE capable, with the lower performing Legacy Network Adapter.
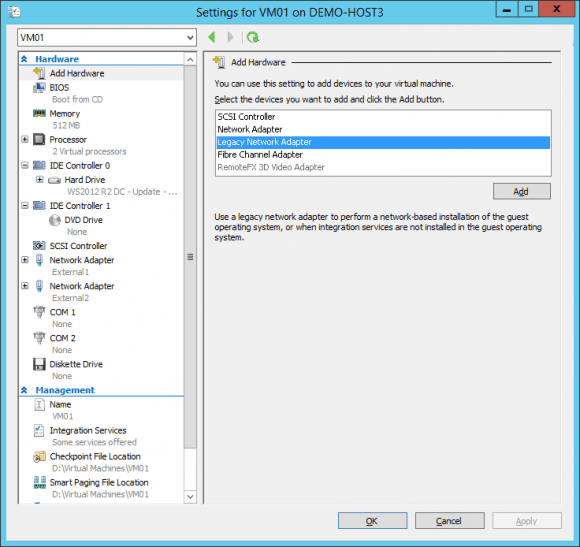
Generation 1 Hyper-V VMs can only PXE Boot with the Legacy Network Adapter. (Image: Aidan Finn)
Tip: Set the Startup RAM to be 1024 MB. Doing an OS installation with just 512 MB RAM can cause all sorts of funny symptoms, including network driver failure in a boot image, failures of SCCM task sequences, and OS installation failures because (allegedly) the text of the EULA cannot be found on the media!
Remember that Dynamic Memory won’t start up until the guest OS is running with a current set of Hyper-V integration components. Things are much easier with Generation 2 virtual machines; with this newer specification, the synthetic Network Adapter is network boot-capable. That means you do not need to add any virtual hardware to this generation of virtual machine to boot using PXE.
However, if you are doing test/demo lab work, then keep in mind that Generation 2 virtual machines only support very recent versions of Windows (Windows Server 2012, Windows 8 64-bit, and later) and Linux (the latter requires secure boot to be disabled). You will boot a Hyper-V virtual machine off the network the same way as you would with a server or PC. Power the machine up, and the boot order (configured also in the virtual machine settings) will decide what device (virtual hard disk, network adapter) will be used. You can modify the boot order if required. Unlike with physical hardware, there is no lengthy POST to check hardware. So I would recommend that you start the virtual machine from the Connect window so that you see the the network boot prompt when it appears and you have a chance to hit it (maybe F12) before it times out.

Aidan Finn, Microsoft Most Valuable Professional (MVP), has been working in IT since 1996. He has worked as a consultant and administrator for the likes of Innofactor Norway, Amdahl DMR, Fujitsu, Barclays and Hypo Real Estate Bank International where...