Moving Mailboxes to Exchange 2010 and the BadItemLimit
Overview
Whether you are upgrading to Exchange 2010 as part of an SBS2011 project or as a standalone server, one of the major tasks you will need to perform is moving your users’ mailboxes. Those readers who can remember upgrading to Exchange 2003 or previous versions may well be concerned already, but in fact Exchange 2010 makes the process very easy.
Move mailboxes with one click (below)
However, there is one thing which may catch you out if you have mailboxes with a large number of corrupted items in them – the BadItemLimit. We’ll cover options for managing this issue later on in the article.
Moving a Mailbox to Exchange 2010
We’ll assume you have followed the Microsoft Exchange 2010 upgrade guide successfully up to the point where you are ready to move your mailboxes to your new server. In fact the procedure is well documented and is simple, so we’ll only cover it briefly here, and then move on to what happens when there is a problem.
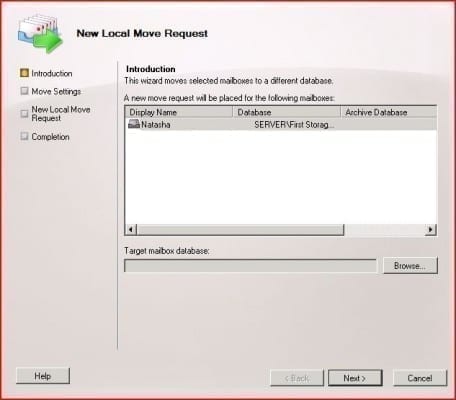
Open your Exchange Management Console (the EMC) and expand your way down to the Mailbox container under “Recipient Configuration” – you should see all your mailboxes listed. At the moment virtually all of them will be “Legacy Mailbox“, indicating that they are hosted on a pre-2010 server; once moved they will become “User Mailbox“. Select a mailbox to migrate and then in the right-hand “Actions” pane click on “New Local Move Request” to start the wizard. Note that at this point you can save time by selecting several mailboxes to move, using either Shift-click or Ctrl-click, then all your following choices will be applied to all the mailboxes selected.
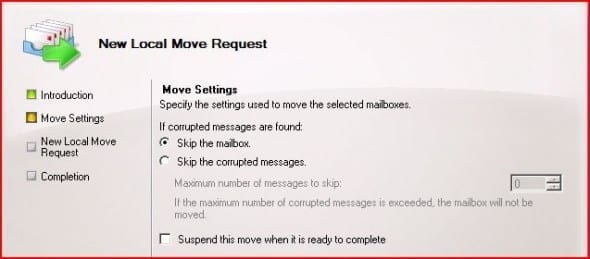
On the first page, you just need to click on the “Browse” button and select your new server’s mailbox database as the target for your move. The next page requires some more difficult decisions to be made:
Your main concern is what to do about any corrupted items that might be in the mailbox. The older and larger the mailbox is, the more likely it is that some corruption has occurred. My view is that if the items are already corrupted, then the user probably hasn’t been able to access them for a while, and so will not miss them if they are removed in the move process. However, you may feel that the mailbox contents are too important to risk any loss without attempting recovery first, in which case select the “Skip the mailbox” option.
Assuming you can cope with the loss of any corrupted items you should select the “Skip the corrupted messages” option, and then decide what is a suitable maximum limit to set. The number you choose here should probably be dependant on the number of items in the user’s mailbox, i.e., with 10,000 items, a limit of 100 is probably not unreasonable. If there were only 1000 items in the mailbox then this is likely to be far too high, as you could lose 10% of the mailbox in the move, which would suggest some serious corruption problems in your old mail store. At this point you also need to consider a new limit imposed by Exchange 2010 SP1 – the Move Request wizard will only allow a maximum corrupted message limit less than 50, otherwise the operation will fail to start. You have to explicitly “AcceptLargeDataLoss” to override this, but its not an option available in the wizard so see the section later on explaining how to do it in PowerShell instead.
The final option “Suspend this move when it is ready to complete” can be useful if you are moving users’ mailboxes whilst they are using them. The Exchange 2010 mailbox mover cunningly replicates the mailbox to the new server first, then does a final sync and updates the Exchange server pointer for the user in AD before deleting the old mailbox. This means the user can continue using their mailbox during the replication process, but they have to be offline for the move to complete. Although Outlook 2k7+ will prompt the user to restart their client, you may feel it is safer to leave that part until after hours, in which case you should tick this selection box. The final sections of the wizard just confirm the selections you have chosen, then display the PowerShell command that it will run when you click “New“. Assuming it doesn’t encounter any odd problems at this point, you should be able to click your way through to “Finish“.
How to Override the BadItemLimit in the Local Move Request Wizard
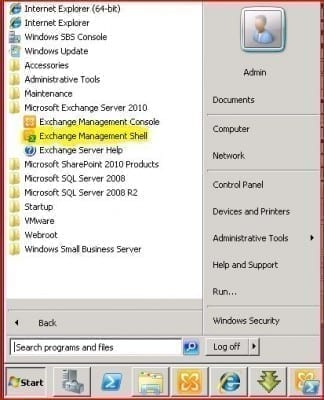
Should you have a large mailbox to move, you may decide that a maximum corrupted messages limit greater than 50 is appropriate; however, the wizard will not allow you to set this so you will have to use the Exchange Management Shell (EMS) instead. You can launch this from Start – All Programs – Microsoft Exchange:
If you haven’t used it before, then the EMS can be a little intimidating at first. You may think we have taken a backward step to the world of the DOS prompt, or even a Linux bash session. In fact, it is an Exchange specific PowerShell console and provides a powerful environment for running advanced Exchange management commands. Everything you do in the Exchange Management Console actually runs EMS commands behind the scenes, and if you look, you will find that most of its wizards show you the PowerShell command which they are about to run. This isn’t the time or place for an in depth tutorial on the EMS, so we will simply look at the command you need to run to move your mailbox.
Enter the following in the EMS windows: New-MoveRequest -Identity ‘Administrator’ -BadItemLimit 100 -AcceptLargeDataLoss. If you look at the documentation for this command (or just enter help New-MoveRequest), you might think we have missed out a lot of options for the command, but it’s not a problem as it will automatically use the defaults which are fine for this procedure. Replace “Administrator” with the alias of the mailbox you want to move, and set the BadItemLimit to an appropriate amount, then press return to execute the command. Assuming you haven’t made any mistakes, you should then see a message confirming that the move request has been queued:
Checking the Progress of Move Requests
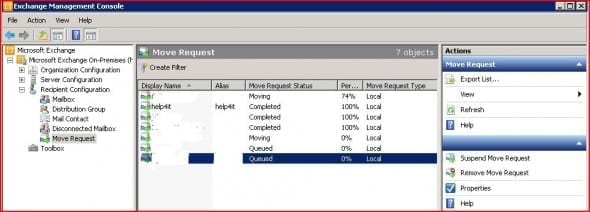
Although you can queue as many move requests as you wish the Exchange Mailbox Mover will only process two at a time, and won’t start the next operation until it has completed a previous one. You can tell if a mailbox has been successfully moved because its type will change from “Legacy” to “User Mailbox” in the mailbox list, but if you are moving large mailboxes you may wish for more information about progress. Should you want more information, you can see it in the Exchange Management Console by selecting “Move Request” in the lefthand pane.
Oddly, the default view for this window does not show you the “Percent Complete” column, which I would consider one of the more useful pieces of information. To display it, you need to click the “View” option in the righthand pane, select “Add/remove column” and add it in. Also the progress does not update itself automatically, so you will need to remember to click “Refresh” to see the latest status in the central pane. There are a couple of commands you can run from this window – if you have a user selected you will see them listed in the righthand pane, and both are self-explanatory. You may wish to “suspend move request” if the user has unexpectedly returned to work, or maybe you realised that you’d forgotten to empty their Deleted Items folder. “Remove Move Request” is most likely to be useful if the move operation has failed for some reason – usually too many corrupted items, as it will not let you create a new move request until the old one is deleted.
At this point “Properties” can also be helpful, as it allows you to view any log data from the previous move operations to ascertain why they failed. Since you are now familiar with the EMS, we may as well look briefly at the equivalent command you can use to view progress, although it’s somewhat more complicated.
Get-MoveRequest | ?{$_.status -eq “In Progress”} | Get-MoveRequestStatistics | ft Disp*,Per*,BytesTransferredPerMinute
This complex command nicely demonstrates the power in PowerShell, as it combines several commands to retrieve the required information and display it. You will notice that it also shows the data transfer rate for the mailbox move, which is interesting but not usually consistent enough to calculate an estimated completion time. If you are moving a large amount of data, however, you can get an idea of the minimum time required from it.
Conclusion
One thing we have glossed over is what to do if you have corrupted messages in mailboxes that you do not wish to lose, because as mentioned before, it is rarely relevant. Certainly you will have to carry out any repair and recovery operations on your old Exchange Server, which will depend on the version you are running. In most cases though you should find that the mailbox move process is remarkably simple to manage, and if you do need to lose a few corrupted messages then your mailboxes will probably benefit from it. Why has my mailbox store got bigger? If you haven’t been studying the Exchange 2010 documentation carefully then one thing that might well surprise you after you have migrated all the mailboxes is that your store has noticeably increased in size. Although this shouldn’t be a problem as the store size limit is now nominally 2TB it may mess up your server storage allocations. The reason it has happened is because Microsoft have completely removed Single Instance Storage from Exchange 2010, so where previously a large file attachment kept by ten users would only result in one copy in the store it now becomes ten copies again. Microsoft say this has allowed them to greatly improve the performance of Exchange storage, to the extent that you can use SATA instead of SAS drives which should more than offset the cost of the extra storage.


