


In the first article in this two-part series, I discussed evaluating whether it’s necessary for security configuration settings to be changed from the defaults in Windows Server, and how to use the Security Configuration Wizard (SCW) to create and save a specially tailored security policy.
In this final part, I’ll show you how to apply and roll back the policy we created in part one using the GUI, along with instructions on how to convert a SCW policy into a Group Policy Object using the command line version of the tool.
Apply a Previously Created Security Policy
Once you’ve determined that a security policy works for a server or group of servers, then you can use the Security Configuration Wizard to apply the policy.
- Start the wizard from Server Manager.
- Click Next on the welcome screen.
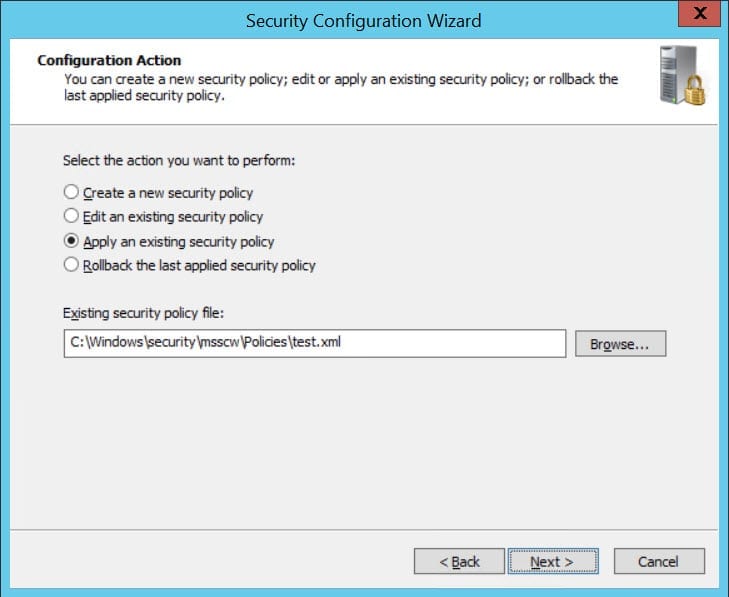
- On the Configuration Action screen, select Apply an existing security policy.
- Click Browse to select the security policy file (.xml) that you want to apply. By default, policies are stored in c:\windows\security\msscw\policies.
- Click Next once you’ve chosen a file.
- Now select the server you want to apply the policy to. You can either type the name in the Server box, or click Browse to select the server from Active Directory. Don’t forget you need local administrator permissions on the destination server.
- Click Next to apply the policy on the Apply Security Policy screen.
The policy should apply within a few minutes. Be careful about applying policy to remote servers, especially those where there is no Integrated Lights Out facility, such as VMs running on Microsoft Azure where the only way to connect is using PowerShell or a Remote Desktop Connection.
Rollback an Already Applied Security Policy
There might be occasions, especially during the testing phase, where you want to rollback a security policy that you have applied. I wouldn’t rely on this as a plan for a production environment, but nevertheless it’s a handy feature.
- Start the wizard from Server Manager.
- Click Next on the welcome screen.
- On the Configuration Action screen, select Rollback the last applied security policy and click Next.
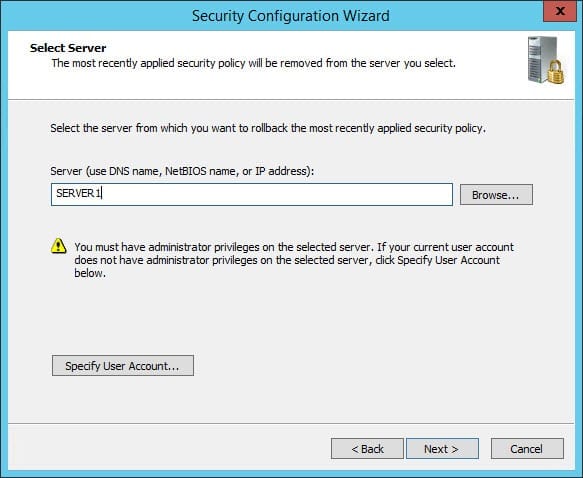
- Make sure the correct target server is selected on the Select Server screen and click Next.
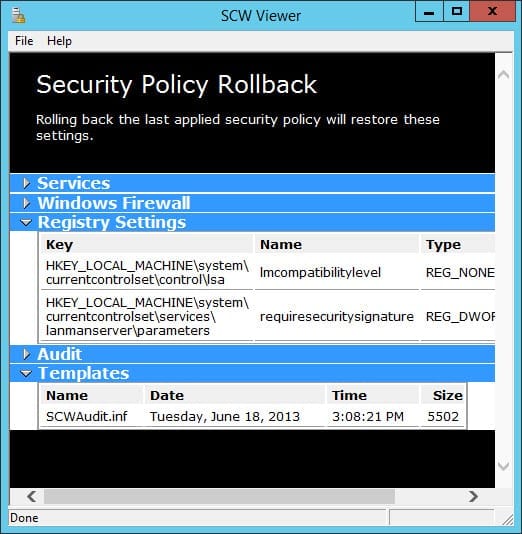
- On the Rollback Security Configuration screen, you can click View Rollback File to see the settings that will be restored in the SCW Viewer. Click Next to roll back the settings.
- Once the rollback operation has completed, click Next in the wizard.
- Click Finish to close SCW.
Convert a Security Configuration Wizard Policy into a Group Policy Object
While the Security Configuration Wizard GUI is great for working with single servers, once you’ve created a policy, you might like to apply and manage it centrally across multiple devices. Fortunately, the command line version of the tool allows us to do just that.
- Log on to Windows Server 2012 R2 and make sure the .xml file for the saved security policy is available on the server.
- Start a command prompt with local administrative privileges. Switch to the Start screen, type cmd and select Command Prompt from the search results. Alternatively, click the blue PowerShell icon on the desktop taskbar.
- In the command prompt window, type scwcmd transform /p:”C:\Windows\security\msscw\Policies\test.xml” /g:”Server Security” and press ENTER, replacing “C:\Windows\security\msscw\Policies\test.xml” with the full path to the SCW security policy you want to turn into a Group Policy Object (GPO) and “Server Security” with the name of the GPO you want the tool to create.
The new GPO will be created in Active Directory, but not linked to an Organizational Unit (OU). That you must do yourself using the Group Policy Management tool, which can be found on the Tools menu in Server Manager.
Apply a Security Configuration Wizard Policy to Multiple Servers without Active Directory
It is always preferable to use Group Policy to manage computers on a network where possible, but there are situations where servers are not members of an Active Directory domain so can’t be managed using Group Policy. Again using the command line version of SCW, you can apply a policy to more than one server.
- Log on to Windows Server 2012 R2 and make sure the .xml file for the saved security policy is available on the server.
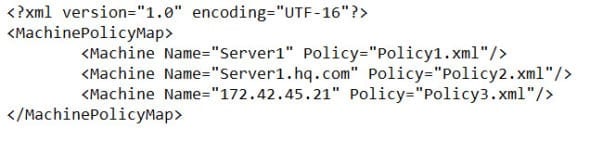
- Before continuing, you’ll need to prepare another .xml file that contains a list of the computers you want to configure and the appropriate policy for each server. The file should be formatted as shown in the figure below and saved to the working directory of your command prompt session.
- Click the blue PowerShell icon on the desktop taskbar.
- In the PowerShell window, type scwcmd configure /i:machines.xml /t:10 /u:administrator and press ENTER, replacing machines.xml with the name of the file you created containing a list of servers and security policies.
The /t: parameter is used to specify the number of working threads, which is useful if you want to apply policy to many servers, and /u: to specify the user account that will authenticate on the remote servers.
- Enter the password for the account specified in the /u: parameter when prompted and press ENTER.

You’ll then be shown a progress monitor and informed when the operation has completed. You can see the resulting logs on each server under %windir%\security\msscw\logs, although they are not particularly informative.
Analyze a Remote Server to Check it Complies with a Security Policy
Now that a security policy has been applied to a remote server, you can use scwcmd.exe to check that it has been applied successfully.
- In a command prompt window, type scwcmd analyze /m:server1 /p:securitypolicy.xml /u:administrator and press ENTER, replacing server1 with the name of the remote server you want to analyze, and securitypolicy.xml with the name of the security policy you want to verify. You can analyze multiple servers using an .xml file and specifying the /i: switch as we did with the configure command above.
- Enter the password for the account specified in the /u: parameter when prompted and press ENTER.
When the analyze command has completed, you can check the results in the working directory of the command prompt. Unfortunately, the report is a little incomprehensible, although you will find buried in there information about whether the server passed checks for each section of the security policy.