


Joining a Domain in Windows XP Pro
How do I change a computer’s description, name, or join a domain in Windows XP Pro?
Update for Windows 7 Users: Please also see “How to Join a Domain in Windows 7” for instructions specific to your operating system.
You can perform the preceding tasks by using the Computer Name tab in the System Properties dialog box from the Control Panel or by right-clicking My Computer, and then Properties or by pressing the Windows logo key ÿ and Break.
To add a computer description
On the Computer Name tab, type a name or description in the box, and then click Apply.
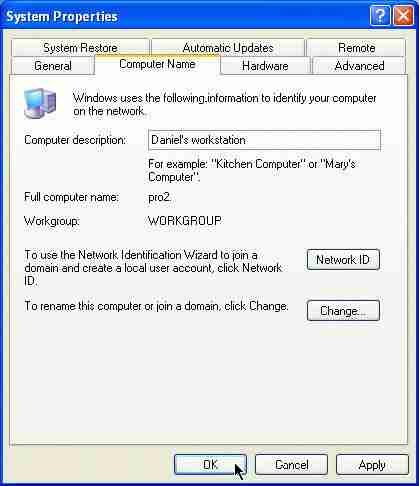
This name will help you identify the computer on the network and in the Network Neighborhood, so please try to be as specific and as methodic as possible.
To change a computer name
Many users setup their computer without giving a second thought to it’s name. This is a bad thing.
Make note of the following naming rules:
- If your computer does not have TCP/IP networking installed, or it has other networking protocols installed (without TCP/IP), the computer name must be in uppercase 15 or fewer bytes long (depending on which characters are used and the language set as the Language for non-Unicode programs in Regional and Language Options in Control Panel).
- If your computer has TCP/IP networking installed, the computer name can be up to 63 bytes long (depending on which characters are used and the language set as the Language for non-Unicode programs in Regional and Language Options in Control Panel) but should only contain the numbers 0-9, the letters A-Z and a-z, and hyphens. You can use other characters, but doing so might prevent other users from finding your computer on the network. If your network is using a Microsoft DNS server, you can use any characters except periods.
- Microsoft recommends using computer names that are shorter than 16 bytes. If you want to specify a computer name that is longer than 15 bytes and you want to join your computer to a domain that includes Windows 2000 domain controllers, the domain administrator should enable longer names in the computer account of the Active Directory domain.
- If you rename your computer or workgroup when it is disconnected from the network, duplicate computer names might result. Check with your network administrator before renaming your computer.
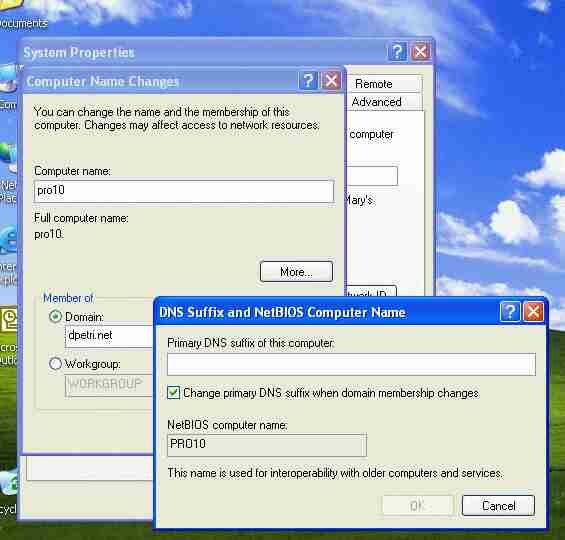
On the Computer Name tab, click Change, and then enter the information in the Computer Name Changes dialog box.
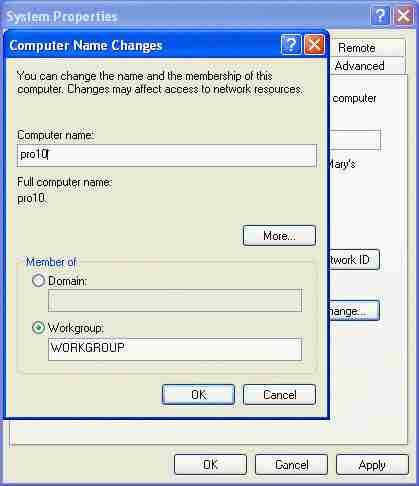
A reboot will be necessary to complete this process.
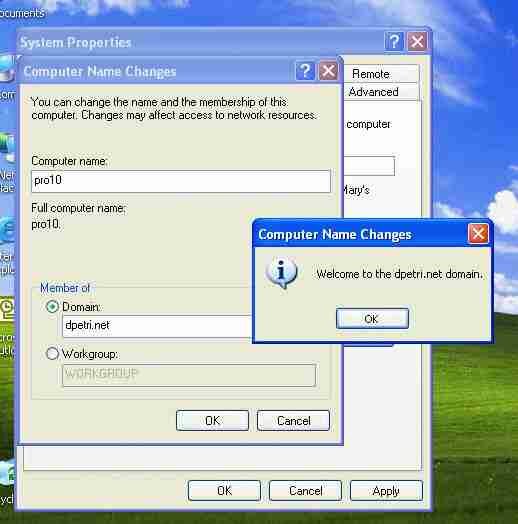
To join a Domain or Workgroup
On the Computer Name tab, click Change, and then enter the domain membership information.

If everything is in place (especially the computer’s TCP/IP and DNS configuration – read Requirements when Joining a Domain for more info) then you should receive a username and password dialog box. Enter the username and password of a user that has enough right to create computer accounts in the domain (for example – a Domain Admin group member).

If all went ok youll get a welcome message.
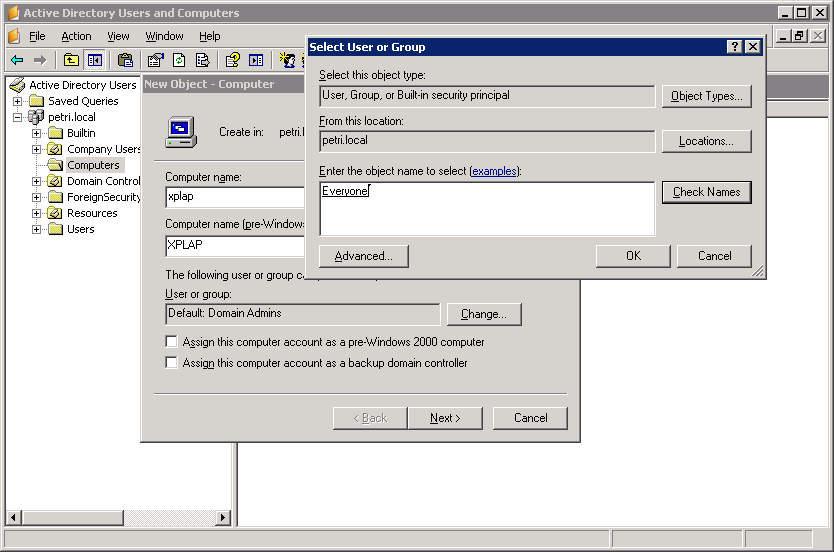
If a computer account was already established in the domain then you can enter any username and password of any valid user (for example – your own domain username and password). This is true if the Domain Admin that has created the computer account has specified the EVERYONE special group on the new computer account’s permissions box.
Note: Usually, there is no need to manually change the computer’s DNS Suffix when joining an Active Directory domain, because the suffix will automatically be set to mach the DNS name of the domain. So if you plan to join an AD domain, leave the DNS suffix empty.
Note: Home Edition is not designed to join domains; only workgroups. To join domains, use XP Professional version or above.
A reboot will be necessary to complete this process.

Network ID Wizard
If you are unfamiliar or uncertain about performing these tasks, you can use the Network Identification (ID) Wizard to help you.
Click Network ID on the System Properties dialog box. This step starts the Network ID Wizard. This wizard is new to Windows XP, and its purpose is to guide you with a series of questions that can enable the computer to be added to either a workgroup or domain. You can move backwards and forwards in the wizard by using the Back and Next buttons.
The first set of options in the wizard are:
- Option 1 states: “This computer is part of a business network, and I use it to connect to other computers at work.”
- Option 2 states: “This computer is for home use and is not part of a business network.”
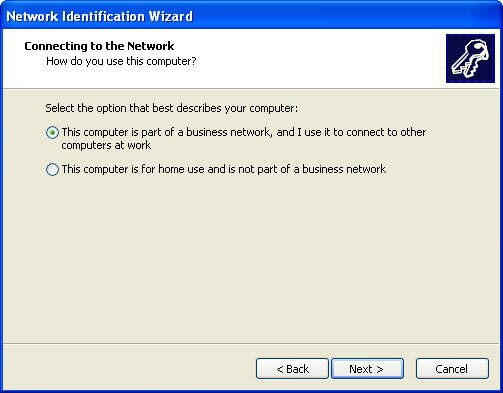
If you select option 2, the wizard requests you to click Finish to restart the computer. If you follow this step, the configuration of the computer is “Workgroup Member”, with the name of the workgroup as “Workgroup,” by default.
If you select option 1, the following options are displayed:
- Option 1a: “My company uses a network with a domain.”
- Option 1b: “My company uses a network without a domain.”
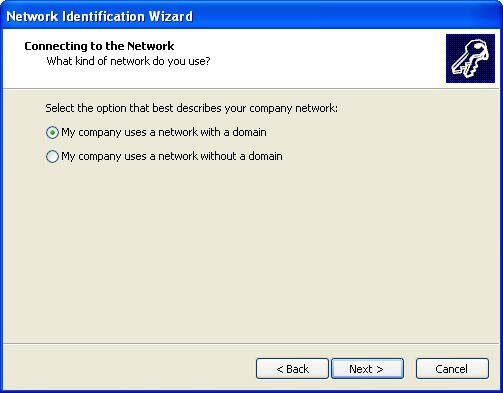
If you select option 1b, you can also configure the computer as a “Workgroup Member”, and you can enter the name of the workgroup.
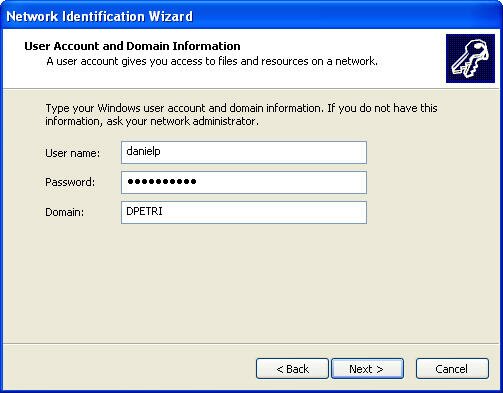
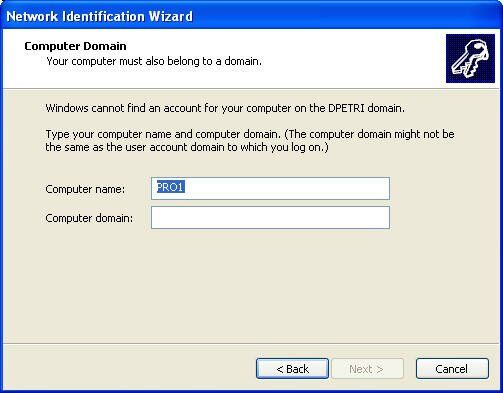
If you select option 1a, a dialog box is displayed that requests the following information:
- User name
- Password
- User account domain
- Computer name
- Computer domain
The next page requires the domain name to which the computer is to be added and the username and password of an account that has the rights to add a computer to the domain.
The next page enables the user account from the previous page to be added to this computer.
The next page enables that newly added user to have various rights on the local computer.
The user may be added to the following built-in groups on the local computer:
Administrators Backup Operators Debugger Users Guests HelpServicesGroup Network Configuration Operators Power Users Remote Desktop Users Replicator Users
Note: If the computer is a member of a domain, the computer also maintains a local domain with security accounts that pertain only to that computer. To change domains at the logon screen, press CTRL+ALT+DELETE. If the domain box is not displayed, click the Options button to display the domain box. Then, select the required domain from the menu.
Links
Windows 2000 Deployment Planning Guide![]()
To join a domain![]()
Error Message “Network Name Is No Longer Available” Joining Windows XP Domain – 293403![]()