Deploy a SharePoint Farm in Microsoft Azure
In this Ask the Admin, I’ll show you how to deploy a SharePoint farm in Microsoft Azure, including all the necessary servers and components, in just a few clicks!
Microsoft Azure Resource Groups allow vendors and organizations to collect resources used to provision line-of-business applications and easily manage the entire lifecycle of the group. While I’m not going to cover Azure Resource Group functionality in detail in this article, I want to show you how this is used in the new management portal that lets users provision an off-the-shelf SharePoint farm in a few easy steps.
Provision a SharePoint Farm in Microsoft Azure
If you are not familiar with the new management portal, which is currently in preview, you can access it either by signing on directly using your Azure subscription. You can also access the new portal from the menu in the top-right corner of the old management portal by clicking Switch to new portal.
- Once the new portal has opened, click + NEW in the bottom left.
- In the NEW panel that slides in from the left, scroll down the list of available items and select SharePoint Server Farm.
- In the Create a SharePoint Farm panel, enter a name for the new resource group in the RESOURCE GROUP field.
- Continue by adding an administrator username and password in the appropriate fields.
- If you want to configure a highly available farm, consisting of two domain controllers, three SQL Servers and four SharePoint servers, check Enable high availability.
Before creating the farm, you have the option to modify the standard settings for domain controllers, SQL Servers, and SharePoint servers by clicking on the relevant tile. Other options can also be modified, such as virtual network settings and location. In this example, I’m only going to modify the location to suit my needs.
- Click the LOCATION tile.
- In the Location panel, select the geographical location for the new farm.
- To complete the procedure, make sure that Add to Startboard is selected in the Create a SharePoint farm panel and then click Create.
In a few seconds, you should see a tile showing Creating SharePoint Server Farm appear on the Startboard. Naturally, the provisioning process may take a little time. Click NOTIFICATIONS in the left panel of the portal to check progress.
Connecting to the New SharePoint Farm
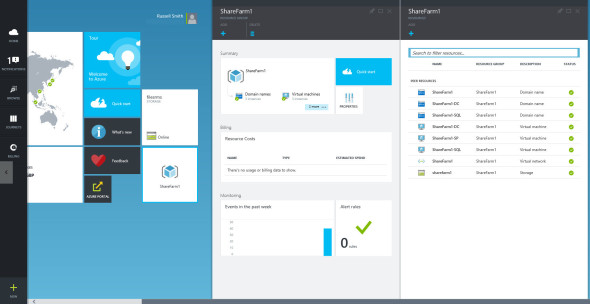
Once the provisioning process has completed, the name of the farm will be displayed in the center of the Startboard tile, which you can click to show information about the farm.
Deploy a SharePoint farm in Microsoft Azure. (Image: Russell Smith)
- Click the farm panel on the Startboard.
- In the panel that appears to the right, click Virtual machines in the Summary box.
- In the VIRTUAL MACHINES panel, click the VM that has –SP fixed to the end of its name. This is the SharePoint server in the farm. –DC and –SQL represent the domain controller and SQL Server respectively.
- Click CONNECT at the top of the VM panel to connect using remote desktop.
- Click Open when prompted by the browser to launch the .rdp file for the VM.
- Click OK on any security warning dialogs, and when prompted enter the username and password for the farm that you entered when creating the resource group.
You should now know how to deploy SharePoint in Microsoft Azure, and you now have a fully-working SharePoint farm configured in the provisioned VMs. You can modify the farm settings or extend it by clicking on the Quick start tile under Summary on the farm’s main panel in the Azure portal.


