How to Create Active Directory Sites in Windows Server
How can I create an Active Directory site in Windows Server?
Active Directory gives system administrators the option to define sites, consisting of one or more subnets. While it may not be necessary to define sites in all AD deployments, they can come in useful if you have geographically dispersed offices that are separated by slow wide area network (WAN) links. If you have plenty of bandwidth linking offices, so that Active Directory can replicate in a timely fashion, it may not be necessary to create AD sites.
The design of an AD site topology depends on many factors, including network link speed, the number of objects in each domain, and the amount of non-AD traffic flowing over your WAN links. This article is not intended to be a best-practices document, and you should refer to Microsoft TechNet for more information on AD design.
Why Create AD Sites?
If you have slow network links between offices and need to control AD replication, sites can provide a way to improve reliability. Client PCs will also be able to find a domain controller that is physically close to them for logon. And other applications that rely on AD, such as Exchange Server, can use site topology information to locate services that are close by.
Create a site in Active Directory
Log in to Windows Server 2012 with a domain administrator account from the forest root domain, or as an Enterprise Administrator.
Rename the default first site
There’s always one site in AD, which is the default first site if you haven’t created your own sites or renamed the default site.
- Open Server Manager from the Windows Server 2012 Start screen, or using the icon on the desktop Taskbar.
- Select Active Directory Sites and Services from the Tools menu in Server Manager.
- In the left pane of the Active Directory Sites and Services management console, expand Sites.
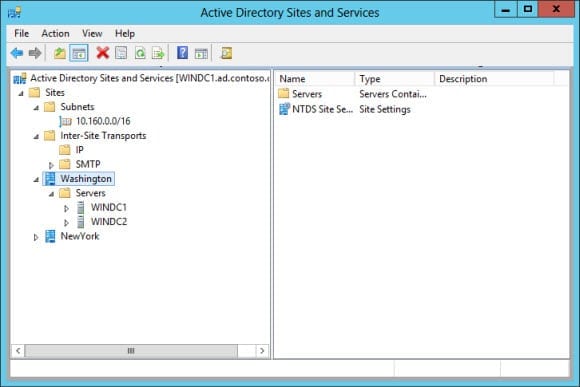
Assuming you’ve never configured AD sites in your domain before, you’ll see the default first site.
- Right-click Default-First-Site-Name and select Rename from the menu.
- Give the site a meaningful name and press Enter.
If you expand the site and the Servers folder, you should see a list of the domain controllers in your domain.
Add additional sites
Now that you’ve renamed the first default site, it’s time to add more sites.
- Right-click the Sites folder in the left pane and select New Site from the menu.
- In the New Object – Site window, give the new site a name, click DEFAULTIPSITELINK and then OK.
You’ll see a message telling you to add at least one subnet to the site; and to either install a minimum of one domain controller (DC) in the site or move an existing DC to the new site. Don’t forget you should also have at least one Global Catalog (GC) server in each site.
The DEFAULTIPSITELINK represents the WAN link between my two sites. Depending on the topology of your network and the number of sites, you may need to create additional links. Site links allow you to set the cost, i.e. should the link be used in preference to a slower link, the replication frequency and schedule.
Add subnets
AD sites aren’t much use without subnets, so now let’s add some subnets and assign them to our sites.
- Right-click the Subnets folder under Sites and select New Subnet from the menu.
- In the New Object – Subnet window, add a subnet. In this example, the subnet I’m adding is 10.160.0.0 with a subnet mask of 255.255.0.0. So in the Prefix box I need to type 10.160.0.0/16. If you’re not sure how to write the prefix, you can use a subnet calculator to help you out.
- In the Select a site object for this prefix box, I’m going to select my default Washington site. Now click OK.
You can add more than one subnet to an AD site.


