How can I correctly configure DNS server addresses for a network adapter in Windows Server?
DNS plays a vital role in a healthy Active Directory (AD) environment, and any failure in name resolution could be disastrous. Before promoting Windows Server to a DC, you should always assign the server a static IP address. What I’m showing you in this article applies to simple AD environments with one domain controller.
DNS Server Addresses on a Domain Controller
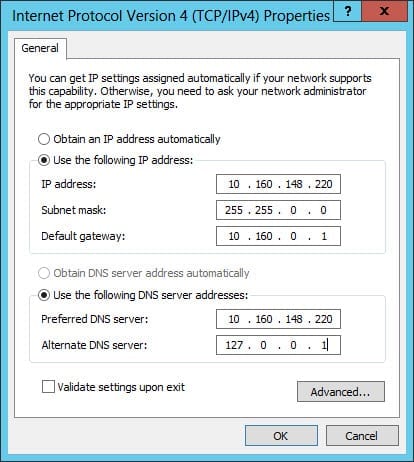
Assuming the DNS server role will be installed on the same server as the DC, specify the server’s static IP address as the primary DNS server and use the loopback address (127.0.0.1) as the secondary DNS server entry.
Configure Network Adapter in Windows Server 2012
Log in to Windows Server 2012 with an administrator account. To change the IP address and DNS server settings for a network adapter using the GUI:
- On the desktop, right-click the network icon in the bottom right of the Task Bar and select Open Network and Sharing Center from the menu.
- In the Network and Sharing Center, click Change adapter settings.
- Right-click the relevant network adapter in the Network Connections window and select Properties from the menu.
- In the adapter’s Properties window, select Internet Protocol Version 4 (TCP/IPv4) and click Properties.
- Enter the required IP address and DNS server settings and then click OK.
- Click Close in the adapter’s Properties window.
Configure Network Adapter Settings Using PowerShell
To perform the same procedure using PowerShell:
- Right-click the blue PowerShell icon on the desktop and select Run as Administrator from the menu.
- To find out the interface number of your network adapter, type Get-NetIPInterface and press Enter.
Identify your network adapter in the list and make a note of its interface index number. You’ll need this in the following steps. The Internet alias is usually Ethernet by default and will appear twice in the list, once for IPv4 and again for IPv6.
- Now type New-NetIPAddress –InterfaceIndex 12 –IPAddress 192.168.0.2 –PrefixLength 24 –DefaultGateway 192.168.0.1, replacing the appropriate parameter values in each case as appropriate for your local network. The –PrefixLength parameter refers to what is labeled the subnet mask in the GUI. A prefix length of 24 is equal to a subnet mask of 255.255.255.0
Finally, set the primary and secondary DNS server addresses. Type Set-DNSClientServerAddress –InterfaceIndex 12 -ServerAddresses 192.168.0.2,127.0.0.1, replacing the index number and DNS server addresses as appropriate for your network.


