


Provisioning Windows Server 2012 on Amazon Web Services (AWS)
It might seem natural for Microsoft system administrators to turn to Microsoft’s own Azure cloud platform when looking to provision server instances in the cloud, but Amazon’s cloud platform is a mature product with some compelling features. In this how-to article, I’ll look at some of the basic concepts you need to understand in Amazon Web Services (AWS), how to get Windows Server 2012 up and running in a VM, and how to attach an additional disk.
Sign Up for Amazon Web Services (AWS)
Amazon offers a one-year free trial that allows you to provision Windows Server micro-instances with up to 750 hours of compute time per month (but with limited storage and network I/O). During the sign-up process, you will need to provide a contact phone number, which Amazon will use to contact you to confirm your identity using an automated system. You’ll also need to provide credit card details to cover any additional fees should you exceed any of the free-tier limits during the first year of your subscription.
As most of us already have an account for use on Amazon.com, the sign-up process is simple using your existing email address and password. You’ll just be required to confirm a security code using your phone’s dial pad. It’s possible to enable multi-factor authentication during the sign-up procedure, but for simplicity’s sake, you might want to wait until you are more familiar with AWS before switching on additional security for your account.
AWS Management Console Login
The management console can be accessed from http://aws.amazon.com. Head over to the top-right corner, click My Account / Console and select AWS Management Console from the menu. If you are not already signed in to AWS, you’ll be prompted to enter your email address and password.
In the list of services, we’re interested in EC2 (Elastic Compute Cloud). We’ll also need some of the other services, such as Elastic Block Store (EBS), but we’ll look at them later in the article. Click EC2 under Amazon Web Services to get started.
Instances, AMIs, and Storage
Before we create a VM, it’s helpful to understand some terminology. An Amazon Machine Image (AMI) is a template from which instances can be launched. You can create your own AMIs or use the provided Amazon Web Images (AWIs). Multiple instances can be launched from a single AMI, and instances can be based on different hardware configurations.
AMIs are instance store backed or Amazon EBS backed; you can find this information in the description of the AMI. AMIs that use instance stores for the root device (system disk) will lose any information stored on the disk when the instance is terminated, or if the storage fails for some reason. Stop operations are not supported.
Amazon EBS-backed root devices can be stopped and restarted without losing data. By default, Amazon EBS-backed storage devices are deleted when an instance is terminated, but this behavior can be changed when you create instances by deselecting the Delete on Termination option for the root volume.
Create a New Instance of Windows Server 2012
Let’s create a new VM, or instance in AWS parlance, with Windows Server 2012 provisioned from an Amazon Web Image (AWI). You probably noticed that I haven’t mentioned Windows Server 2012 R2, because at the time of writing this article, R2 is still not supported or provided as an AWI.
- Under Create Instance in the center of the management console, click the blue Launch Instance button.
- In Step 1 of the wizard on the left of the window, check Free tier only. We want to make sure only to select an AWI that can be provisioned without being billed if used below the resource thresholds set out by Amazon for the one-year free trial.
- Scroll down the list of available AWIs and click Select to the right of Microsoft Windows Server 2012 Base.
- In the second step of the wizard, make sure that Micro instances is selected on the left, which is the only instance type eligible on a free subscription. You’ll see the memory assigned is quite low, at 600MB. Storage is set to EBS, which means no data will be lost from the OS drive when the instance is stopped.
- Click Review and Launch in the bottom right.
")
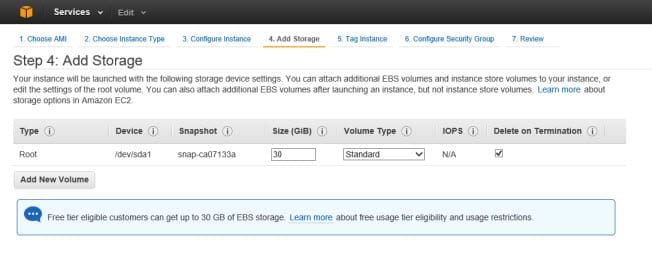
I’ve bypassed advanced configuration options at this stage. If you continue through this wizard, it’s possible to add additional storage and modify inbound network rules, but these options can also be changed at later. By default, you have one 30GB OS volume attached to the instance, and inbound connectivity for RDP TCP port 3389 is allowed from any IP address.
- In the final review page of the wizard, click Launch to start the provisioning process.
- You now need to create a key by which AWS encrypts the administrator password. Without the private key, you won’t be able to decrypt the password provided. From the menu in the Select an existing key pair or create a new key pair dialog, select Create a new key pair from the first drop-down menu.
- In the Key pair name box, type a name for the public/private key pair and then click Download Key Pair and save the .pem file to a convenient place on your local machine.
- Now click Launch Instances at the bottom of the dialog.
")
Within a minute, you should see a message stating that Your instance in now launching. Click View Instances in the bottom right of the console to view the current state of your new instance. Your new instance should be up and running fairly quickly, but you might need to wait up to 30 minutes before a password is generated so that you can connect and remotely authenticate.

Connect to Your New VM
Now that our new VM has been successfully created, let’s start it up and connect to it.
- Make sure that you are on the EC2 dashboard. You can do this by clicking Services in the top menu of the AWS management console and selecting EC2.
- In the left-hand menu, click Instances.
- In the right-hand pane, check the instance that you want to start, click Actions and then Start.
- Confirm you want to start the instance by clicking Yes, Start in the pop-up dialog.
- Keep an eye on the Status Checks column in the management console, and wait until the instance’s status changes to a green tick.
- Now click Connect at the top of the management console.
- In the Connect To Your Instance pop-up window, click Get Password.
- Click Browse and open the .pem file saved in the previous steps.

- Click Decrypt Password. Now you will see the password displayed in the Connect To Your Instance pop-up.
- Click Download Remote Desktop File and open the file when prompted by your browser.
- Click Connect in the Remote Desktop Connection window, enter the username and password as displayed in the Connect To Your Instance pop-up in the AWS Management Console and click OK.
- Click Yes in the Remote Desktop Connection security warning dialog to complete the connection to the VM.
Stop or Terminate a VM
There are two options under the Action menu for shutting down a VM instance. Stop shuts down the instance, but retains it for further use, and Terminate shuts down the VM and deletes the instance. When an instance is stopped, you are not charged for instance hours, but every time you transition from stopped to running, a full instance hour is the minimum charge.
Terminating an instance deletes the instance itself and any attached EBS storage, unless the instance’s deleteOnTermination attribute is marked as false. This parameter can be set when you launch a new instance in step 4 of the wizard.
Connect an Additional Disk to a VM
Connecting additional EBS backed storage is easy. First we need to create a new volume in the management console.
- Under Elastic Block Store in the left pane of the management console, click Volumes.
- In the right pane, click Create Volume.
- In the Create Volume dialog, select Standard from the Type menu.
- In the Size field, enter the size for the new volume in GBs.
- Change the Availability Zone if required and click Create.

- Creating an EBS-backed volume.

The new volume should now appear in the list in the right pane of the management console.
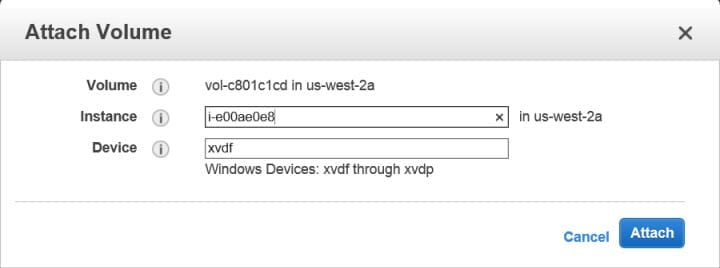
- Select the new volume by checking the box to the left, click Actions and select Attach Volume from the menu.
- In the Attach Volume dialog, click the Instance field and either type to search for the instance name that you want to attach the volume to, or select an instance from the list.
- Choose a device name. I’m going to leave the first available name, xvdf, which was selected automatically. Click Attach to complete the process.
- In the left pane of the management console, click Instances.
- In the right pane, check the instance to which you just attached a disk.
- Scroll down to the information panel at the bottom of the console, select the Description tab, and scroll down to the information on EBS. There you should see your new volume listed in the attached devices.
Start the instance if it is not already running and connect to it using Remote Desktop Connection. Open File Explorer and you should see the new disk. Unlike Microsoft Azure, you don’t need to use Server Manager to bring the disk online.