In the last article in our series on using PowerShell to create ping sweep tools, we had created a basic function to ping a range of IP addresses. Since we are taking the time to write a function, we should make it as robust and complete as possible. One thing we can do is add some parameter validation. These are tests to ensure that a parameter value meets some criteria. I find it better to throw an error at the beginning before getting half-way through the script and bombing out because a parameter value was wrong. PowerShell Ping Sweep Tool Article Series
Let’s look at the first parameter for the IP subnet. When I work on something, I try to think about the person who will use it, even if it is myself. Does it make sense to simply type a parameter value or should I require the parameter name? In this case, it seems to me that an expectation would be to type Test-Subnet X, where X is the subnet address. Any other parameter values can require the name, such as Start and End. In the current version, I have hard-coded my subnet. But if you run the command, then you’ll need to change that. I could make it mandatory and require the user to specify a subnet. But let’s branch out and set a default value.
Since I’m assuming the person running the function will be running PowerShell 4.0 and most likely Windows 8.1, I can take advantage of the Get-NetIPAddress cmdlet, which is in the NetTCPIP module. In fact, I can make this a requirement. At the beginning of the script file, I insert these two comments.
Even though they are comments, PowerShell will process them as directives. If the user is running an older version of PowerShell or doesn't have the NetTCPIP module, the script won't run and the function won't load. Technically, I think this will work with PowerShell 3 on Windows 8, which has the NetTCPIP module, but I don't have anything handy to confirm that. How can I use Get-NetIPAddress to give me a default subnet value? Let's walk through it.
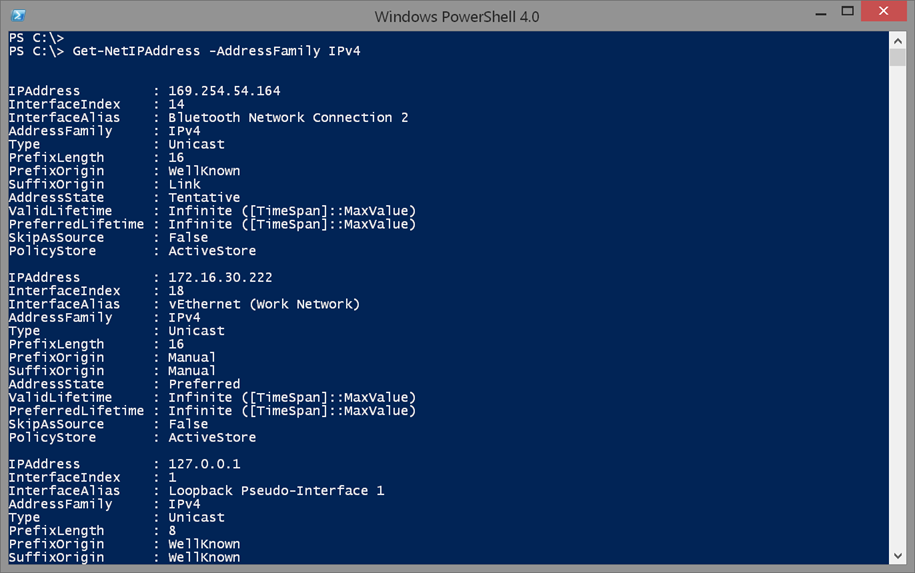
I know I only care about IPv4 addresses.
However, I have a number of adapters.
Using the Get-NetIPAddress in Windows PowerShell. (Image Credit: Jeff Hicks)
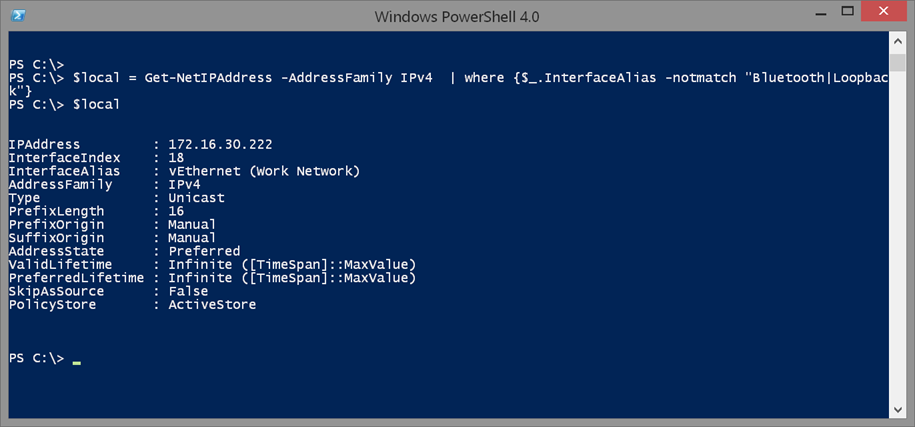
The Get-NetIPAddress has a parameter, InterfaceAlias, which I could use to limit my query. But I have no way of knowing what your alias might be. By the way, I'm also assuming that I have to worry about one adapter. Instead, I'll take this result and filter out the Bluetooth and loopback adatpers.
Using Get-NetIPAddress's InterfaceAlias parameter in Windows PowerShell. (Image Credit: Jeff Hicks)
Good. Now I can use the IPAddress property and convert it into a value for my function.
The Replace operator is using a regular expression pattern, finding 1 to 3 numbers at the end, and replacing that value with a 0.
Perfect. To use this in my function as a default value, I can turn the several steps I showed you into a single expression.
This expression is using the Where method syntax introduced in PowerShell v4. Here's my first parameter revised.
I've given the parameter a position of 0 meaning it can be first and doesn't require the parameter name. In addition, I've added a validation pattern attribute. If someone tries to enter subnet value that doesn't look like an IP address ending in 0, the command will throw an exception and not run. I'm not verifying it is a valid IP address only that it looks like one.
There are regex patterns that are much more comprehensive, but I didn't want to overwhelm you. In a similar vein, I want to validate the start and ending values since I know they have to be between 1 and 254. Here I'll use the ValidateRange() attribute and set default values.
I'm also making sure the values are treated as integers. Lastly, I don't want the user to get crazy with pinging, so I'll add a validation for the number of pings and set a default value.
You'll also notice the Alias attribute. Remember I said you need to think about who will use your tool and their expectations. My thinking is that someone using my Test-Subnet function might think in terms of the number or count of pings to send. You can have multiple aliases separated by commas. If the user want to specify a different number of pings they can use –Ping or –Count.
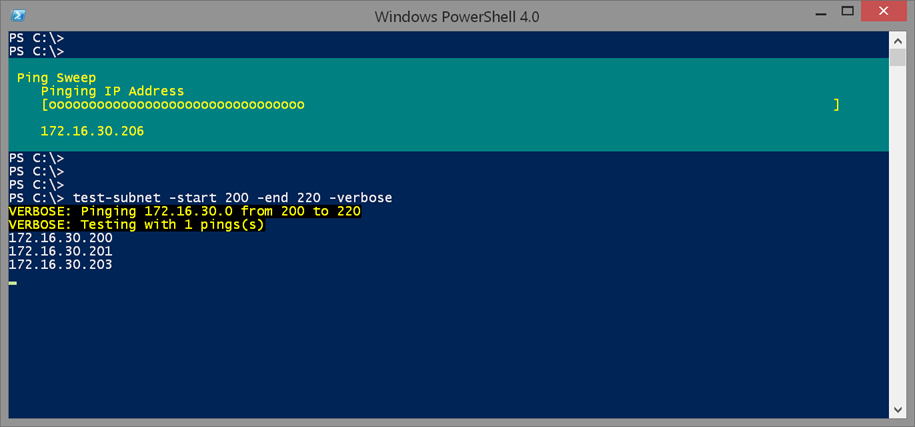
In the previous version, I used Write-Host to display progress messages. That's OK for development and simple scripts, just remember to use a foreground or background color so you can distinguish the message from any output. But for a tool like this, I think there is a better choice. I'm going to use Write-Progress to display a progress bar across the top of the screen. With Write-Progress, I can display what the script is doing without necessarily cluttering the screen and interfering with output. Personally, I think Write-Progress is under-utilized in PowerShell scripts and is especially useful with long running scripts like the test subnet function.
The final step in making this a robust script is to include internal documentation. I often tell people to start with a script file laid out with comments about what you want to accomplish. But we're going to add them after the fact. In addition to comments, I also recommend the use of Write-Verbose messages. I use them as trace or debug messages so that when I need more detail about what my function is doing I can run it with –Verbose and get a lot more information. The Write-Verbose messages can often double as documentation. You want to write your function so that someone new PowerShell can read it and have some sort of understanding about how it works or at least knows what to go research. This is also why you should use full cmdlet and parameter names. Here's the current version of Test-Subnet with the additions I've talked about.
Function Test-Subnet {
[cmdletbinding()]
Param(
[Parameter(Position=0,HelpMessage="Enter an IPv4 subnet ending in 0.")]
[ValidatePattern("\d{1,3}\.\d{1,3}\.\d{1,3}\.0")]
[string]$Subnet= ((Get-NetIPAddress -AddressFamily IPv4).Where({$_.InterfaceAlias -notmatch "Bluetooth|Loopback"}).IPAddress -replace "\d{1,3}$","0"),
[ValidateRange(1,254)]
[int]$Start = 1,
[ValidateRange(1,254)]
[int]$End = 254,
[ValidateRange(1,10)]
[Alias("count")]
[int]$Ping = 1
)
Write-Verbose "Pinging $subnet from $start to $end"
Write-Verbose "Testing with $ping pings(s)"
#a hash table of parameter values to splat to Write-Progress
$progHash = @{
Activity = "Ping Sweep"
CurrentOperation = "None"
Status = "Pinging IP Address"
PercentComplete = 0
}
#How many addresses need to be pinged?
$count = ($end - $start)+1
<#
take the subnet and split it into an array then join the first
3 elements back into a string separated by a period.
This will be used to construct an IP address.
#>
$base = $subnet.split(".")[0..2] -join "."
#Initialize a counter
$i = 0
#loop while the value of $start is <= $end
while ($start -le $end) {
#increment the counter
$i++
#calculate % processed for Write-Progress
$progHash.PercentComplete = ($i/$count)*100
#define the IP address to be pinged by using the current value of $start
$IP = "$base.$start"
#Use the value in Write-Progress
$proghash.currentoperation = $IP
Write-Progress @proghash
#test the connection
if (Test-Connection -ComputerName $IP -Count $ping -Quiet) {
#write the pingable address to the pipeline if it responded
$IP
} #if test ping
#increment the value $start by 1
$start++
} #close while loop
} #end function
Even if you are new to PowerShell, I think you can read through this code and have a pretty good idea about what the script does and how it works. Write the script for the next person. It might even be you coming back to it is a year.
Here’s what it now looks like in action. The ping sweep tool in action. (Image Credit: Jeff Hicks)
If you have been following along, get the code and try it out. See how the validation works. This may be all you need in a ping sweep tool, but I have a few more things I think will make this really useful and educational.


Perfect. To use this in my function as a default value, I can turn the several steps I showed you into a single expression.
 Perfect. To use this in my function as a default value, I can turn the several steps I showed you into a single expression.