


Assigning Elastic IP Addresses to Amazon EC2 Instances
In this easy Ask the Admin, I’ll show you how to assign a static public facing IP address to your Amazon EC2 instances (VMs).
In Manage IP Addressing with Virtual Private Clouds in Amazon Web Services on the Petri IT Knowledgebase, I showed you how to launch a new nondefault-VPC instance using PowerShell. A Virtual Private Cloud (VPC) is the equivalent of a Microsoft Azure virtual network (VNET). I used a nondefault-VPC to create my own private subnet and address range, which can’t be changed in the default VPC provided by Amazon. Additionally, when provisioning the instance using the New-EC2Instance PowerShell cmdlet, I set the –AssociatePublicIp to $true, because nondefault-VPC instances are not assigned public IP addresses.
Public IP Addresses and DNS Name Resolution
The resulting instance is assigned a different public IP address every time it’s started, and while this isn’t a problem in itself in the majority of use cases, the instance’s external DNS name is made up in part by the assigned public IP address. So if you need to connect to the instance from the public Internet, then you’re going to have a lot of fun because its DNS name isn’t static.
Elastic IP Addresses (EIPs)
To solve this problem, you need to provision and associate an Elastic IP address (EIP) with the instance. When an Elastic IP address is associated with an instance, any existing public IP address is returned to the EC2-VPC public IP address pool. Should an EIP be disassociated from a nondefault-VPC instance, an address from the EC2-VPC public IP address pool is reassigned within a few minutes, unless the instance has a second network interface card, and you must associate an EIP manually.
Even if you are using the EC2 12-month free tier, then there may be charges associated with using EIPs. The first EIP associated with an instance is free, but any additional EIPs are billable. Additionally, EIPs associated with stopped or unattached network interfaces are subject to an hourly charge. See Amazon EC2 Pricing for more information on EIP pricing.
Working with Elastic IP Addresses
Before starting, you’ll need to make sure that you have the AWS Tools for Windows PowerShell installed and configured for your AWS subscription on your local PC, as described in Provision Windows Server in Amazon Web Services using PowerShell on Petri.
First, let’s establish if there are any EIPs provisioned in my subscription.
- Open a PowerShell command prompt.
- In the command prompt, type Get-EC2Address and press ENTER.
If you have any EIPs provision in your subscription, they will now be displayed in the command prompt, along with information including the public IP address and AllocationId. I have a couple of EIPs already provisioned, but I want a new EIP for an instance that I will create later. To provision a new EIP for use in a VPC:
- In the PowerShell prompt, type New-EC2Address -Domain “vpc” and press ENTER.
The new EIP AllocationId and public IP address will be displayed in the prompt. If you run Get-EC2Address again, you’ll see that some fields are empty because the EIP is not yet associated with an instance.
Now I have an EIP ready for use, I need to provision a new instance. To provision a new VPC instance using PowerShell and get its InstanceId using Get-EC2Instance with a filter, see Manage IP Addressing with Virtual Private Clouds in Amazon Web Services. I chose not to set the –AssociatePublicIp to $true, as I know that I’m going to assign an EIP as soon as the new instance is ready for use. As such, the new instance won’t be provisioned initially with a public IP address or public DNS name, but that doesn’t matter.
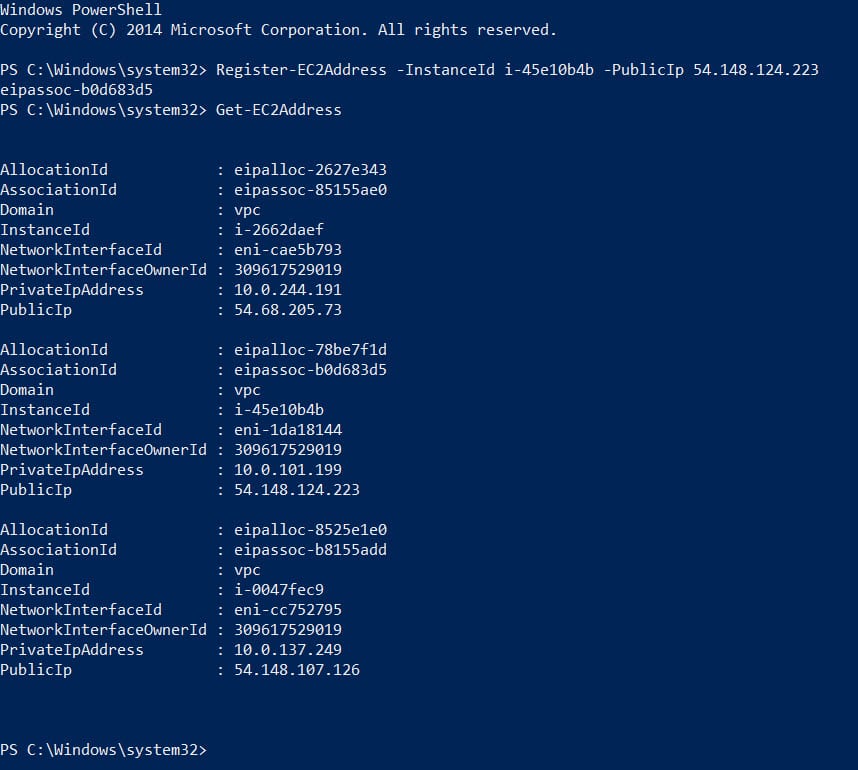
Once the new instance is running and initialized, run the cmdlet shown below, replacing the values of the –InstanceId and –PublicIp parameters, the –PublicIp being that assigned to the EIP created earlier:
Register-EC2Address -InstanceId i-45e10b4b -PublicIp 54.148.124.223
The cmdlet returns the new AssociationId. If you run Get-EC2Address again, you’ll see that the EIP is now associated with an InstanceId and internal private IP address. The instance is now also assigned a public DNS name that will not change if the instance is restarted.
Disassociate and Remove an EIP
To remove the EIP from your AWS subscription, disassociate it from the instance and then delete it.
Unregister-EC2Address -PublicIp 54.148.124.223 Remove-EC2Address –AllocationId eipalloc-78be7f1d -force