Home Network Setup – What are the possible configuration settings for a home/SOHO network with 3-4 computers and an ADSL Internet connection?
- Blog
- Networking
- Post
On this page I will describe the 4 variants or options that one has when connecting a home or small office network to the Internet via an ADSL or Cable modem. Carefully read the pros and cons of each method and decide what’s best for you.
In this page I will not go into PC configuration details. There are now software apps from Cisco/Linksys that assist with the PC configuration component.
Home Network Setup Option 1: Everything hooked to a Hub or Switch
Pros
- Simple setup
- No server needed
- Configure each PC manually
Cons
- Maximum 4 PC’s
- Fixed IP addresses for all 4 PC’s
- Dial-in required per PC
- No Proxy
- Hub ports = the number of PC’s + 1
- Only one PC at a time can be connected to the Internet
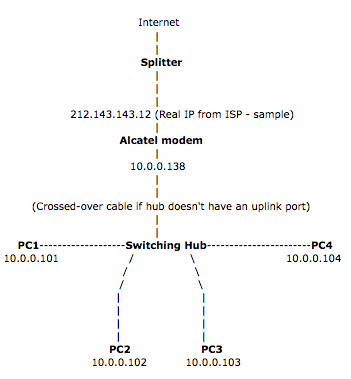
With this home network setup we connect all Ethernet cables (PC and ADSL) to a hub or switch. The hub or switch can be any model UTP based hub preferably with a uplink/MDI crossed connector. You will need the uplink connector to connect the ADSL connector. If your hub does not come with such a connector, you should buy or prepare a UTP crossed-over network cable and use that instead. Your hub should have at least the amount of PC’s plus 1 (ADSL) UTP ports.
Layout:
- The ADSL cable goes to the splitter.
- The ADSL modem is connected to the splitter.
- The Ethernet cable from the modem either is connected to the uplink UTP connector of your hub, or – using a UTP crossed cable – to a regular UTP connector.
- Each PC is connected to a regular UTP port of the hub/switch.
- Each PC (maximum of 4!) should be configured as a ADSL client as described by your provider. Each PC should have an unique IP address.
Home Network Setup Option 2: Everything to the Hub or Switch – one of the PCs is a server
Pros
- Simple setup
- No manual PC configuration
- Almost no limit to the number of PC’s (254)
- Dialup is done automatically
- Proxy (WinRoute or similar)
Cons
- Server software (NAT or Proxy) or Microsoft Internet Connection Sharing (ICS) required
- Configuring the server can be difficult
- Hub ports = number PC’s + 1
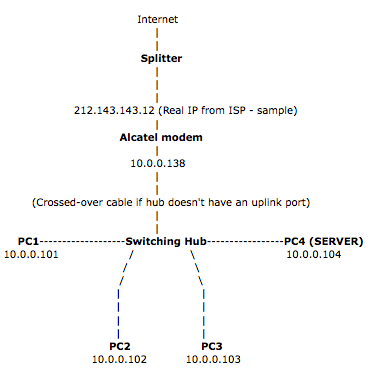
This network setup is similar to variant 1 with one difference: we have a server which enables us to use a different IP range for PCs.
Layout:
- The ADSL cable goes to the splitter.
- The ADSL modem is connected to the splitter.
- The Ethernet cable from the modem either is connected to the uplink UTP connector of your hub, or – using a UTP crossed cable – to a regular UTP connector.
- Each PC is connected to a regular UTP port of the hub/switch.
- One of the PC’s is to be configured as server either using software like WinRoute or Microsoft Internet Connection Sharing (Windows 2000, XP and ME have this standard included).
Home Network Setup Option 3: All PC’s to a Hub or Switch – Server connected to ADSL
Pros
- Simple setup
- No manual configuration of PC’s
- Almost unlimited number of PC’s (254)
- Dialup done automatically
- Separation between the Internet and the LAN
- No uplink or crossed UTP cable required
- Hub ports = number PC’s
- Proxy (WinRoute or similar)
Cons
- Server software (NAT or Proxy) or Microsoft Internet Connection Sharing (ICS) required
- Configuring the server can be difficult
- Hub ports = number PC’s + 1
- Server needs additional network-card
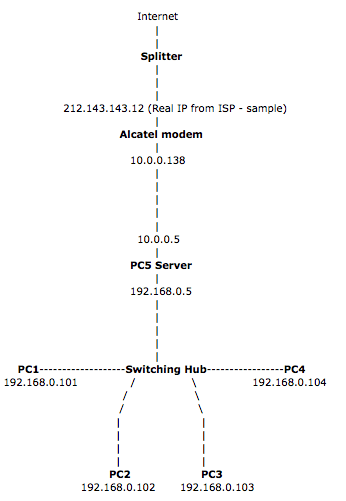
Similar to option 1 and option 2 with the exception that the ADSL cable is connected to a server directly and from that server an second network connection is connected to the hub or switch. There are no limitations to the switch or hub used, this can even be a coax network if you would like so (this requires NO hub).
The ADSL network cable is connected to the server, which has 2 network-cards:
- ADSL connection
- LAN/hub connection
- The ADSL cable goes to the splitter.
- The ADSL modem is connected to the splitter.
- The Ethernet cable from the modem is connected to the server.
- The second network-card of the server is connected to the hub.
- Each PC is connected to a regular UTP port of the hub/switch.
- One of the PC’s is to be configured as server either using software like WinRoute or Microsoft Internet Connection Sharing.
Home Network Setup Option 4: PC’s and ADSL to Router/Switch
Pros
- Simple setup
- No manual configuration of PC’s
- Almost unlimited number of PC’s (254)
- Dialup done automatically
- Separation between the Internet and the LAN
- No uplink or crossed UTP cable required
- Hub ports = number PC’s
- No server required
Cons
- Routers can be expensive
- Configuration of a router can be hard
- Not all ADSL routers support RAS with VPN/PPTP
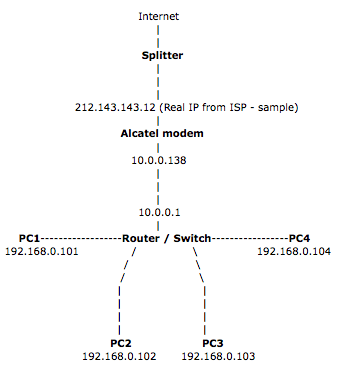
The router/switch (like the LinkSys models) is both a “server” for DHCP, firewall, DNS etc. and a hub in one.
Layout:
- The ADSL cable goes to the splitter.
- The ADSL modem is connected to the splitter.
- The Ethernet cable from the modem is connected to the router/switch.
- All PC’s are connected to the router/switch.
- All you need to do is to configure the router for Internet Sharing.
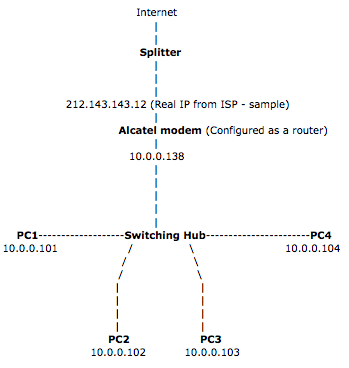
Note: Some ADSL modems, such as the Alcatel SpeedTouch Pro, can function as routers between the Internet and the LAN. Read Upgrade from Alcatel SpeedTouch Home to Pro on how to configure your modem. In that case you will no longer require a router on your network:
Layout:
- The ADSL cable goes to the splitter.
- The ADSL modem is connected to the splitter.
- The ADSL modem is configured as a router.
- The Ethernet cable from the modem is connected to the switching hub.
- All PC’s are connected to the switching hub.
Remember these are just a few of the options available in a home network setup.
Addtional information on router configuration, including the default address for most routers: 192.168.1.1
Get Help With your Home Network Setup Right Now!


